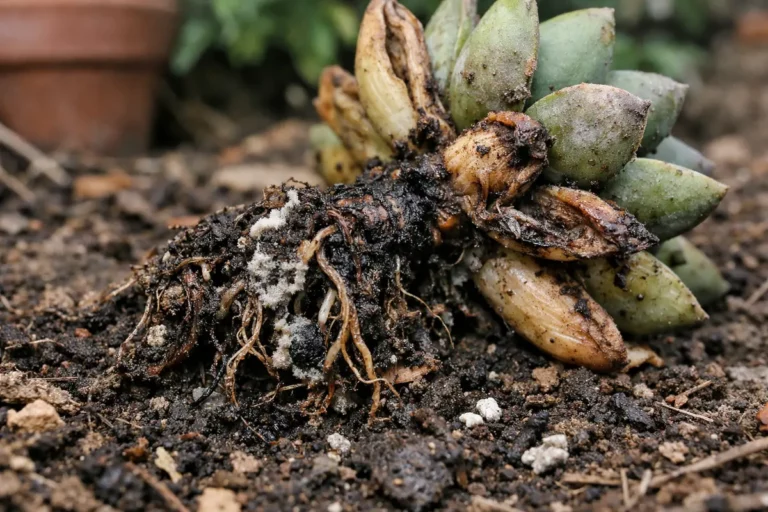
You may notice your orchid’s roots looking dark and mushy during the humid summer months, which is why you need to know what to do if my orchid roots are rotting in pots. This condition typically arises from overwatering or inadequate drainage, leading to root damage and yellowing leaves. If left unaddressed, the problem can spread, weakens the plant, and makes recovery harder, but fixing it is possible now by carefully inspecting the roots and adjusting your watering routine.
Step 1 – Trim Rotting Orchid Roots Anew
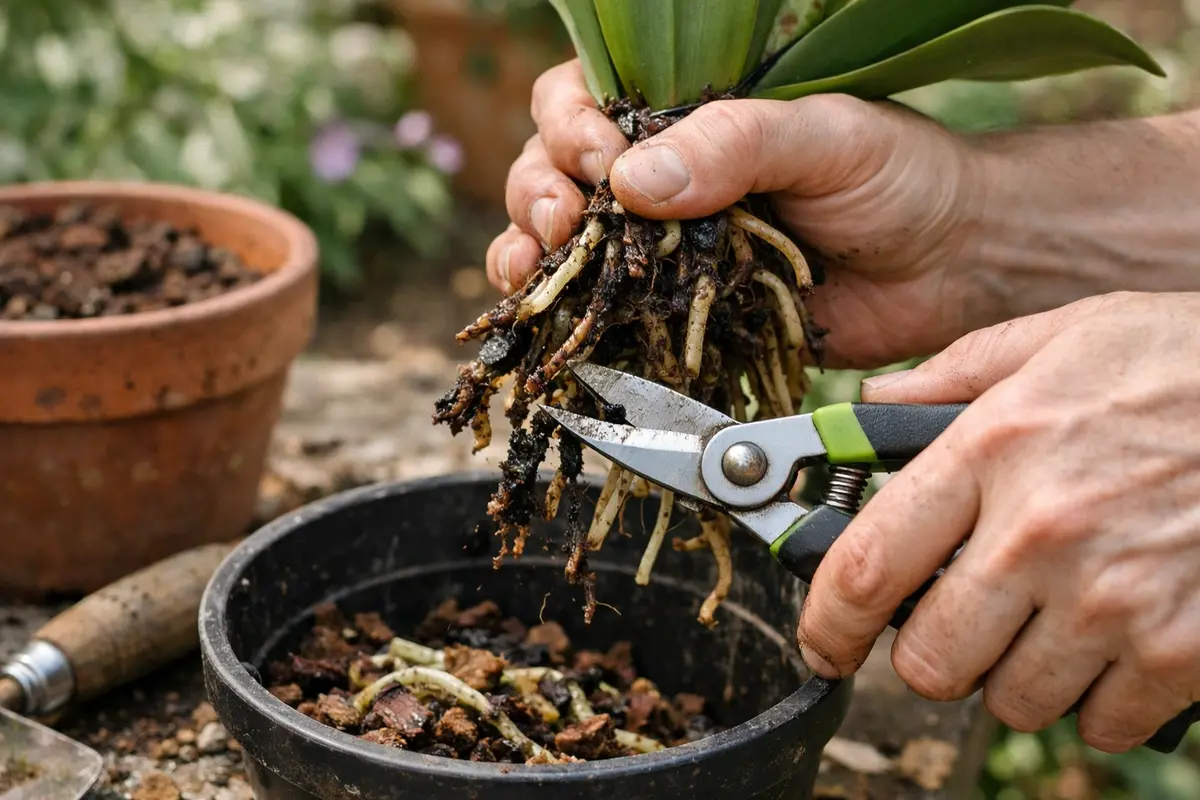
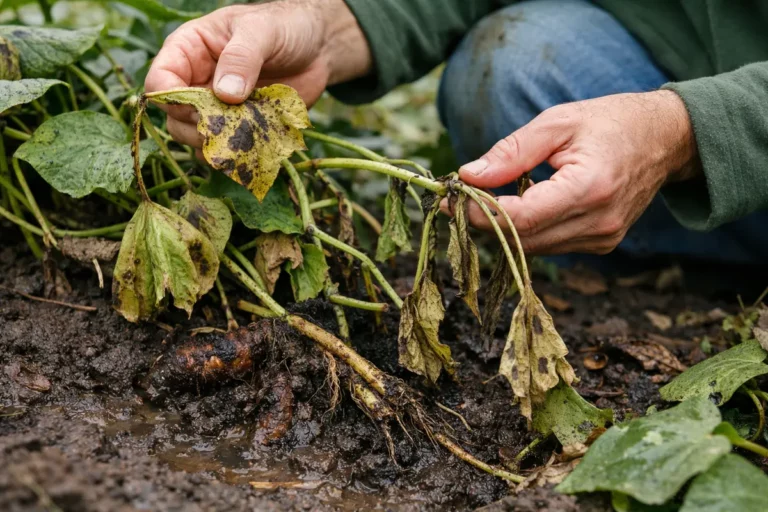
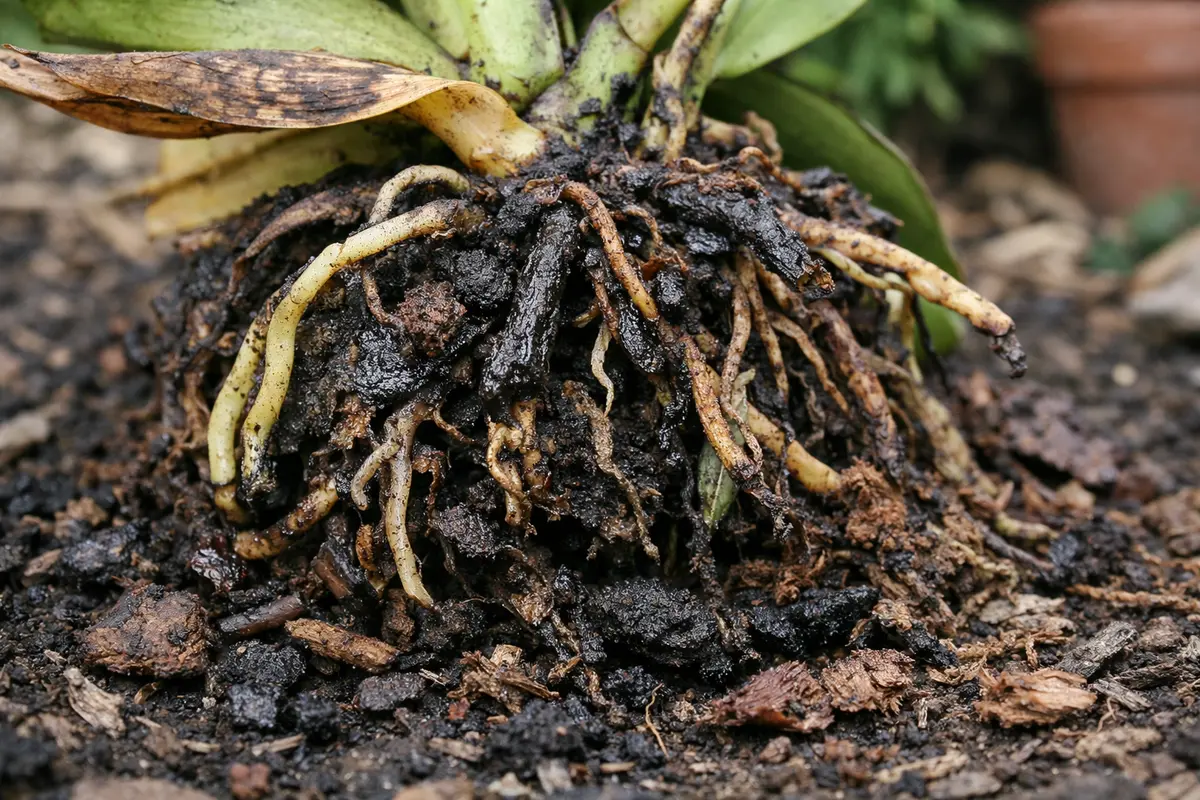
Start by carefully removing the orchid from its pot. You will see the damaged roots clearly and can prevent further decay as you inspect them. Make sure to use sterilized scissors or pruning shears when cutting away the rotting sections to avoid spreading infections. The cutting should focus mainly on the roots that feel mushy and show signs of brown discoloration, as these are indicators of rot. If any roots appear soft but not visibly rotting, inspect them closely for changes in color; healthy roots may still have moisture but should be firm to the touch.
This immediate action is crucial because once roots start rotting, they release toxins that can affect the entire plant. Healthy roots are vital for nutrient absorption and water transport; thus, trimming the damaged segments helps halt the spread of degradation. Performing this process under bright, indirect light can improve visibility and make the task easier, especially for those learning the visual signs of rot. The longer the rot persists, the more difficult it becomes to revive the plant. A reminder: if you notice roots near the base that appear yellow or brown but aren’t mushy, they may just be experiencing stress from environmental changes rather than rot and can be left intact.
A common mistake gardeners make at this stage is to delay the trimming, hoping the plant will recover on its own. In cases of severe rot, delaying action can accelerate the decline. If you’re unsure about which roots to trim, focus on those that feel mushy or have a brown coloration, as these are indicators of rot. Additionally, inspect the roots’ base closely; if you see any blackened roots, it’s usually a sign that decay has set in deeper. If rot is suspected but the extent isn’t clear immediately, err on the side of caution by removing more than you might think necessary; it’s better to sacrifice a bit of healthy root than to risk the entire plant. Seek out roots that appear black or snap easily when bent, as these are often severely compromised.
Step 2 – Assess Potting Mix for Overwatering Issues
First, remove the orchid from its pot immediately and inspect the roots for rot. Trim away any brown, mushy roots with sterilized scissors and repot in fresh, well-draining orchid mix; within days, you should observe a reduction in fungal odors and potential new root growth.
The rot occurs primarily due to overwatering, causing the roots to sit in waterlogged soil and suffocating them. In this anaerobic environment, harmful bacteria can thrive, leading to root decay. Healthy roots are typically firm and white, contrasting sharply with the dark, mushy appearance of rotting roots. If tangy or sour odors are present, it confirms the presence of anaerobic bacteria; if the roots feel firm yet discolored, they may be surviving but under stress.
If any remaining roots look shriveled and lack color, consider adjusting your watering schedule to give the plant more time to dry out between waterings. Alternatively, if the potting medium smells sour, replace it entirely and ensure your pot has adequate drainage holes; failing to do so could lead to a repeat of the root rot issue.
When roots rot, it is often caused by excessive moisture or poor drainage in the potting medium, leading to anaerobic conditions that suffocate the roots. Healthy roots are typically firm and white, while rotting roots appear brown and mushy due to the breakdown of plant tissue from fungal or bacterial infections thriving in overly wet soil. If roots are left in such conditions, they cannot absorb nutrients effectively, causing further decline in the plant’s overall condition. If you see that your potting mix remains constantly soggy, this indicates that you should not only change the mix but also investigate the pot’s drainage holes to ensure they are not blocked. Poor drainage episodes often surface as discover why your succulent is turning.
If the soil smells sour, indicating potential root rot, consider changing the pot entirely to eliminate bacteria and fungus, rather than just repotting. Alternatively, if you notice crispy, shriveled roots but no scent, you may be dealing with underwatering; in this case, increase your watering frequency to restore moisture levels effectively. Pay attention to the potting medium—if the surface dries out too quickly after watering, it may indicate insufficient moisture retention capacity.
Orchids thrive in environments with excellent drainage. When the potting mix is too dense or remains wet for extended periods, air circulation decreases, leading to anaerobic conditions that promote root rot. For instance, if the soil smells sour or is overly wet after a recent watering, it indicates poor drainage and a high likelihood of root damage. Conduct a quick test by inserting a finger into the soil; if more than a couple of inches down it feels wet, it is an indicator that conditions are ripe for root rot issues. In situations of high humidity, it can be helpful to adjust watering frequency; if the topsoil feels dry within the first few days after watering, a reduction in watering frequency might be required.
If the potting mix is indeed too wet, consider repotting the orchid in a fresh, well-aerated orchid mix designed for drainage. This involves removing as much of the old mix as possible without damaging the existing roots. Alternatively, if the soil feels just damp and not overly saturated, it may just require letting it dry out before the next watering. Refreshing or changing the potting medium ensures adequate moisture retention while avoiding overly soggy conditions. Make sure to check the material to ensure it allows for airflow; Coco coir or a mixture containing expanded clay pellets can enhance your orchid’s health.
Step 3 – Repot Orchid to Aid Recovery Process
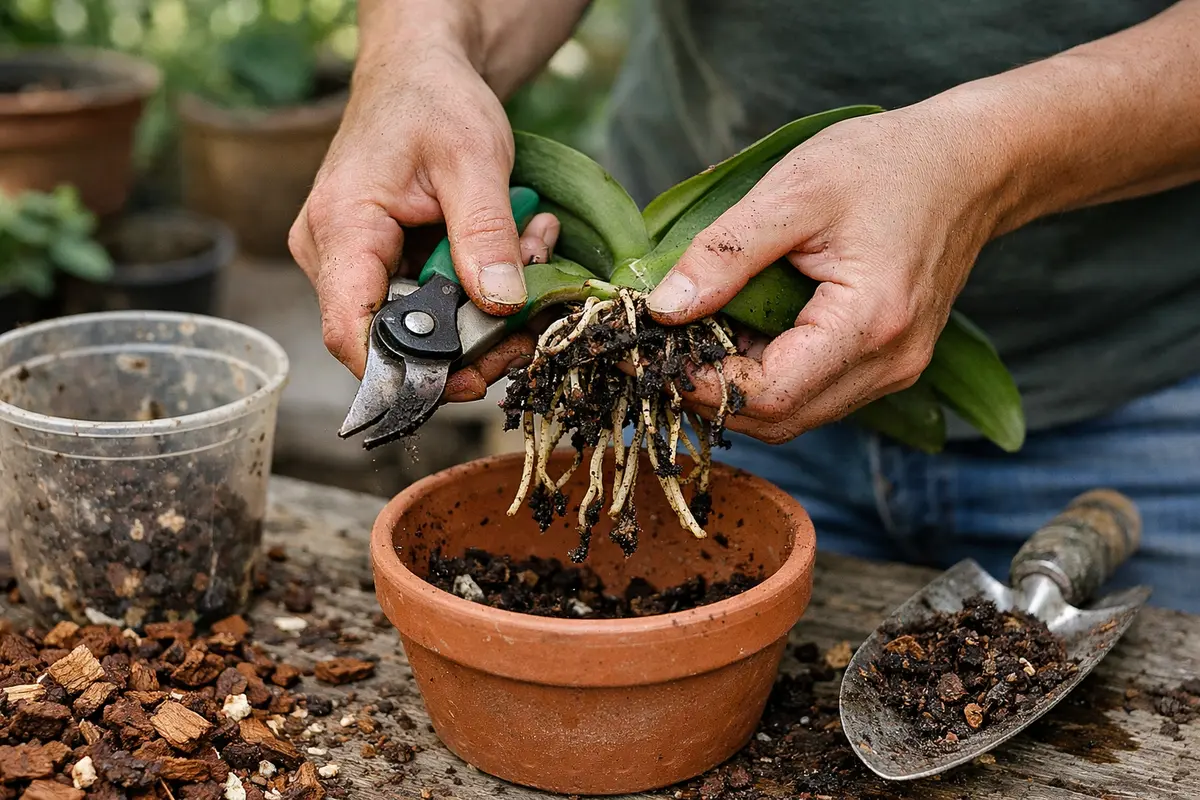
Start by removing the orchid from its pot and gently rinsing the roots with lukewarm water to remove any decaying material. Trim away the brown, mushy roots using sterilized scissors, leaving only the healthy, firm ones intact. Within a couple of weeks, look for signs of new root growth, which may appear as small green tips emerging from the base of the plant.
Recovery may take anywhere from a few weeks to several months, depending on the extent of the damage and environmental conditions. Healthy regrowth often features vibrant green roots that extend into the potting medium, while stagnant roots may remain brown and shriveled. Providing warmth and humidity can accelerate recovery, while low light or cool temperatures can slow the process significantly.
Avoid overwatering during recovery as it can lead to more rot or stress on the plant. Instead of frequent watering, allow the potting medium to dry out slightly between waterings. If roots continue to show signs of decay despite your efforts, check that the potting medium is not retaining too much moisture.
The recovery timeline for an orchid can vary, typically taking several weeks to a few months for noticeable regrowth. Healthy regrowth includes firm roots that are greenish in color and new leaf development that appears vibrant and firm. Providing optimal conditions like bright, indirect sunlight and a stable temperature can speed up recovery, while excessive humidity or cold drafts might slow it down. A common mistake during this phase is placing the orchid in direct sunlight, assuming it will accelerate growth, but this can lead to stress and further issues.
Avoid the mistake of overcompensating with extra water or fertilizer during recovery; this can further stress the plant. Waiting too long to repot the orchid can also hinder recovery, so if the roots remain mushy and dark after a few weeks, check the potting medium for drainage issues or root death. Timing plays a critical role here; when the temperature rises in spring, it’s usually the best time to repot and promote new growth. Keep a close watch on moisture using the finger test often, as regeneration takes time.
A new potting medium encourages root health by ensuring that moisture levels are better balanced. During repotting, avoid pressing down on the medium too firmly, as this can lead to compaction and reduced aeration. Instead, allow the roots to sit naturally, which promotes better airflow throughout. After repotting, maintain a humid environment around the orchid but make sure the pot and medium have good drainage. Observe the plant diligently for a couple of weeks to monitor new root growth, and adjust care practices as necessary as the orchid adapts to its new conditions.
Be cautious during this step, as over-fertilizing the newly repotted orchid can lead to additional stress. Many gardeners mistakenly add fertilizer too soon, not realizing that newly planted orchids may be sensitive. Wait about a month before feeding to allow roots to reestablish, prioritizing proper hydration and environmental factors during this period. Watch for signs of stress, such as leaf wrinkling or darkened root coloration, before applying any nutrients, as applying them while conditions are still unstable can multiply stress on the plant and might encourage further deterioration.
Step 4 – Water Orchid Sparingly During Humid Months
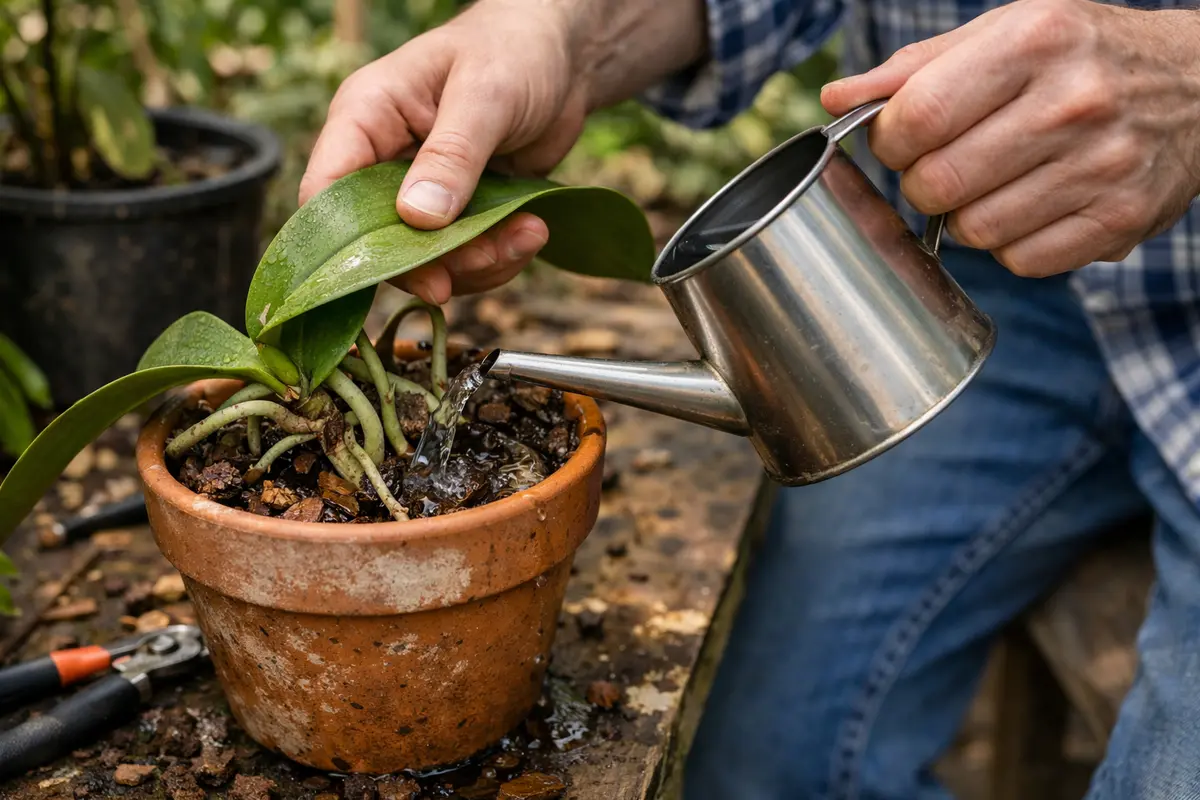
Water your orchid sparingly during humid months to prevent future issues. You will notice a reduction in the risk of root rot and overall moisture-related stress on the plant. Keeping a consistent watering schedule may not be the best practice; instead, rely on the conditions surrounding your plant. For example, during especially humid weather, check the pot daily to assess moisture needs before providing additional water.
Orchids naturally adapt to seasonal changes, requiring less water in summer and more during dry seasons. Understanding your local climate is essential, as high humidity can easily lead to over-saturation of potting soil. For instance, if you live in a particularly humid area, implementing a schedule that involves checking pot moisture rather than adhering to a strict timeline can provide more adaptability while still safeguarding plant health. This method also allows you to catch signs of overwatering quickly, such as yellowing leaves or soft roots.
As temperatures rise, consider monitoring weekly instead of bi-weekly watering schedules. This approach helps adapt to the plant’s changing needs while preventing future occurrences of rot. Pay attention to weight; a light pot signals it’s time to water, while a heavier pot suggests sufficient moisture retained. If you begin to notice yellowing leaves, it may signal that your orchid is still receiving excess water or not enough sun. Furthermore, if you find that the roots are starting to turn a dark green color, that may also indicate that excess moisture is present.
Another helpful tip during these humid months is to allow the orchid to dry out slightly between waterings to promote healthy root growth. This will also help prevent rot; for instance, if the potting mix takes longer than a week to dry out after watering, it is essential to reassess the conditions. Implementing proper airflow around the orchid can also enhance drying times; consider moving the plant to a slightly breezy location or near an open window during dry spells.
Step 5 – Inspect Roots for Fresh Rot Signs Weekly
Inspect the orchid roots for signs of fresh rot every week. You should observe whether the roots appear healthy and firm again, marking progress toward recovery. Regularly checking helps catch any issues before they escalate. If any roots begin to display looseness or discoloration, take immediate action by cutting away the affected portions and reassessing environmental conditions to prevent recurrence. To do this effectively, separate the orchid from its pot carefully and inspect the entire root system; if you feel any resistance or hear a crunching sound as you pull on a root, this typically indicates rot has set in.
A fully recovered orchid will display bright green, strong roots with no signs of mushiness or discoloration. Additionally, firm and vibrant leaves signal that the plant is returning to health. If rot signs return, such as yellowing or softening leaves, it indicates that previous issues are recurring or that new problems have arisen. In such cases, reevaluate all care aspects, including watering frequency and potting medium selection. For instance, if you repotted the orchid just after a heavy rain, check for water retention in the potting medium before watering again.
If the problem persists even after taking these precautions, consider consulting with a local plant specialist. Regular root checks should help maintain orchid health; however, if you notice the same signs after attempting recovery methods, it may be time to escalate the situation for a proper assessment. A second layer of knowledge or a fresh perspective can identify potential underlying issues unrelated to typical root rot scenarios. A seasoned plant parent often notes that consistent care leads to stronger plants; don’t hesitate to seek help if you’re unsure about the next step in recuperating your orchid.
FAQ
How long does it take for an orchid to recover from root rot?
Recovery time for an orchid can vary but typically takes between 3 to 6 weeks depending on the extent of the damage. The newly adjusted environment plays a crucial role in recovery speed. Once you notice new root growth and firm leaves, it’s a good sign that the orchid is recovering, but know that full recovery can take longer for severely affected plants. If you closely monitor conditions and maintain optimal care, the recovery process may be significantly shorter for healthier orchids.
Can root rot spread to other orchids in the same area?
Yes, root rot can spread to other orchids if contaminated water is present or if the tools used are not disinfected. Make sure to sanitize any pots or tools used with infected plants before touching healthy ones. Additionally, avoid watering sick plants with the same water supply that might have traces of pathogens. Implementing good cultural practices, such as using sterilized tools and maintaining separate watering systems, can minimize disease transfer.
Should I remove all rotting roots immediately?
Yes, you should remove all visibly rotting roots as soon as you notice them. Healthy roots are crucial for the orchid’s well-being, so taking immediate corrective action helps promote recovery. Ensure that you keep the environment optimal following this intervention, as unaddressed factors could lead to new rot cycles. Observing the root’s texture during removal and categorizing the roots can help target potential issues that may need attention afterward.