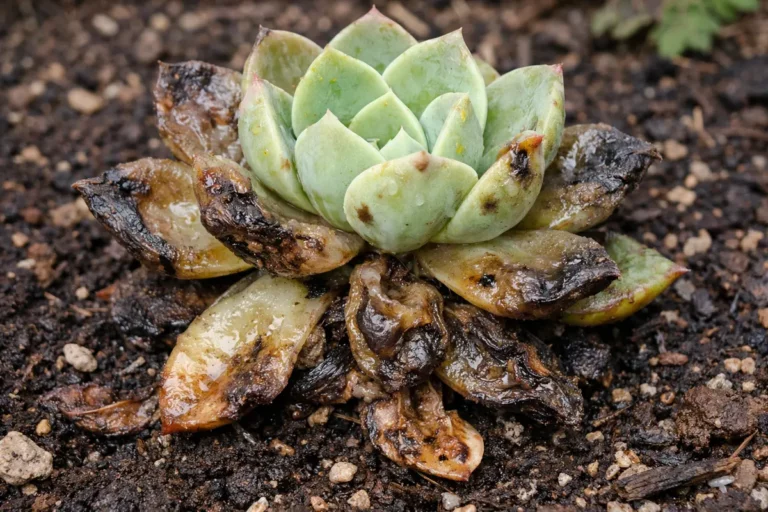
You notice dark, mushy leaves on your succulent after weeks of heavy rain, prompting you to think about “What to do if my succulent is rotting in pots.” The plant is struggling due to excess moisture, leading to rot in the leaves and roots. If left untreated, the rotting will worsen, potentially killing the plant, but you can fix it by taking immediate action.
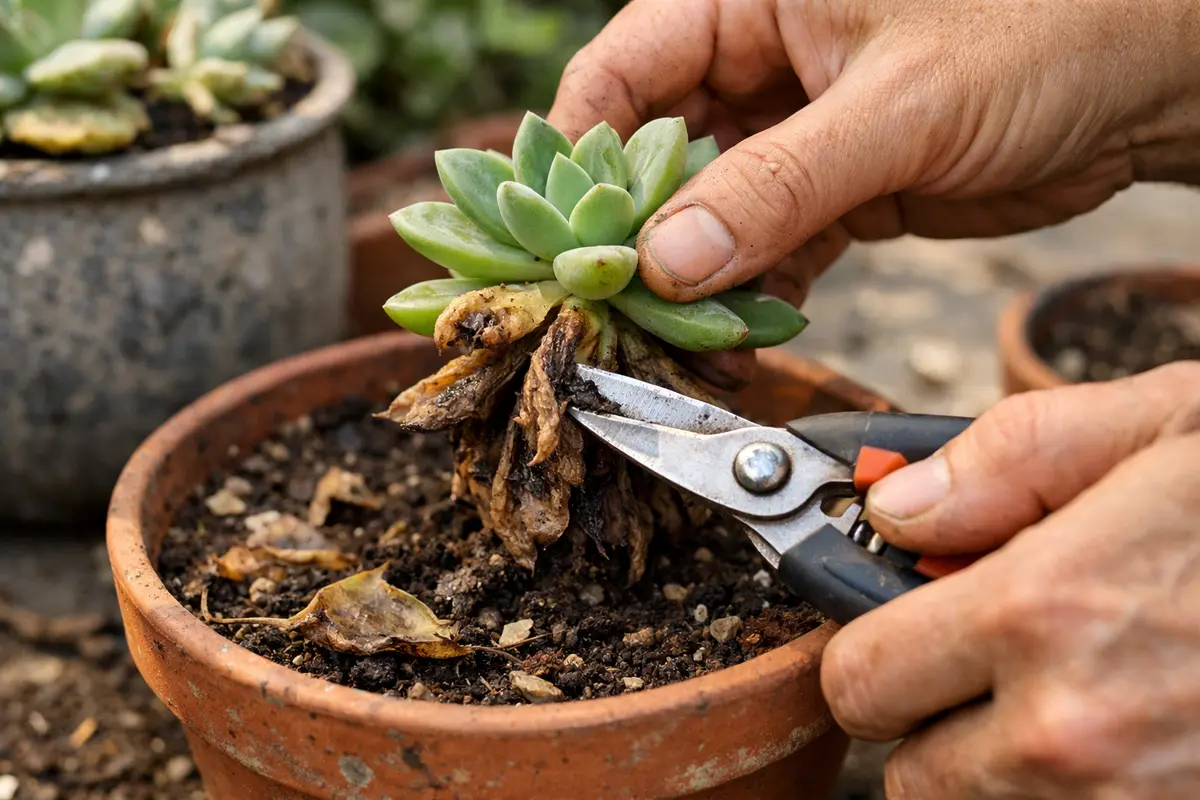
Step 1 – Trim Decaying Leaves from Succulents
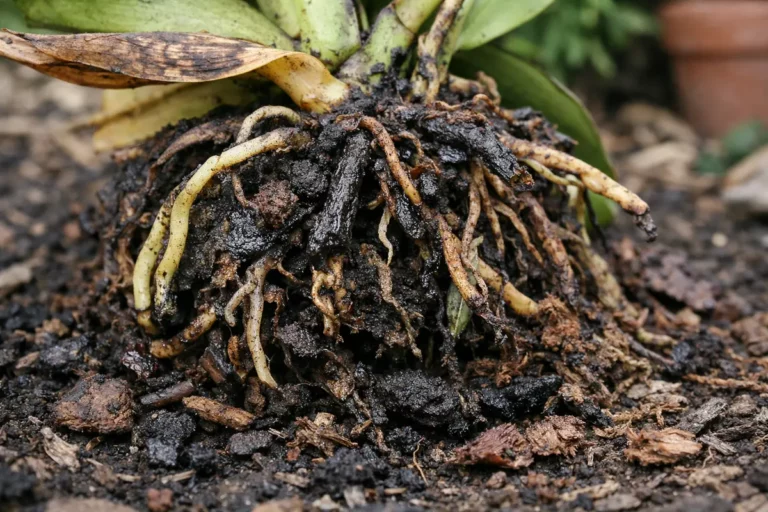
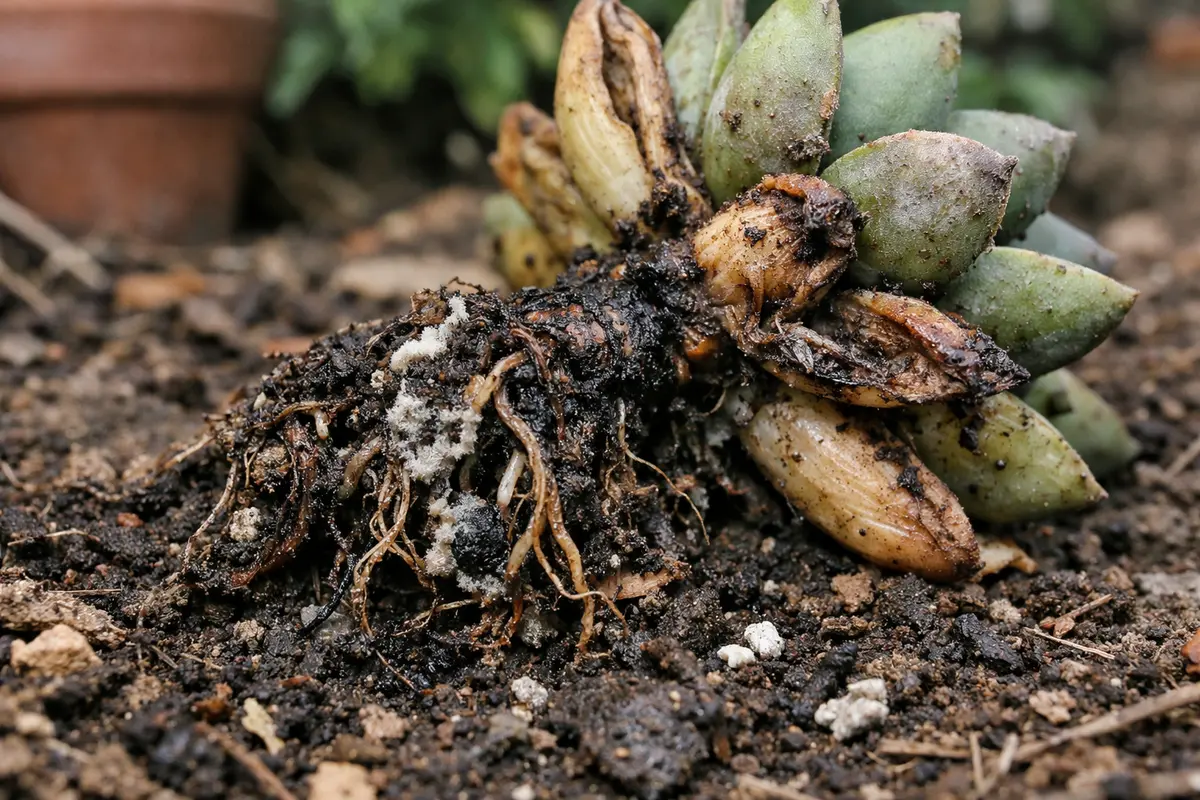
Start by carefully removing the succulent from its pot, ensuring you do not damage the roots. Inspect the roots for blackened or mushy sections, and trim away any rotting parts using sterile scissors. After this, repot the succulent in fresh, dry soil specifically designed for succulents, allowing for immediate stabilization and a noticeable firming of the plant’s structure.
Acting fast is critical because succulents are particularly sensitive to overwatering, and delaying action can lead to continued rot that spreads to healthy areas. When rot sets in, it disrupts the plant’s natural nutrient flow and can cause a rapid decline in overall vitality, ultimately leading to plant death if not addressed quickly. If your succulent feels overly soft and squishy, that’s a clear indication to act, while a firm texture in another succulent signals that it remains healthy and requires no immediate intervention.
Many gardeners mistakenly leave a rotting succulent in its pot, thinking the plant can recover on its own. A case study reveals that someone waited a week to act, leading to complete root rot and the loss of a valuable plant, where timely intervention could have salvaged it. If no improvement is seen in a few days after repotting, check the moisture levels to ensure you’re not reintroducing conditions that led to the rot.
Trimming damaged leaves is crucial because it limits the scope of rot spreading to healthy parts of the plant. If you delay this step, the rot can progress to the stem and roots, making recovery significantly more difficult. Regularly inspect the cut areas after trimming for any signs of further decay; if you notice continued discoloration or ooze from the stem cuts, this indicates that further intervention may be necessary. By addressing the issue swiftly, you give your succulent a better chance for recovery.
Many gardeners underestimate the urgency of removing affected parts and might think waiting will help the plant heal itself. Ignoring those first signs can lead to further decay and potential loss of the entire plant. Act quickly by cutting back the unhealthy leaves, and keep an eye on the sections you’ve pruned to ensure further treatment is effective. If left unchecked, rot can escalate to a level where entire sections of the plant turn a darker shade and become mushy, indicating that time is running out. Quick intervention will allow your plant to refocus its resources effectively. If you notice that you’ve cut away a substantial amount of foliage, you might need to adjust your care routine, as the plant will need time to heal and regenerate new leaves.
Step 2 – Diagnose Water Overload in Potted Succulents
Check the moisture level of the soil immediately; it might be overly wet. You should see clear signs whether the soil is saturated or dry by assessing its stickiness or by inserting a finger about an inch deep. If it’s muddy or overly moist, it indicates that water retention is likely the cause of rotting, and it’s essential to allow the top inch of soil to dry out fully before proceeding to the next step. Additionally, consider the last time you watered the plant—if it was very recent and still feels saturated, you might have overwatered.
Water overload signals that the roots are struggling for air, leading to root rot and subsequent decay in the leaves. Failing to act on waterlogged soil may cause further damage since succulents need a well-draining medium to thrive. The roots suffocate in a wet environment, leading to lowered nutrient absorption and the eventual death of the plant. If, when testing the soil, it feels like mud between your fingers, it’s a clear indicator of excessive moisture. To confirm this, pull out the pot and check for water collecting at the bottom; if you see standing water, it’s imperative to rectify this drainage issue.
If you notice a sour smell emanating from the soil, this is a clear warning sign of root rot due to standing water. In this case, you should repot the succulent into fresh, dry soil while checking the roots for rot; if they appear black or mushy, trim those areas away to prevent further spread. If your roots seem healthy, ensure that you’re using a well-draining mix going forward. Keep an eye on seasonal conditions too; spring rains can lead to over-saturation even before you notice symptoms. Ensure your pot has adequate drainage holes, and consider adding perlite or sand to your soil mix for better aeration, which will help mitigate the risks associated with excess moisture.
Step 3 – Pray for New Growth in Ailing Succulents

Water the succulent lightly following your trimming and diagnosis. You will notice that in a few days, new growth could begin to appear, and the remaining leaves may firm up. Careful watering will ensure that the plant begins to regain its strength without overloading the soil again. Implement a strategy where you water only when the upper layer of soil is dry to the touch; this gives roots time to breathe without being deprived of moisture. If the top layer dries out too quickly and you notice shriveling, consider adjusting your watering schedule.
New growth indicates that your succulent is responding positively to the corrections made. Healthy plants will begin to show signs of budding leaves or improved coloration in their existing foliage as they recover. Conditions such as light exposure and temperatures should be optimal to promote regrowth after rot has been managed; you should keep the succulent in a location with bright, indirect sunlight. Be vigilant since too much direct sunlight can sometimes stress recovering plants further. If leaves start to wither or curl again, it may signal another issue, such as insufficient light or lingering soil issues.
Be cautious not to overwater during this recovery period, as many gardeners mistakenly believe hydrating more will help their plants bounce back faster. It’s essential to find a healthy balance in your watering routine, allowing the soil to dry out sufficiently between watering sessions. If you see no signs of new growth within a week, consider reassessing your watering routine or repotting method, as the plant may still be at risk of rot. When uncertain, always opt for a lighter watering approach to promote recovery without overwhelming the roots. Doing so will also assist in strengthening the roots, allowing them to absorb nutrients and water more effectively once growth resumes.
Step 4 – Avoid Overwatering Succulents in Spring
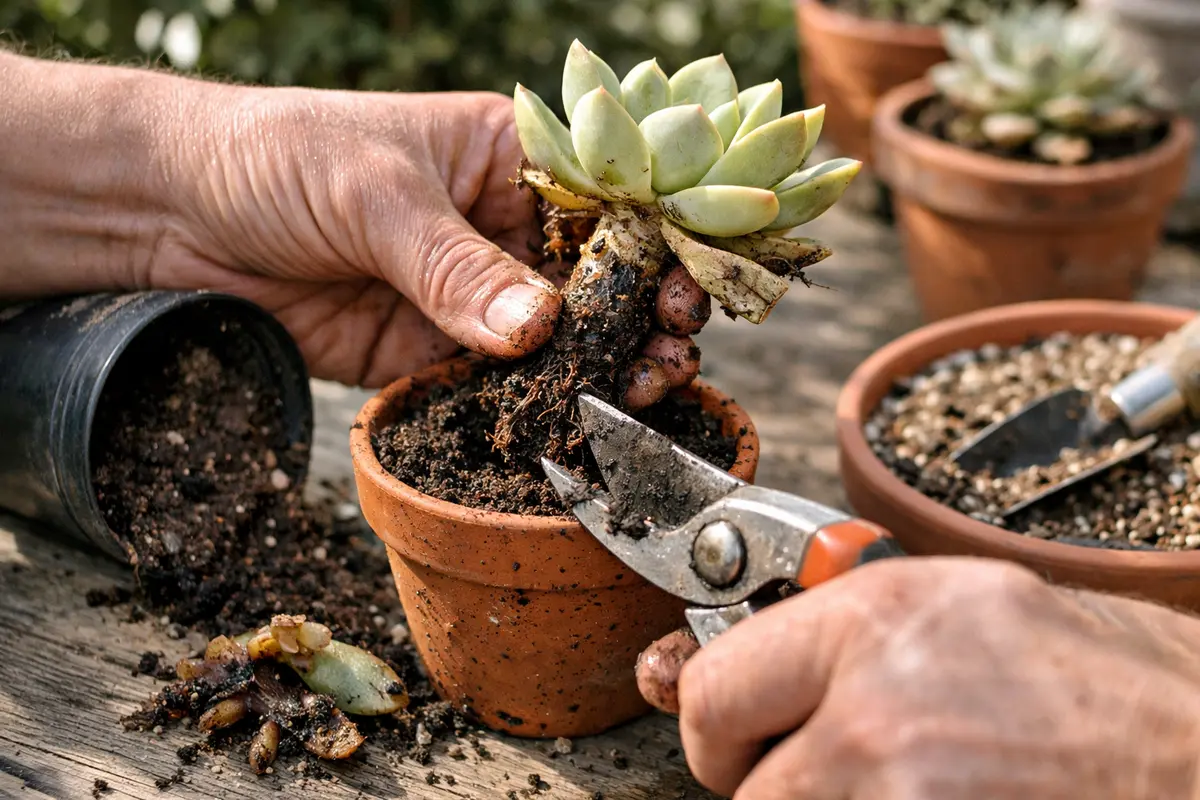
Start by ensuring that your succulent is planted in a pot with adequate drainage holes and a well-draining soil mix. This immediate action will help prevent excess moisture retention, which is a key factor in root rot, enabling your plant to thrive without the risk of decay. If your pot does not have drainage holes, consider repotting it into one that does, as this is crucial for healthy root development.
Excess moisture often occurs in pots lacking drainage, leading to a damp environment conducive to rot. When you establish a routine of using well-draining soil and pots, you significantly reduce the chances of your succulent encountering repeat rot issues. If you grow your succulent in the same potting media but notice that the water tends to pool, check for a blockage in your drainage holes, clearing any debris that may prevent proper drainage.
In the winter, decrease your watering frequency to adapt to the plant’s reduced growth rate due to cooler temperatures and lower light conditions. Conversely, during the humid summer months, adding a layer of gravel at the bottom of your pot can further enhance drainage, providing an extra preventive measure against excess moisture. Adjust your watering frequency based on seasonal changes; generally, less water and more time between watering sessions are better for succulents during colder months. Remember that succulents thrive in dry conditions, so developing a keen sense of your plant’s moisture needs based on its environment can prevent costly mistakes.
Focusing on preventing overwatering is vital because succulents originate from arid environments where they thrive on drier soils. This new watering schedule allows you to provide just enough hydration without overwhelming the roots, thereby promoting a healthy growth cycle. Pay attention to your succulent’s location; an outdoor succulent may require different watering than one indoors due to environmental factors like humidity and light exposure. If humidity levels rise significantly in spring, consider moving your pots to a more ventilated area to prevent stagnant moisture from collecting. If the soil remains consistently moist, you risk creating an environment where fungal issues can thrive, further complicating the plant’s recovery.
In spring, pay particular attention to rainfall—especially if your succulent is outdoors—since heavy spring showers can contribute to excess water retention. Furthermore, you may observe that old soil loses its draining capabilities over time, which could contribute to soggy conditions. If the soil has become compacted or retains water longer than it used to, consider switching out the soil mixture every couple of years to maintain optimal health; this sensible routine will safeguard your succulents from similar issues in the future, securing a stable environment for healthy growth.
Step 5 – Inspect Succulent Soil for Foul Odors Weekly
Check the succulent’s soil weekly for foul odors as an indicator of health. You should observe a clean, earthy smell if the soil remains suitable, whereas a sour scent signifies ongoing rot issues. This regular check allows you to catch potential problems before they escalate again. Be vigilant during seasonal shifts or after significant rainfall, as conditions can change quickly in potting environments. If the smell returns, it may indicate that moisture levels are again inappropriate, prompting you to reassess your care regimen.
Recovery signs will emerge as you notice a return to normal watering practices; a healthy plant will develop firm leaves and vibrant colors. If the succulent appears less vibrant or if odors return, it indicates the possibility of lingering rot or other issues necessitating further action. If you implement proper plant care, the risk of foul odors should significantly decrease, but don’t hesitate to check if issues arise again. In some cases, it might be necessary to re-evaluate your soil type and drainage strategy. If the soil amendments lose their consistency and begin to compact, they can impede proper drainage, leading to a buildup of toxins from the decaying organic matter. Pay attention to how quickly the soil dries after watering; if it remains damp for longer periods, then reassess the balance of your mix.
If you again notice foul smells after ensuring the conditions are correct, it may be necessary to check for root rot again or consider repotting with a fresh, well-draining soil. Catching these signs early can make a difference in managing your succulents’ health. The smell of decay often worsens if left untreated, leading to further degradation and a larger cleanup operation. Ultimately, staying proactive will allow your plants to recover fully from the initial rot without repeating damaging cycles; consistent monitoring will help enforce positive growth over time. Building a routine of inspections and proactive adjustments will make a significant difference in long-term success with succulents.
FAQ
How long does it take for succulents to recover from rot?
Recovery from rot may vary, but you can usually expect to see improvements in about 1-2 weeks depending on how well you manage the conditions. New growth will be the most visible sign that recovery is happening; firm leaves and vibrant colors indicate a return to health. It’s essential to monitor closely during this period to ensure that you’re providing the right care to facilitate recovery. Some might even see signs of regeneration in as little as a week, but that’s contingent on addressing the underlying issues quickly. If you do not see initial signs of recovery by this time, it’s a signal that additional investigation into watering, soil quality, or light conditions may be required.
Can root rot spread to other plants nearby?
Yes, root rot can spread if the infected plant is left untreated, especially if they’re in close proximity. To prevent further spread, isolate any affected plants, and ensure your watering practices are adjusted to avoid over saturation for all plants. You will likely need to inspect nearby plants as well for any early signs of stress to intervene swiftly. Regular checks on neighboring plants can help ensure that root rot issues do not proliferate, as infected soil can transfer pathogens to other plants quickly. If you notice that they also show signs of overwatering or fading color, consider adjusting their care as well.
Should I remove all the affected parts immediately?
Yes, it’s best to remove all visibly affected parts as soon as you notice the symptoms. Cutting away decayed leaves quickly helps limit the rot’s spread and allows the plant to divert its energy to healthy growth. Failure to act promptly might result in the rot spreading further into the stem and roots, complicating recovery considerably. This proactive approach can provide a better prognosis for the plant’s overall health moving forward. Being vigilant in your monitoring will help to ensure that any further decay is caught early and effectively managed.