You may notice tiny green insects clustering on your squash plants when the temperatures begin to rise, which is why you need to know how to treat aphids on squash before planting. These pests siphon off plant fluids, causing yellowing leaves and stunted growth. If left untreated, the infestation can spread rapidly, weakening the plant’s health, but fixing the issue is possible now—just monitor your squash closely and remove any aphids you find.
Step 1 – Spray Insecticidal Soap on Squash Leaves
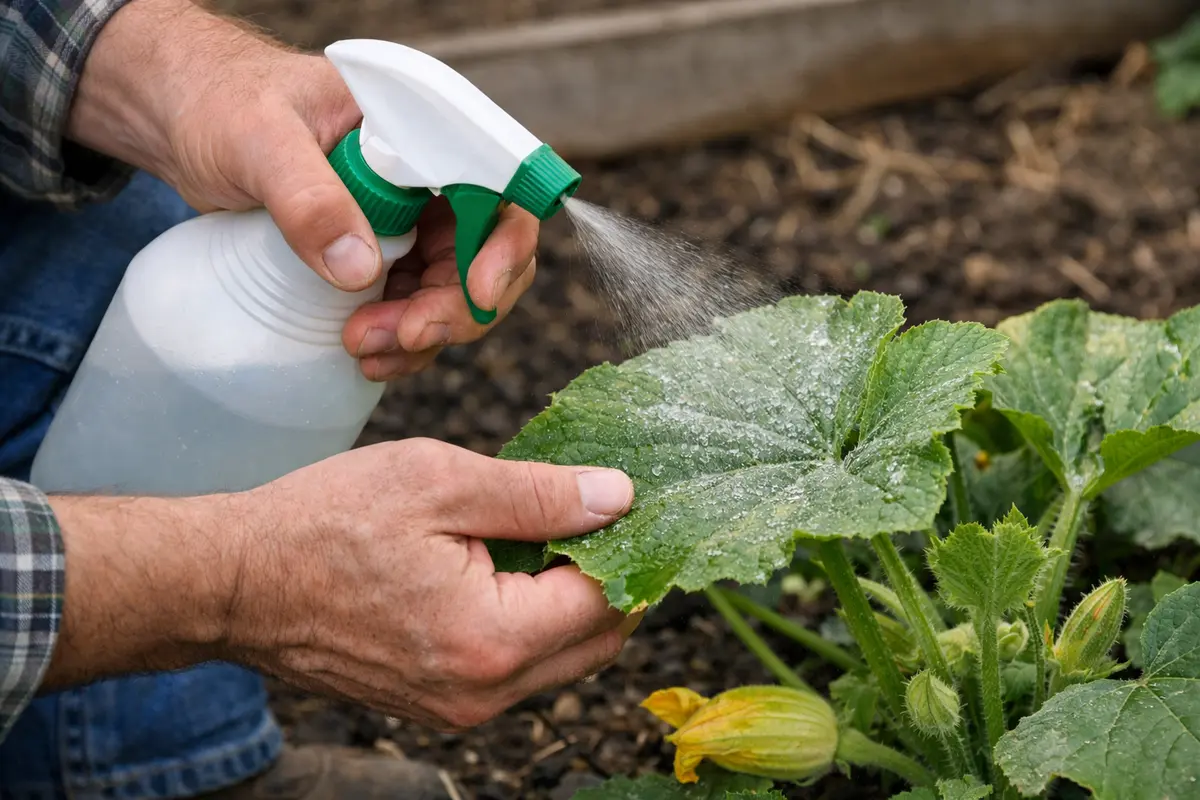
Start by applying an insecticidal soap solution directly onto the affected squash leaves. You should see the aphids begin to peel away and fall off the leaves within a few hours. This immediate action helps reduce the population quickly, preventing further damage to the plant. An effective mixture is typically one to two tablespoons of insecticidal soap in a quart of water, ensuring a well-dissolved mixture before application for maximum efficacy.
Insecticidal soap works by suffocating the aphids and disrupting their cell membranes, which is especially effective when applied to soft-bodied insects like aphids. Aim to cover both the tops and undersides of the leaves thoroughly, as this is where aphids often hide. If applied correctly, you should observe the affected leaves returning to their normal color, which suggests that the soap is doing its job. Early intervention is crucial; delaying treatment can allow the infestation to grow, leading to more extensive damage that is harder to control. If left unchecked, wilting leaves may eventually lead to an inability to photosynthesize effectively, thereby hindering overall plant growth.
A common mistake is applying the soap during high temperatures or direct sunlight, which can lead to leaf burn and reduced effectiveness of the treatment. For optimum results, refrain from treatments during the hottest parts of the day and instead, apply it in the cooler early morning or late evening hours. If the endpoint temperature exceeds 30°C, it is usually better to apply the solution in the evening or on a cooler day. Additionally, fully inspect your plants before treatment; if you find wilting or discoloration prior to application, consider waiting for recovery to initiate before applying any soap to ensure you do not shock the plant further.
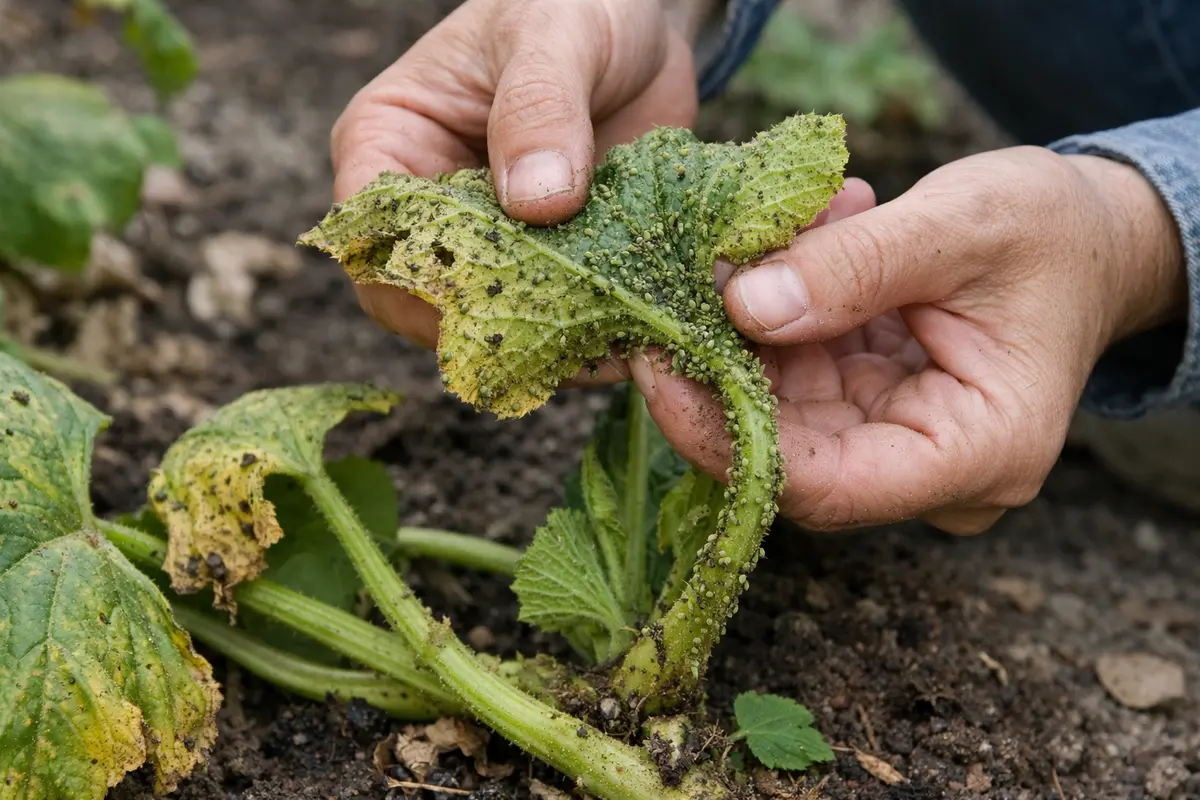
Step 2 – Diagnose Aphid Infestation in Your Squash
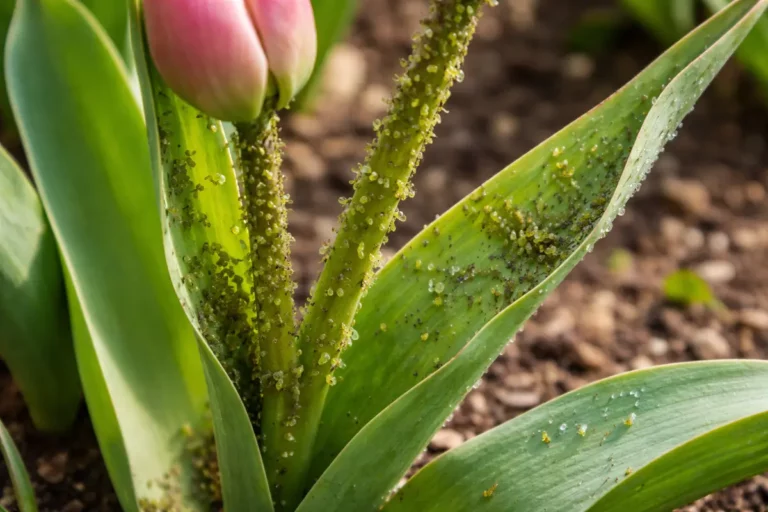
Examine your squash plants closely to confirm the presence of aphids before taking further action. If you see clusters of small green or black insects on the undersides of the leaves, it’s likely that aphids are present and causing damage. Identifying the problem is essential for addressing its root cause effectively. Look for any signs of distortion in the leaves, as healthy squash leaves should be smooth and firm. You may also notice swelling or curling along the edges of affected leaves, which often indicates aphid activity.
Aphids feed on plant sap, which can lead to wilting, yellowing of the leaves, and even significant plant stunting if not treated appropriately. Detecting them early ensures that you can respond before significant damage occurs. Healthy plants exposed to prolonged aphid feeding will typically exhibit lagging growth and even potential yield loss. On the other hand, squash plants that are given immediate attention at the first signs of aphid presence are often able to recover more rapidly, displaying new growth and stability. The consequences of ignoring the issue can escalate quickly — waiting too long can result in plants developing a sickly, weak appearance, ultimately impacting yield.
If you observe mold or sticky residue on the leaves, this could indicate honeydew secretion from aphids, signaling a more severe infestation. In such cases, check surrounding plants, as aphids often migrate quickly within the garden. If you see aphids traversing from one plant to another, it’s a sure sign of an increasing population risk. If your diagnostic efforts lead to uncertainty, take a sample to a local extension office for verification, which can prevent misdiagnosis and ensure you’re implementing the right control measures.
Step 3 – Treat Squash Plants with Neem Oil Solution
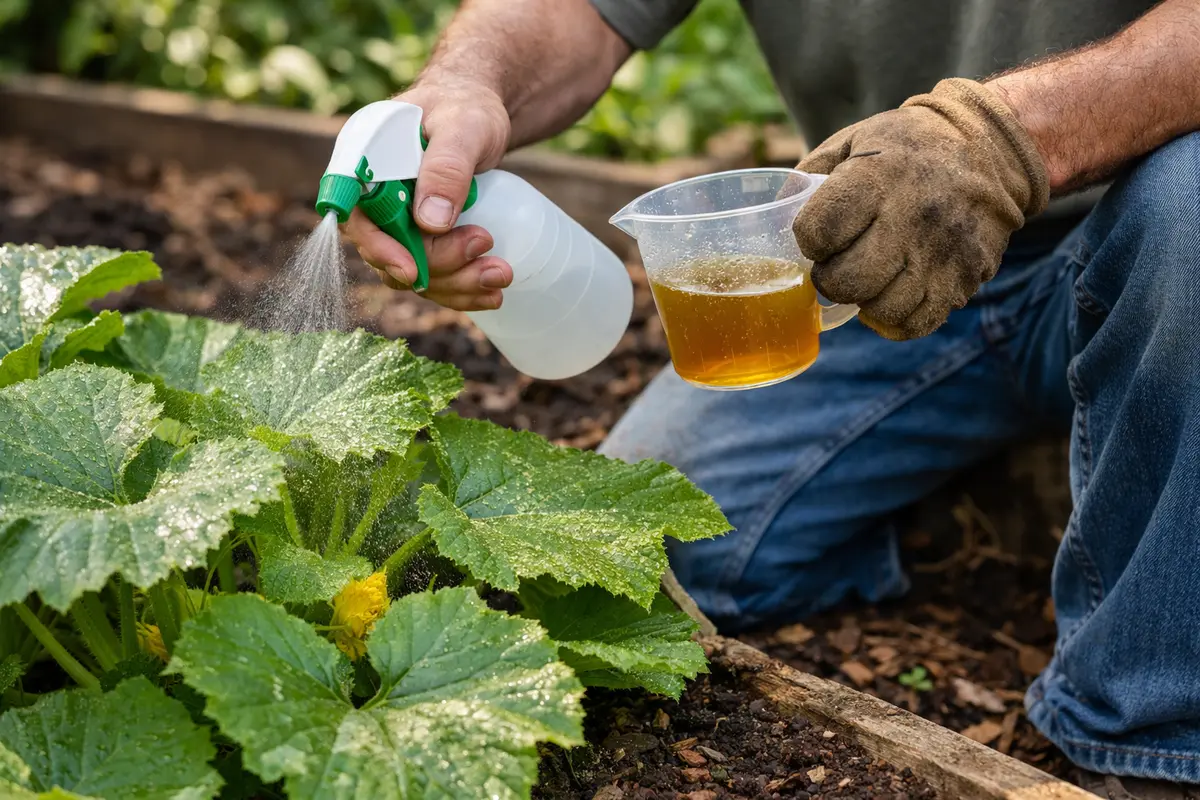
Apply a mixture of neem oil and water directly to the infested areas of your squash plants. Within a few days, observe a noticeable decline in aphid populations as they begin to wither and turn brown, indicating the treatment is working effectively.
Recovery from aphid infestations typically takes about one to two weeks, provided the conditions are right. Healthy regrowth is characterized by vibrant new leaves emerging, which are lush and green, contrasting sharply with the previous stunted growth. If you notice yellowing leaves persisting after treatment, check for aphid reinfestation or inadequate sunlight exposure.
Avoid overwatering your squash plants during the recovery phase, as excess moisture can create a breeding ground for fungal issues. Instead, ensure the soil remains well-drained; if not this, check the drainage system in your garden beds to prevent waterlogging.
The recovery timeline for squash can vary; typically, you may see signs of new leaf growth within a week if conditions are favorable, such as adequate sunlight and moderate moisture. However, if the weather is too dry or excessively humid, growth could be stunted, with slower recovery marked by yellowing leaves. To gauge moisture, perform a quick soil test; if the top inch feels dry, add water to maintain an even moisture level that encourages healthy plant growth. Conversely, if new growth isn’t appearing within a week, check the soil moisture levels. Parched soil for several days commonly drives drooping outdoor ferns after a drought.
During recovery, avoid over-fertilizing, as this can lead to more aphid attraction and potential root issues due to nutrient overload. Squash plants thrive on balanced nutrients, so it’s best to wait until you see new growth before adding any fertilizer. If your plants are still wilting despite adequate care, check for further pest issues or disease that could be impacting recovery. Additionally, if aphid clusters remain despite treatments, it may indicate resistant strains; you might need to switch to another treatment method.
Neem oil has been shown to repel and disrupt aphid feeding, thereby reducing their overall presence on the plants. Additionally, it offers some systemic action, allowing protection against new infestations. When correctly applied, the oil can not only help in controlling aphids but also can promote healthier plant growth, redirecting more energy toward productive efforts instead of battling ongoing pests. If your squash seems to exhibit signs of heavy infestation, such as incomplete leaf unfurling or distorted growth, the addition of neem oil treatment can mitigate these issues quickly. However, be wary — excessive application of neem oil can create a film that might block sunlight and lead to other complications, such as mold growth on wet leaves. It’s advisable to test the neem oil on a small area before undertaking a full treatment to observe any plant reaction.
Step 4 – Mulch Around Squash to Deter Future Aphids
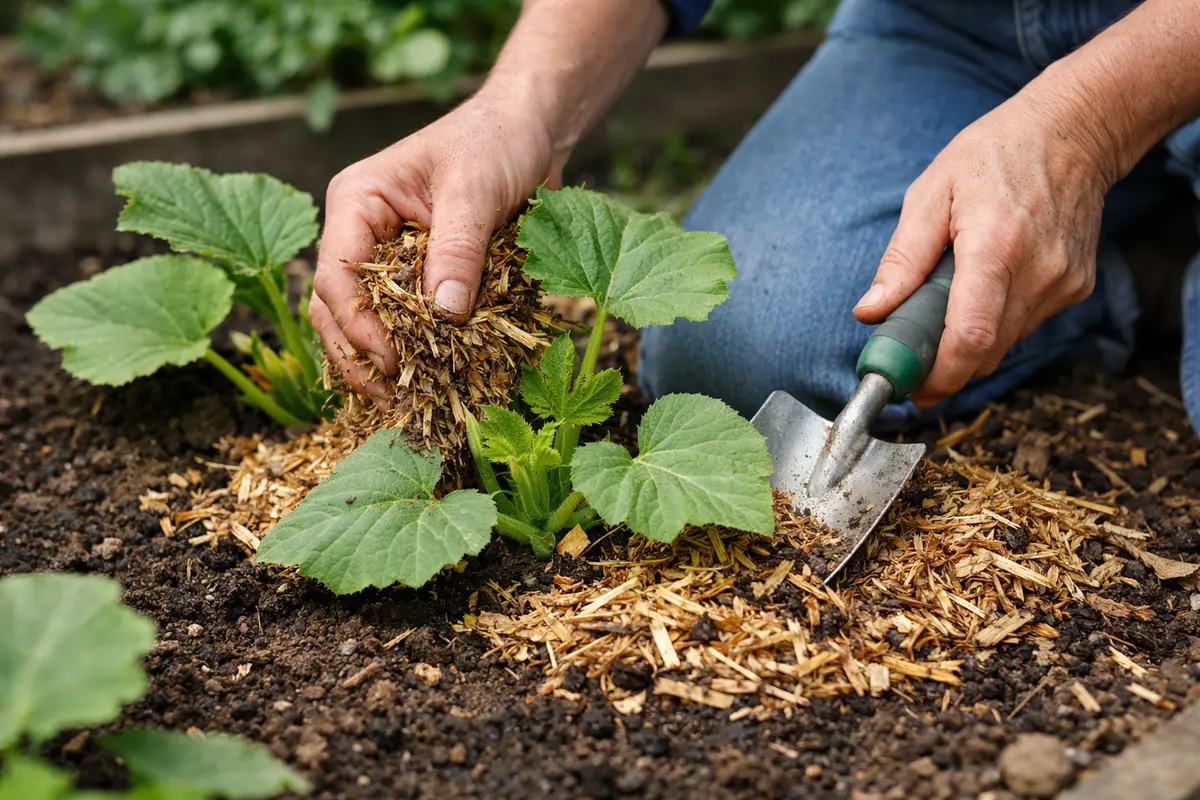
Start by adding a layer of organic mulch around the base of your squash plants at least three inches deep to deter future aphid infestations. Doing this creates a barrier that can help prevent pest access while also maintaining soil moisture levels. This protective measure encourages healthy root systems and overall plant resilience. For optimal results, avoid building up mulch against the plant stem, as this can trap moisture and lead to rot.
Mulch helps retain soil moisture, suppresses weeds, and can even attract beneficial insects, like ladybugs, which feed on aphids. Applying a few inches of mulch creates a favorable environment for your squash plants while simultaneously reducing the risk of future aphid problems. Healthier plants are less susceptible to pest infestations, as stressed plants attract aphids more readily. If you opt for straw or wood chips, ensure that any organic mulch used is aged; fresh wood chips can tie up soil nitrogen, resulting in negative effects on plant growth.
A common oversight is using plastic mulch, which can trap moisture and create a habitat for pests and diseases. Instead, focus on organic materials, like straw or shredded leaves, which can decompose over time and enhance soil health. Monitor the moisture levels of the soil during hot days; mulch may require readjustment or replenishing to maintain efficacy. Additionally, if you live in a region with fluctuating temperatures, consider a mulch layering strategy that changes with the seasons, maintaining plant health throughout the year.
Step 5 – Inspect Seedlings for Aphids Weekly Post-Treatment
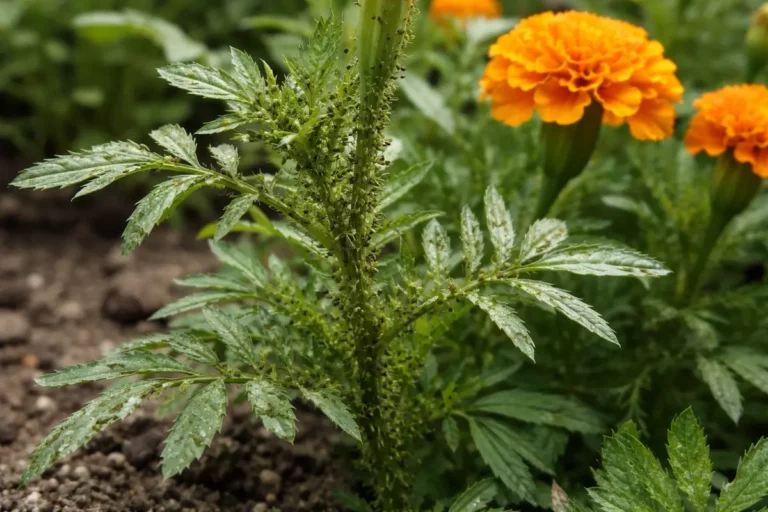
Start by monitoring your squash plants for any signs of aphid infestation. Check the undersides of leaves and the tips of new growth regularly, at least once a week during the growing season. Look for clusters of small, pear-shaped insects, often green, black, or yellow-green, and check for sticky residue or sooty mold, which indicates their presence. Recheck plants after heavy rain, as this can wash away some aphids, but not prevent their return.
A fully recovered squash plant displays vibrant green leaves that are firm to the touch, with new growth emerging robustly at the tips. In contrast, early signs of aphid problems include curled or distorted leaves that may appear sticky and exhibit a dusty residue. If you notice dark spots or additional curling, the issue may be re-emerging—check for those small, clustered aphids again.
If the aphid problem returns despite your initial efforts, consider introducing natural predators like ladybugs to help manage the population. Alternatively, apply insecticidal soap as a fallback action to suppress the infestation. Ensure to repeat the monitoring process afterward to assess the effectiveness of your new strategy, as ongoing vigilance is key.
A fully recovered plant will display vibrant, bright green leaves that stand upright, free from any signs of curling or discoloration. In contrast, early signs of the problem returning may include yellowing leaves accompanied by sticky residue or clusters of aphids visible on the undersides. If you spot sporadic yellowing or textured leaves, it indicates that aphids may be returning to the plant. In such cases, if you see a problem returning, immediately refocus on key actions—check for new pests or declines in natural predators that can usually help curb aphid populations.
If aphids reappear despite your initial treatments, consider introducing beneficial insects like ladybugs or lacewings that feed on aphids, which can provide natural control resources. Alternatively, escalate your approach by applying insecticidal soap or neem oil specifically designed to target aphids without harming beneficial insects. Always reassess the situation and adjust your monitoring schedule based on any new infestations you notice. Regular inspections are essential since proactive actions can prevent minor issues from snowballing into full-blown infestations, allowing your squash to flourish while limiting defense efforts.
Healthy squash plants after treatment will display consistent new growth and leaves that have not curled or yellowed due to aphid feeding. If you notice returning signs of aphids, such as sticky residue or curling leaves, it indicates that the previous treatment was insufficient. Maintain a proactive inspection routine, especially during peak aphid seasons, to catch any signs early. If your inspections reveal varying leaf textures or patches of discoloration, consider adjusting your treatment regime as necessary to prevent a small issue from evolving into a larger problem, ultimately safeguarding your squash crop.
FAQ
How long will it take for my squash to recover from aphid damage?
Recovery time can vary, but you can typically expect to see improvement within a few weeks after treatments are properly applied. New leaf growth and the absence of aphid activity are good indicators that your squash plants are bouncing back. If significant damage had occurred, full recovery might take longer, often manifesting in a gradual return to full vitality. Consistent monitoring during this time is vital to ensure recovery progresses without returning issues.
Can aphids spread to other plants in my garden?
Yes, aphids can easily migrate and infest nearby plants, particularly during warm weather. It’s advisable to inspect surrounding plants regularly and maintain vigilance to prevent infestations from spreading. Take note of any neighboring plants displaying distress and consider proactive measures to treat them if you spot aphids, breaking the cycle before it becomes a larger problem. Early intervention can ensure your garden remains healthy.
Should I remove affected leaves from my squash plants?
Removing heavily infested leaves can help reduce the aphid population and improve airflow around the plant. It’s essential to do this gently to avoid damaging the healthy parts of the plant, while also checking for any additional signs of aphid activity that might further compromise plant health. Additionally, sanitizing your pruning tools can help prevent further spread of pests within your garden, allowing for a more effective treatment process.