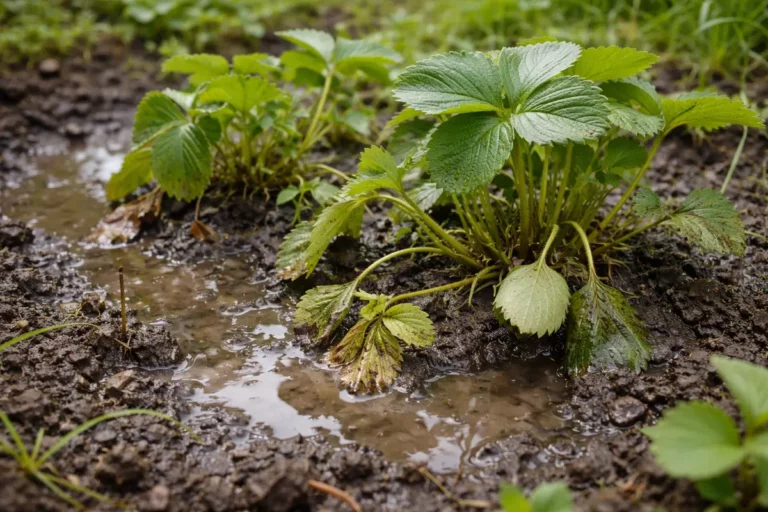
You may notice that your strawberry plants are struggling after heavy rain, which is why you need to know how to fix soggy soil around strawberry plants after rain. Excess moisture often leads to wilting leaves and mushy roots, as the plants struggle to absorb oxygen in waterlogged conditions. If left untreated, this issue can worsen and weaken the plant, making it harder to fix later on, so it’s essential to inspect the soil and improve drainage now.
Step 1 – Dig Trenches to Redirect Water Away
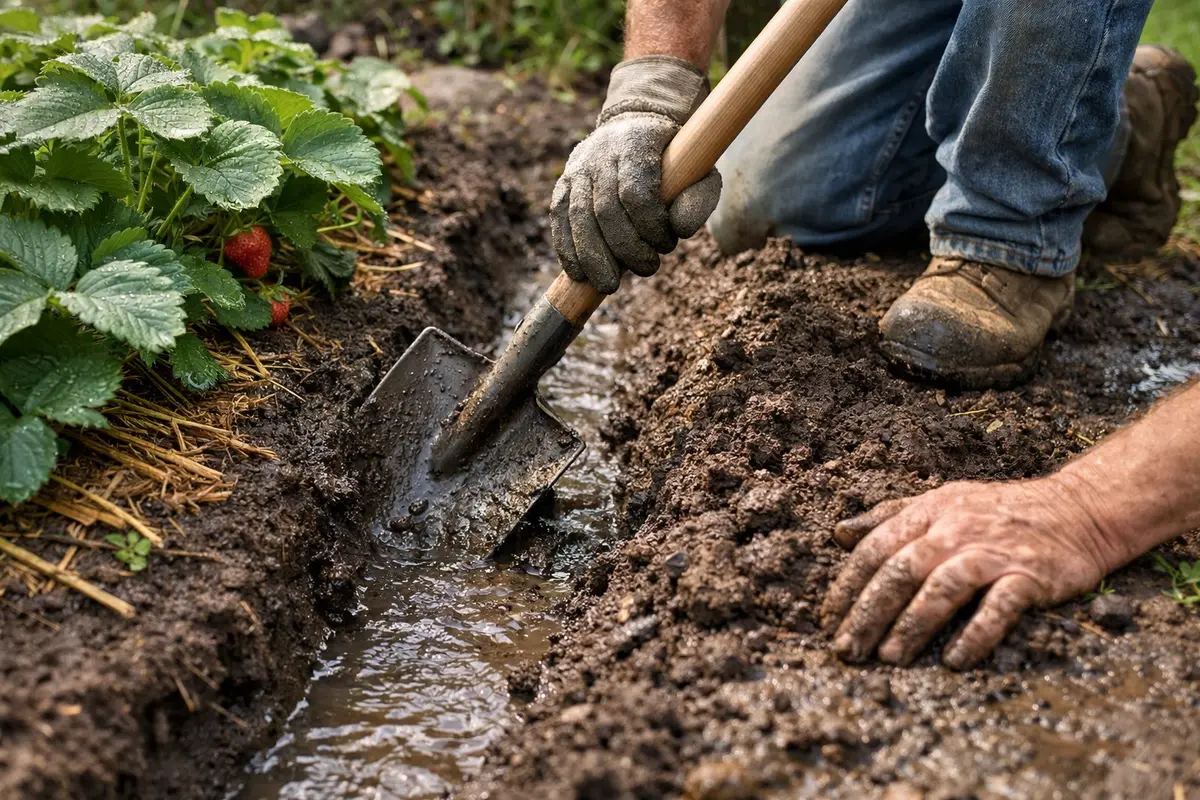
Begin by digging shallow trenches around your strawberry plants to redirect excess water flow. You will see standing water gradually start to recede from the root zone within hours as the trenches effectively channel moisture away. This step minimizes the immediate threat of root rot, which can occur if the plants remain submerged in saturated soil. Within just a few hours, areas previously flooded by excess water will show signs of drying, creating a healthier environment for your strawberry roots.
The reason this action is critical lies in the sensitivity of strawberry roots to over-saturation. Prolonged exposure to waterlogged soil deprives them of necessary oxygen, which can lead to root suffocation and fungal infections. If the soil stays too wet for more than a day, roots begin deteriorating, and symptoms such as yellowing leaves or wilting may manifest, impacting the plant’s capacity to absorb nutrients and water properly. Without intervention, these issues can escalate, leading to irreversible damage, highlighting the urgency of this first step.
A common mistake gardeners make at this stage is digging trenches that are too narrow or not deep enough. Without proper depth or width, the trenches may fail to carry away enough water, leaving the soil still soggy. Ensure trenches are at least 6 inches deep and wide enough to redirect significant water flow effectively. Additionally, avoid placing the trenches too close to the plant base, as this may lead to further displacement of sensitive roots. If the area is still saturated after initial trenches are dug, consider digging additional parallel trenches to better manage water runoff. Regularly monitor these trenches after rainfall events to ensure they remain effective; if water still collects near the plants, further trenching may be necessary.
Step 2 – Test Soil Composition for Water Retention
Check the soil composition around your strawberry plants to identify the type of soil affecting drainage. You will notice the texture and moisture retention level change; sandy soils will drain faster than clay-heavy soils. This assessment is necessary to determine whether you need to amend the soil to improve drainage. Pay close attention to how the soil appears when you squeeze it in your hand—if it clumps tightly and drips water, it is likely retaining too much moisture, causing potential drainage issues that are critical to resolve promptly.
Identifying the soil type helps you understand its water retention capabilities. For instance, clay soils retain moisture poorly due to their dense structure, which causes significant drainage issues, while sandy soils often drain too quickly. If you find clay soil, consider adding organic matter such as peat moss or compost to improve its structure, allowing for better drainage and aeration. The presence of organic materials influences the soil’s texture, making it looser and able to accommodate both water and nutrients more effectively. This tailored assessment of soil composition ensures you take steps specific to your conditions, leading to successful recovery.
If you discover that the soil emits a sour smell, it indicates anaerobic conditions caused by stagnant water, which can lead to more severe problems, including root diseases. Address this problem immediately by improving drainage instead of simply waiting to see if conditions improve. Adjusting the soil’s texture with amendments can lead to substantial recovery for your plants. Additionally, consider testing the pH level of your soil; if it leans too far toward acidic or alkaline, it may further inhibit your strawberries’ ability to take up nutrients from the ground, potentially complicating the recovery process.
Step 3 – Add Organic Matter for Soil Recovery
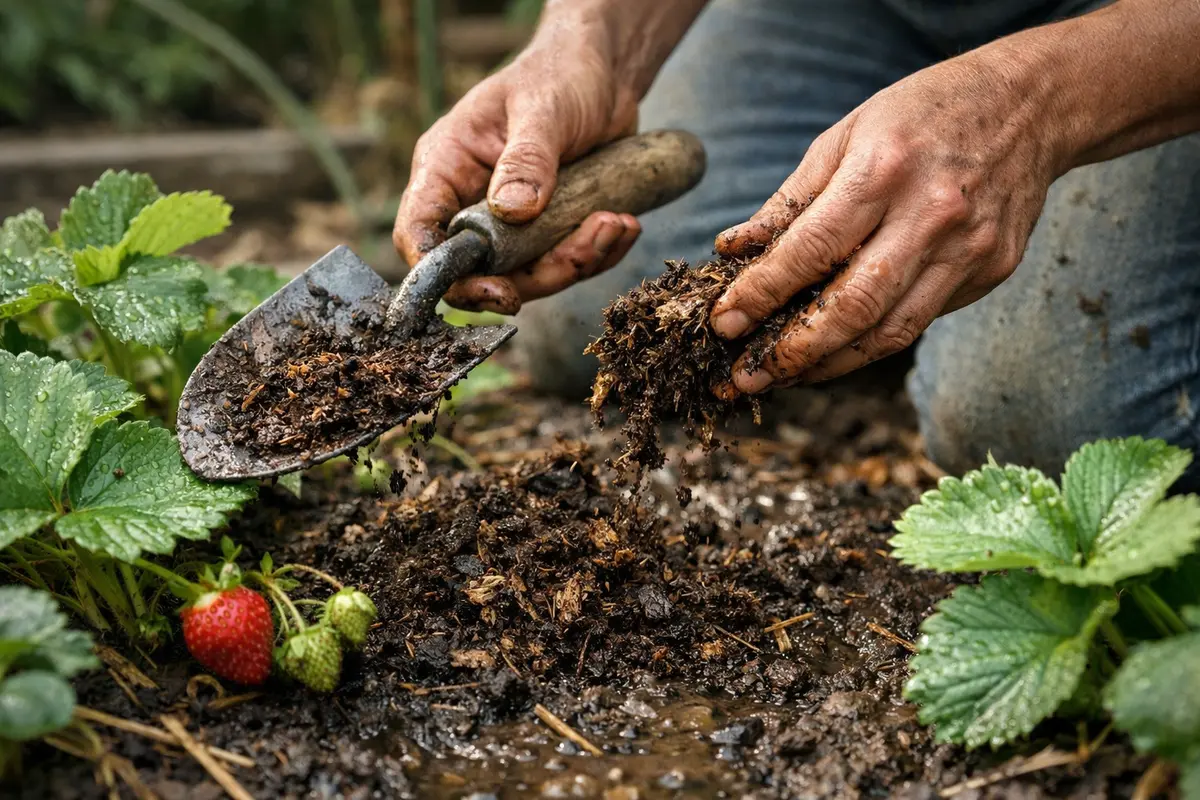
Start by gently loosening the top layer of soil around your strawberry plants with a garden fork, allowing excess moisture to escape. Observe how the soil begins to dry out and the plants perk up, showing signs of resilience, including brighter green leaves and renewed growth. Typically, recovery time after this step can be as quick as within a week, provided the ideal conditions are maintained. The visible signs of healthy growth will manifest as stronger leaf production, thickening stems, and increased flowering, indicating improved nutrient uptake.
The recovery timeline for soggy soil varies; while most plants will respond within seven days, the specific timeframe may fluctuate based on factors like ambient temperature and weather conditions. Persistent dampness may inhibit recovery, while good drainage, warm temperatures, and the presence of beneficial microorganisms greatly enhance it. If leaves remain droopy after a week, check the soil moisture level to ensure it isn’t still too wet, as continued moisture could mean further intervention is necessary.
Avoid overcompensating with additional water or fertilizer during recovery, as this can lead to root rot and further stress the plants. Timing is crucial; apply fertilizers only once the soil has adequately dried out, as excessive nutrients in soggy conditions can cause more harm than good. If the plants exhibit yellowing leaves despite drier soil, check for underlying root issues or pest activity that could be complicating recovery. Adding compost enriches the soil with nutrients while improving its texture and aeration, which is essential for strawberry plants that thrive in optimal drainage conditions. Healthy soil allows roots to breathe and supports beneficial microorganisms capable of outcompeting pathogens. You should start to observe microbial activity visibly increasing in the soil over the coming weeks, further reinforcing plant health.
Be cautious not to overwater your strawberries immediately after adding organic matter, as this can lead to another round of water accumulation in the soil, which would negate the improvements made. Limit watering for the first week, allowing the organic amendments to settle and the plants to adapt to the drier conditions. Regular moisture checks during this initial period will help identify any signs of continued saturation. If the soil shows no signs of drying after a week, you may need to consider further interventions, such as installing drainage pipes or re-evaluating your chosen soil amendments.
Step 4 – Mulch Around Strawberries for Rain Protection
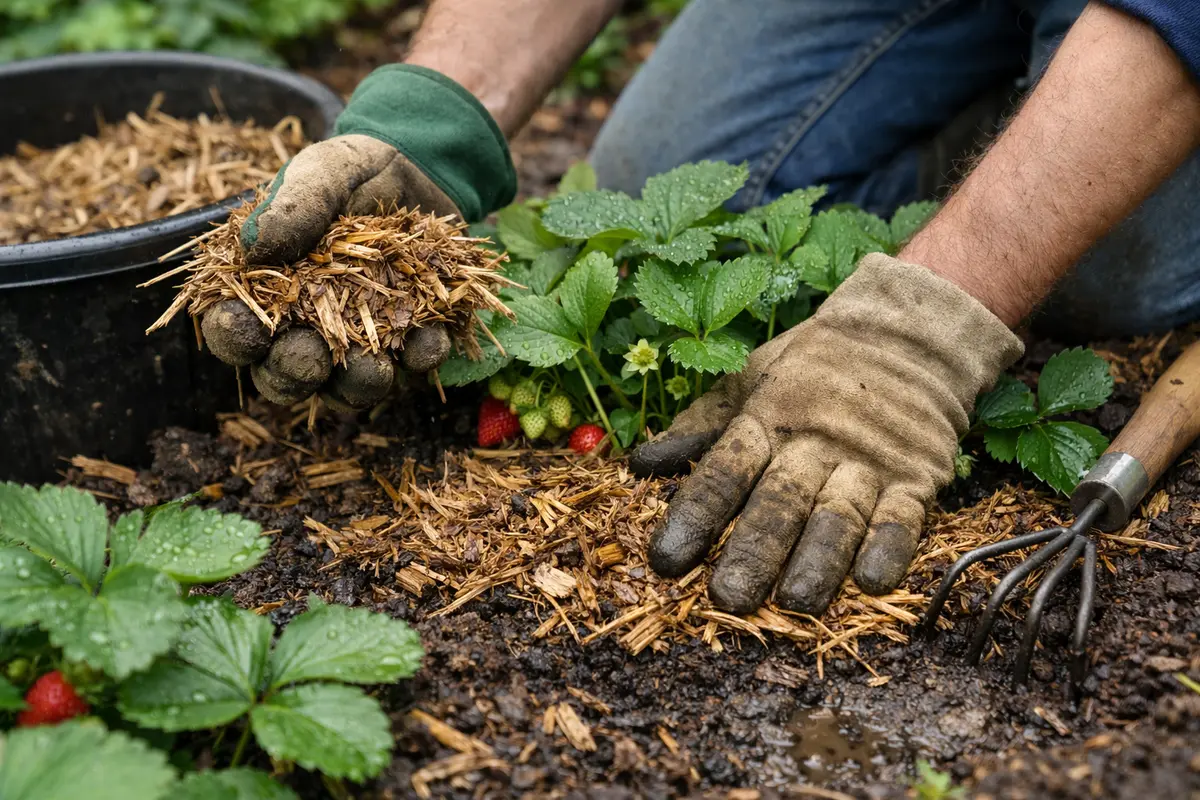
Apply a layer of mulch around your strawberry plants to help regulate soil moisture and protect the roots from excessive rain. You will notice improved soil conditions and moisture retention as mulch acts as a barrier against water runoff and evaporation. This practice helps maintain soil temperature and moisture levels, offering a more stable environment for your plants. Additionally, mulching also suppresses weed growth, which can compete for important nutrients and moisture, especially during the rainy season.
Using organic mulch like straw, wood chips, or dried leaves can significantly reduce soil erosion caused by heavy rains while also preventing excess moisture from lingering near the roots. The decomposition of mulch not only enriches the soil by adding organic material but also increases microbial activity, further enhancing growth and vigor. Over time, this layer benefits the soil structure, allowing it to hold moisture appropriately without becoming overly saturated. Depending on local climate conditions, regular checks should be made to replenish mulch, especially in regions with heavy rainfall where the mulch layer could wash away quickly, exposing soil to further erosion.
A common oversight is failing to apply sufficient mulch; aim for a minimum thickness of at least 3 inches to effectively suppress unwanted weeds, control moisture levels, and maintain temperature stability. In regions with high rainfall, consider increasing the mulch depth slightly to combat intense runoff and to protect the soil beneath from excessive moisture. Frequent monitoring of how well the mulch holds during heavy rain episodes will be beneficial. If the mulch shifts or diminishes in depth, additional applications may be necessary to maintain a protective barrier over your strawberry plants, thus preserving both soil health and moisture levels.
Step 5 – Inspect Soil Moisture Levels Weekly
Check the soil moisture levels around your strawberry plants at least once a week to monitor water retention and prevent future sogginess. You should observe a noticeable improvement in soil drainage when conditions are right; the soil will feel moist but not adversarially waterlogged. This regular inspection ensures that your plants receive the right moisture balance for healthy growth. When soil moisture is consistently monitored, you’ll be able to identify emerging threats before it escalates into a more significant problem.
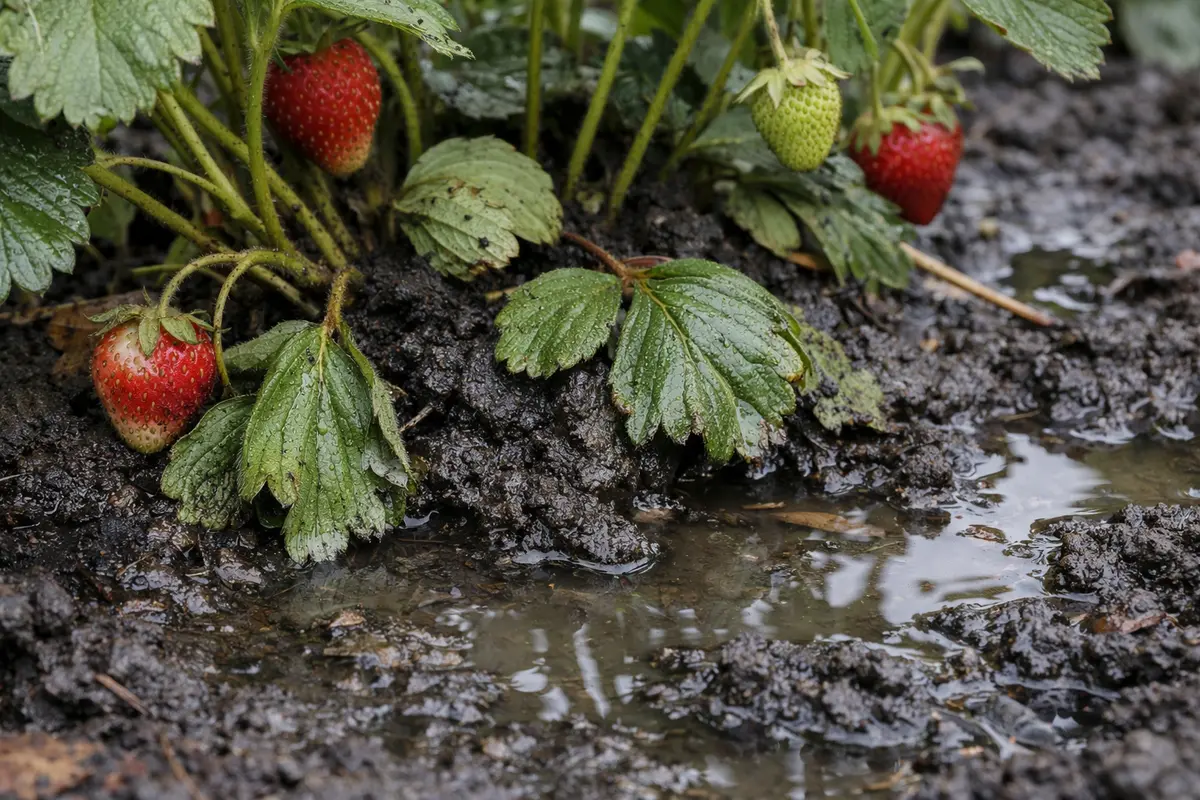
A fully recovered soil should maintain a crumbly texture, ideally resembling damp but not drenched clumps that break apart easily. Early signs of the problem returning manifest as compacted, muddy areas around the base of the plants. Healthy roots coupled with regular moisture checks also lead to improved leaf vigor and fruit development. Conversely, signs of stress, such as wilting or yellowing leaves, indicate that you need to address the moisture situation again promptly. After heavy rainfall, even slight compaction can signify distress and necessitate immediate investigation for further drainage solutions.
If the problem returns despite your efforts, consider re-evaluating soil amendments or drainage strategies. It may also be prudent to check if nearby structures, landscaping features, or drainage systems are obstructing proper water flow away from your garden. Continuous monitoring not only helps you stay ahead of potential issues but can also guide future planting strategies and soil management practices. If water levels remain high for extended periods, or if you notice repeated waterlogging, it may be advisable to consult with a gardening expert to explore more in-depth solutions, such as modifying garden slopes, grading, or installing proper drainage systems.
FAQ
How long will it take for my strawberry plants to recover?
Typically, strawberry plants can show signs of recovery within one to two weeks after addressing soggy soil conditions. If the soil is amended properly with organic matter and drainage measures are implemented, you should see new growth appear as roots re-establish themselves. However, the timeline may extend if the excess moisture has caused extensive damage to the root system, in which case some plants may require additional time to bounce back or may need to be replaced.
Can soggy soil spread disease to my strawberry plants?
Yes, soggy soil can lead to root rot and other fungal diseases that negatively impact strawberry plants. Prolonged moisture creates an environment conducive to pathogen development, which can quickly spread throughout your plants if not managed effectively. Being proactive about soil moisture not only sustains plant health but also minimizes the risk of disease outbreaks, which can save your entire crop from potential loss.
Should I remove any affected strawberry plants?
If some strawberry plants show severe signs of rot or disease, it’s best to remove them to prevent further spread of issues to healthy plants. Always inspect your remaining plants for early signs of distress and take appropriate action as soon as possible. Keeping a close eye on surviving plants can help avert further infestations, protect your strawberry crop, and maintain the integrity of your garden overall.