You may notice your ivy starting to droop and develop yellowing leaves, particularly after a period of heavy rain, which is why you need to know what to do when your ivy shows signs of root rot. This condition usually stems from overwatering, leading to mushy roots that can’t effectively supply nutrients to the plant. Ignoring these signs can worsen the situation and weaken the plant, but fixing it is possible if you inspect the roots and adjust your watering habits accordingly.
Step 1 – Prune Ivy Leaves Showing Root Rot Symptoms
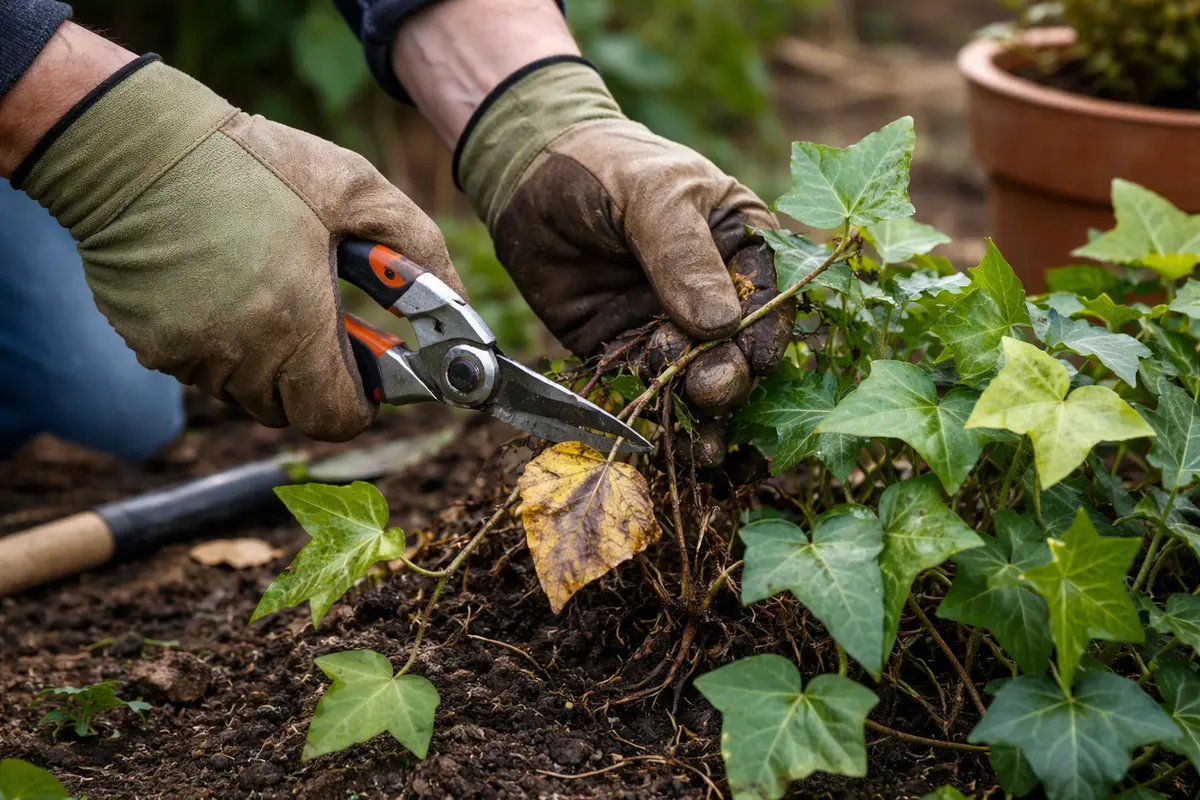
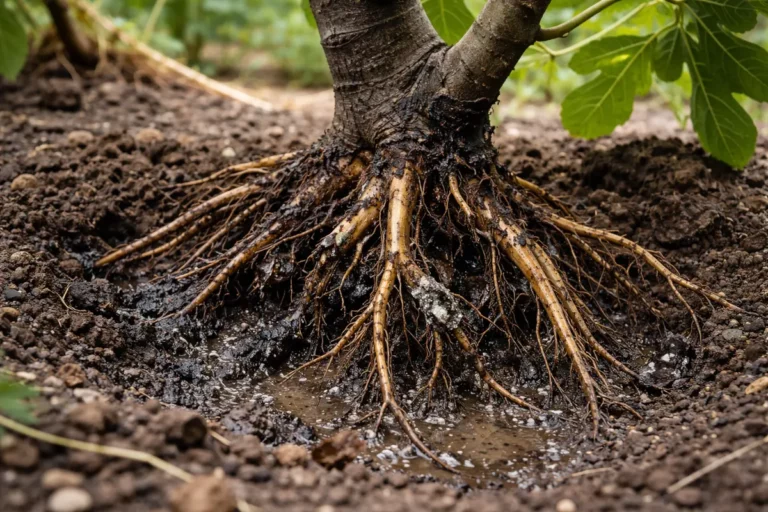
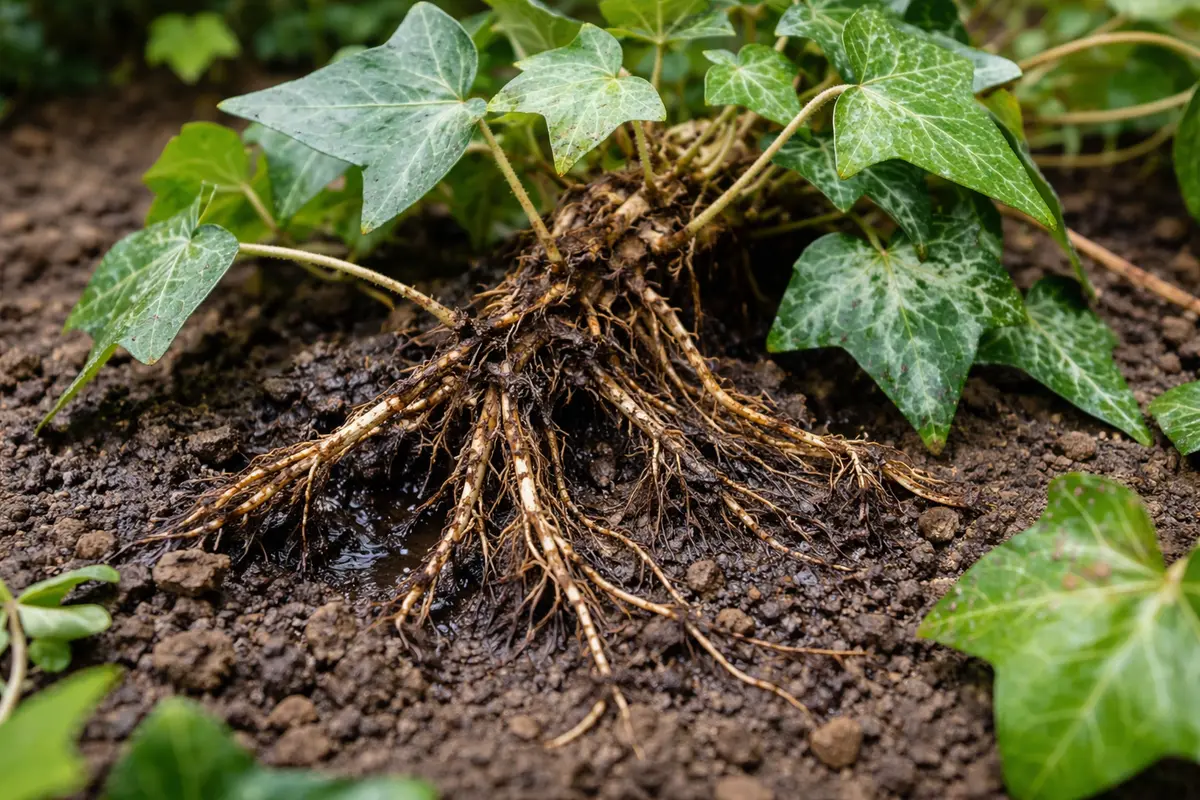
First, remove the ivy from its pot and check the roots for signs of rot, which appear brown and mushy instead of white and firm. Trim away any affected roots with sterilized scissors and repot the plant in fresh, well-draining soil to limit further damage. Within a few days, you should notice the remaining healthy roots taking on a firmer texture, indicating recovery.
Acting quickly is crucial because root rot deprives the ivy of nutrients and water, leading to further decay and eventual plant death if left untreated. When exposed to overly wet conditions, the roots can start to decompose, impairing the plant’s ability to absorb essential elements. If you can’t check the roots immediately and delay, the rot may spread, severely reducing the chance of recovery.
For example, a gardener I know waited too long to address root rot in her ivy, leading to a complete loss of the plant. Conversely, another gardener noticed the early signs and acted swiftly, successfully saving his ivy by making timely cuts and repotting it. If you see brown roots but haven’t noted any leaf discoloration, act now; if leaves are yellowing, you may need to assess other underlying issues.
Acting fast is crucial because leaves affected by root rot can spread fungal infections to the rest of the plant. These infected leaves drain resources from the healthy parts, exacerbating the issue. By cutting away the damaged sections, you help the plant focus on recovery, which is essential amid conditions that may still encourage rot, such as high humidity and poor air circulation. Ideally, you should aim for a clean cut, keeping your pruning shears sterilized to avoid transferring any pathogens.
A common mistake is waiting too long to prune; this often leads to further damage. If left unattended, the rot can reach the stems or even lower parts of the plant, making recovery much more difficult. Cutting off just a few yellow leaves may not be sufficient if the condition is more widespread. Ideally, address noticeable symptoms right away, particularly during high-humidity periods following heavy rain. If you see other indications of distress, like darkened stems, be proactive in cutting those sections as well. Do not hesitate to remove 20% or more of the foliage if needed to assist recovery.
Step 2 – Diagnose Causes of Ivy Root Rot Issues
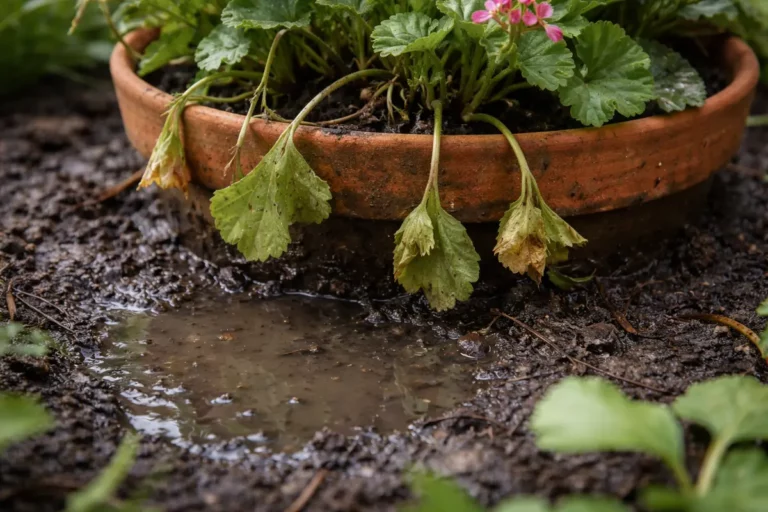
Check the soil moisture level to confirm root rot. If the soil is soggy and has a sour smell, it’s likely the roots are drowning, prompting you to take corrective action. Use a moisture meter if available; this tool can provide a precise reading that helps avoid over- or under-watering. If you don’t have a meter, inserting a finger two inches into the soil can also give you an indication—if it feels wet at that depth, water retention is an issue.
Root rot occurs when the soil remains excessively wet, depriving roots of oxygen. Overwatering is the most frequent cause, usually exacerbated by containers without proper drainage. Immediate detection allows you to implement exposure corrections, enabling the plant to recover from excess water retention. If it’s clear that excessive moisture is to blame, adjusting your watering technique is essential. For example, reducing your watering frequency to once every two weeks can allow for proper drying. A drastic change can shock the plant, so any adjustment should be gradual to avoid additional stress.
If the soil appears dry yet produces a foul smell, examine for root discoloration. Healthy roots should feel firm and appear white; mushy, brown roots can indicate severe damage. If symptoms are mild, consider just changing the watering schedule, perhaps waiting 10-14 days between watering to allow for drying. However, if your plant shows significant root damage, consider repotting it to fresh, well-draining soil as soon as possible. In severe cases, you may need to remove the worst-affected roots to save the plant. Ensure you use clean, sharp tools to prevent introducing pathogens during this process.
Step 3 – Adjust Watering to Help Ivy Recover
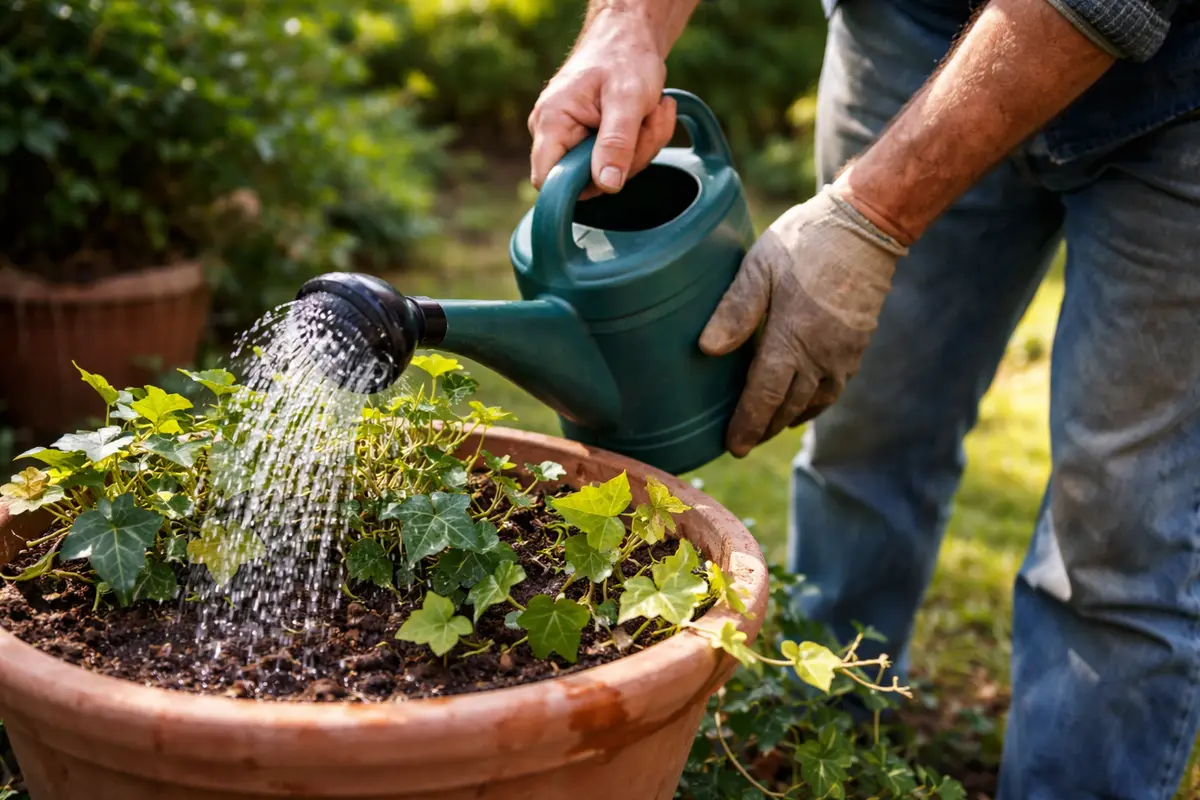
Reduce watering frequency and check soil moisture regularly. You should begin to see healthier, green growth within a few weeks as roots recover and establish themselves again. Aim for a watering schedule that allows the top inch of soil to dry out before adding more water. A good practice is to monitor soil moisture at least once a week, adjusting based on prevailing environmental factors such as season and humidity.
Allowing the soil to dry out between waterings is essential, as ivy roots thrive in moist but not saturated conditions. Overwatering not only contributes to root rot but often delays recovery due to soft, decomposed roots, typically observable during root inspection. A balanced watering pattern can revive healthy root structures, allowing them to absorb nutrients more effectively. Aim to water in the morning so the plant has the day to utilize that moisture; evening watering can often lead to prolonged dampness.
One common mistake during recovery is to overcompensate with water or fertilizer. If you notice a lack of immediate improvement, resist the temptation to flood the soil; this may worsen symptoms. Ensure that drainage holes are not clogged; if they are, improve drainage by repotting using a fresh soil mix. If leaves begin to droop again, adjust the amount of water gradually instead of making abrupt changes to the routine. Ensuring that the environment is conducive for recovery by providing adequate sunlight and maintaining a consistent watering schedule without saturating the soil is essential.
Step 4 – Provide Optimal Drainage to Prevent Root Rot

Start by ensuring your ivy is planted in well-draining soil and using a pot with adequate drainage holes. Avoid overwatering and allow the top inch of soil to dry out before rehydrating to prevent root rot from developing again.
Excess moisture and poor drainage are the main culprits behind root rot in ivies, often manifesting as yellowing leaves and wilting. By maintaining a proper watering schedule and re-evaluating your potting mix for drainage, you reduce the likelihood of creating a soggy environment that encourages disease.
In cooler months, adjust your watering frequency according to lower light and cooler temperatures which can slow down the plant’s growth. If you notice the soil remaining damp for longer periods, switch to a lighter potting mix that promotes faster drainage during colder seasons.
Containers with inadequate drainage retain water, leading to soggy soil conditions that can reintroduce root rot. Incorporating a well-draining potting mix and adding sand or perlite enhances soil aeration, allowing excess water to escape easily. Aim for about 30% perlite or sand mixed into your potting soil to improve drainage characteristics. While healthy ivy plants can cope with some moisture, prolonged exposure to wet conditions can put them at risk of further damage, particularly in root rot-prone species like certain Ivies.
In colder months, be mindful of decreased water evaporation. Adjust your watering routine accordingly, as soil moisture can be retained longer in cooler temperatures. Pay special attention during winter when indoor heating may also alter humidity levels. If possible, ventilate your growing area to prevent moisture buildup. Additionally, if your ivy is outdoors, consider a sheltered location that avoids excessive rain exposure during winter months. One common mistake is assuming water uptake will remain constant regardless of temperature, leading to soggy soil conditions. Monitor the environment closely and alter care accordingly.
Step 5 – Check Ivy Roots for Signs of Improvement Regularly
Start by examining the soil moisture around the ivy and gently remove the plant from its pot to inspect the roots for dark, mushy areas indicative of root rot. Observe the scent of the soil; a sour odor often signals decay. Check the root zone every week for further signs of improvement, watching for new healthy root growth that should appear as light-colored and firm, distinct from the dark lesions often caused by diseases.
A fully recovered ivy will display vibrant, green leaves with a slight sheen, contrasting starkly with the droopy, yellowing foliage typically seen when disease is present. If you notice a return of wilting or blackened roots, the texture of the leaves will also feel limp and soft compared to the robust stiffness of a thriving plant. If not this, check the roots for any newly developed dark spots that may suggest a resurgence of root rot.
If the disease reoccurs despite following the previous steps, consider re-potting the ivy with a fresh, well-draining soil to eliminate any lingering pathogens. Alternatively, treat the plant with a fungicide specifically designed for root rot diseases, applying as directed on the label. If symptoms persist, seek advice from a local nursery or gardening expert to find targeted solutions for your particular situation.
With consistent care, you should observe new growth starting to emerge, indicating the plant’s recovery. Pay attention to the overall vigor of the plant; leaves should begin to perk up while maintaining a bright green hue. If you start seeing yellowing leaves again after initial recovery, this might signal that rot is returning due to poor drainage or excessive watering, reflecting the importance of consistent environmental checks. Observing growth patterns can give you insights into how well your ivy is responding to care adjustments.
If symptoms show signs of returning, reevaluate your watering schedule and soil condition. Check if the soil is compacted or if the drainage holes are blocked; excess moisture here can easily reverse all recovery efforts. Additionally, if you notice persistent issues despite these adjustments, it may be time to consider repotting into fresh soil to fully rejuvenate the plant’s environment. Consistently checking conditions will help catch any issues before they escalate further, ensuring proper light exposure during this phase is also crucial for growth.
FAQ
How can I tell if my ivy is recovering from root rot?
You’ll know your ivy is recovering when you see new growth and firm, white roots. Leaves should regain their vibrant green color and start to perk up slightly within a few weeks of adjusting care. Look for small, healthy shoots emerging from the main stems as an encouraging sign. Additionally, check for an increased frequency of root hairs as further evidence of root regeneration.
Can root rot spread to other plants nearby?
Yes, root rot can spread if it goes untreated. Fungal spores can travel through the soil, potentially affecting other nearby plants, especially if they share the same water source or soil structure. It’s prudent to monitor all nearby plants and ensure they are not showing similar symptoms. If you identify root rot in one plant, it might be wise to isolate that plant until you can ensure the problem won’t spread.
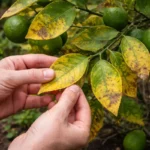
Why do the leaves on my ivy keep turning yellow after I fix watering issues?
Yellow leaves can result from nutrient deficiencies or environmental stress, such as inadequate light. Ensure your ivy is in bright, indirect lighting and consider fertilizing if symptoms persist after you’ve corrected the watering routine. A balanced fertilizer can assist in restoring nutrient levels. If the soil remains compacted, roots may be unable to access nutrients despite a proper watering regimen.