You may notice your potted herbs looking particularly droopy or yellowed during the sweltering summer months, which is why you need to know how to treat root rot in potted herbs during summer. This condition often arises from overwatering or poor drainage, leading to mushy roots and visible damage on the plant. If ignored, root rot can worsen and weaken the plant, making recovery harder to fix. Fortunately, you can tackle this issue now by inspecting your herbs, reducing water levels, and improving drainage to promote healthy growth.
Step 1 – Trim Affected Herb Stems Immediately
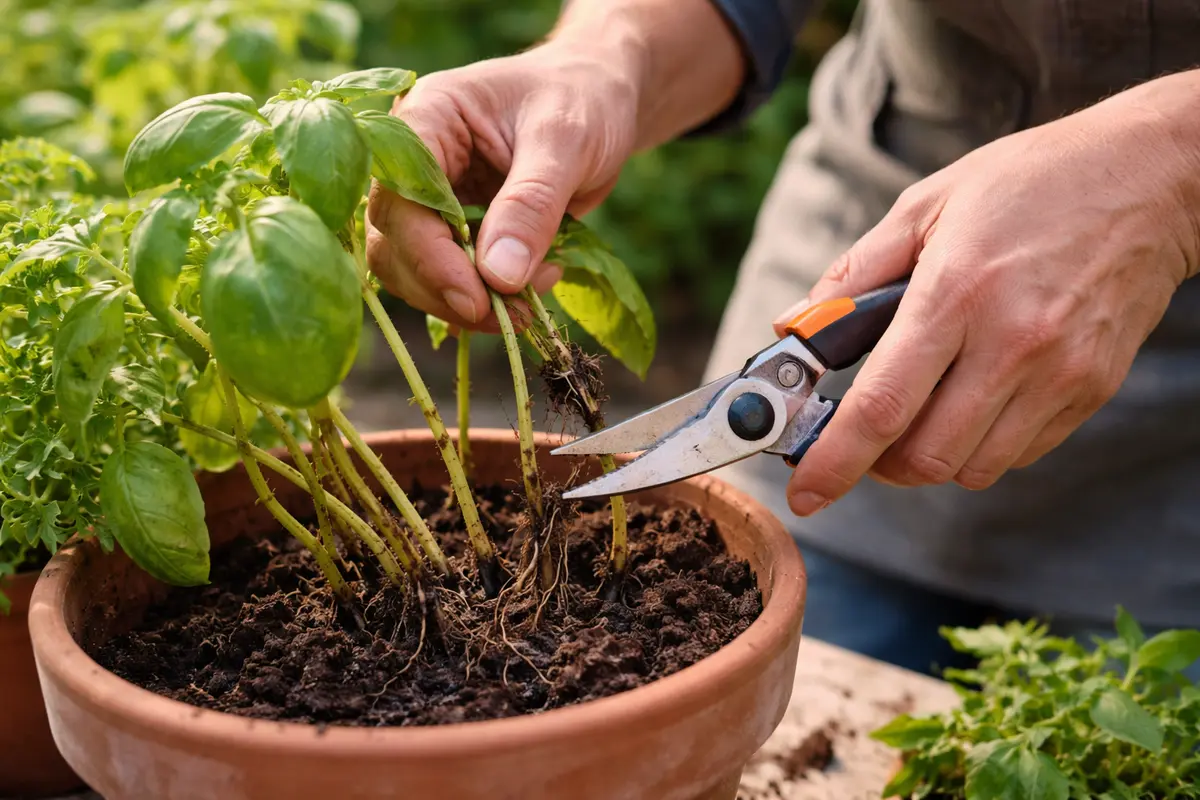
Trim any visibly affected stems and leaves of your herbs right away. You will see a significant reduction in decay signs within a few days as healthier foliage remains intact. Aim to cut above any leaf node to promote regrowth. This focused trimming encourages the plant to redirect its energy toward areas capable of recovery.
Removing the damaged parts prevents the spread of root rot caused by the decay of affected tissue. This immediate action allows the plant to concentrate its resources on the healthier sections, promoting recovery where possible. If you wait too long, the problem can escalate, causing the rot to reach healthy tissue and defeat your recovery efforts. Regularly assessing the plant during summer helps identify affected areas quickly; the sooner you react, the better chance you have at saving your herbs.
A common mistake many gardeners make at this stage is neglecting to check the lower parts of the plant, where rot often originates. Trimming only what is visible can result in the underlying problem persisting, so be thorough in your assessments. If your plant is larger, consider using clean, sharp scissors to make precise cuts. In my experience, checking the entirety of the plant at this stage saves a lot of potential losses down the road. Make sure the tools are sterile to prevent introducing more pathogens into the plant. Furthermore, if you notice a brown or mushy area, it is vital to cut that part away immediately to prevent it from affecting nearby healthy tissue.
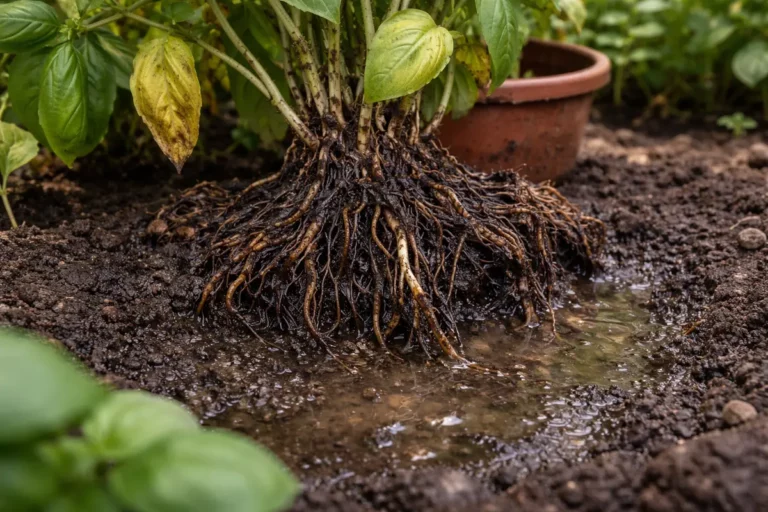
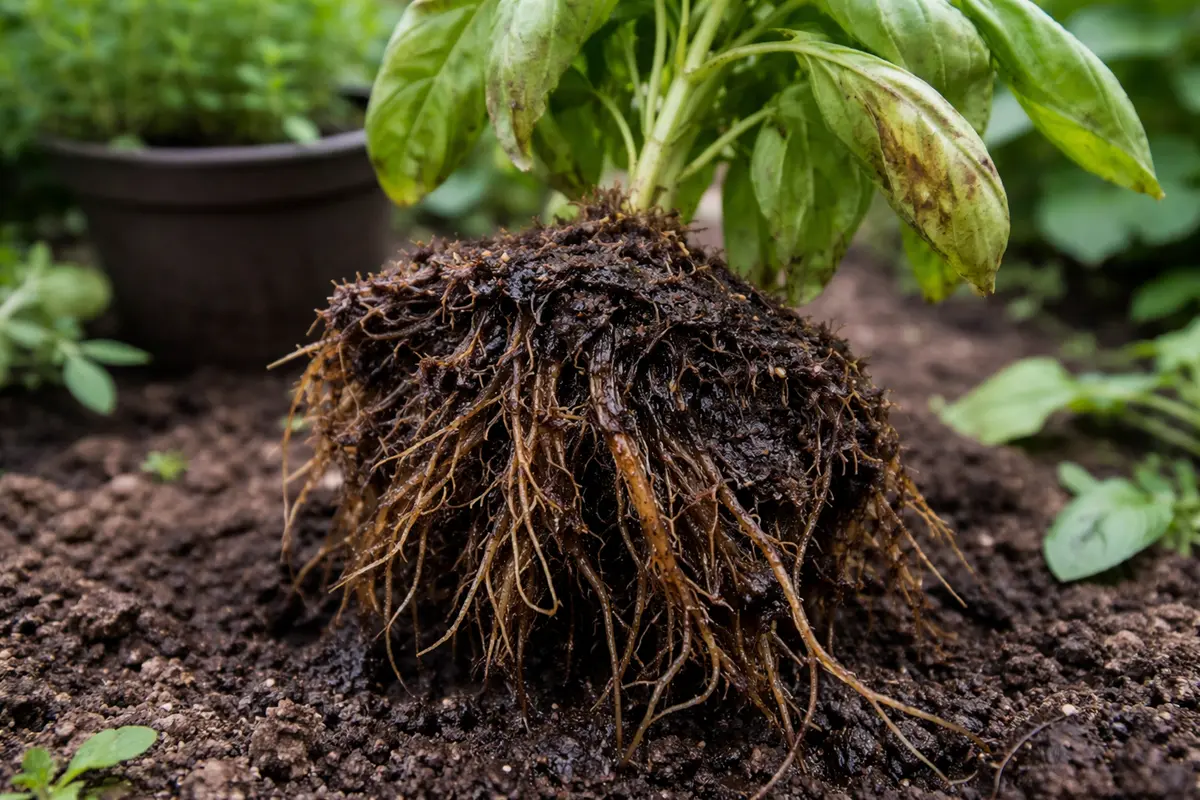
Step 2 – Assess Roots for Standing Water Issues
Examine the roots for excessive moisture or standing water immediately. You will notice whether the roots are firm and healthy or mushy and brown, indicating rot. This assessment should ideally happen a few hours after any recent watering to see if moisture is still present in the pot, allowing a clearer picture of the current soil conditions.
Identifying the moisture levels is crucial as overwatering typically leads to the root rot condition. Healthy roots should feel firm and have a light earthy scent, while rotting roots will likely be dark and have a foul odor. Taking immediate action can prevent further degradation; however, if left unaddressed, continued root saturation will kill the plant completely. Roots that smell sulfurous are a clear sign of anaerobic conditions, which disrupt normal root function. Additionally, make a point to regularly check the drainage holes—if they’re blocked, this could further exacerbate the issue, trapping moisture around the roots. Check for any obstructions like soil clumps or debris that could prevent proper drainage.
If you discover standing water in the pot, consider repotting your herbs into a more well-draining soil mixture, such as a horticultural mix that includes sand or perlite to improve aeration. You should also immediately evaluate your watering practices; if you tend to water on a fixed schedule, adjust it based on the growing conditions of the day and tactile feedback from the soil. If the soil smells sour, it may indicate anaerobic conditions, leading to root rot. Removing the plant for inspection and repotting becomes necessary to avoid further decay. It is advisable to allow the roots to air out for a few hours before repotting them in a fresh mixture. By allowing the plant to dry out and assessing root health, you’ll bolster your chances of saving your herbs.
Step 3 – Revive Herbs with Enhanced Drainage Solutions
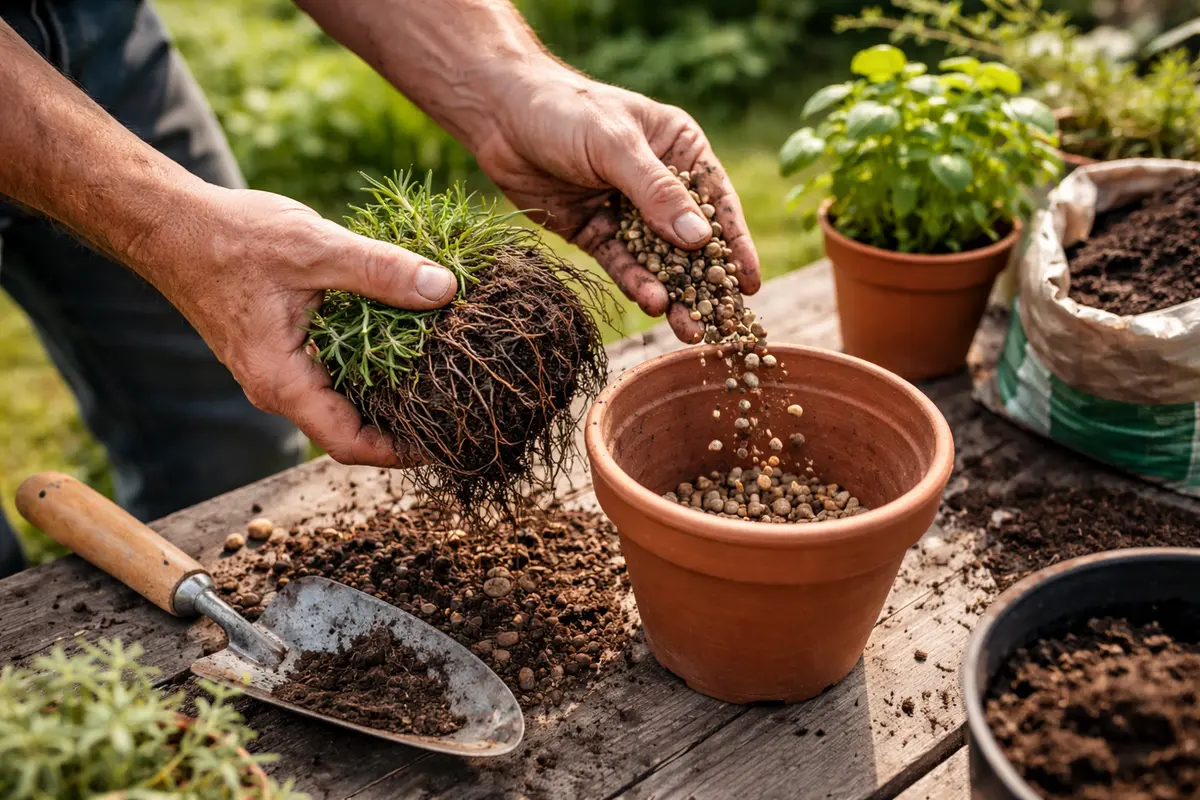
Start by removing the potted herb from its container and gently shaking off any excess soil to expose the roots. Trim away any black, mushy roots using sterile shears, ensuring you leave healthy, white roots intact. Within a few days, you’ll notice the remaining roots beginning to look firmer and healthier, indicating the start of recovery. Healthy roots are critical as they absorb nutrients and water effectively, so improving their condition is essential.
Recovery from root rot can take anywhere from a week to several weeks, depending on the extent of damage and the herb type. For instance, basil may show new leaf growth within a week, while rosemary could take longer, even up to a month. Optimal conditions like warm temperatures, bright but indirect sunlight, and well-draining soil can speed up this process. Keep an eye on the conditions; if you notice no change after a week, check the moisture level in the soil; it may be too wet, stunting recovery.
Avoid overwatering or adding extra fertilizer during recovery as this can exacerbate root rot symptoms. Some potted herbs, like thyme, are particularly sensitive; they thrive on drier soil compared to more moisture-loving variations like mint. If the leaves appear shriveled instead of perky after treatment, check if the soil is soggy, as this indicates insufficient drainage rather than nutrient deficiency. Recognizing these subtle indicators is crucial; the plant’s recovery hinges on the balance of moisture it receives. Also, consider placing the herb in a spot with adequate air circulation to aid in evaporation and promote root health.
Enhancing drainage is vital to prevent future root rot incidents as it allows excess water to escape, maintaining a healthy moisture level around the roots. When roots are kept in consistently moist soil, they are deprived of oxygen, leading to degradation. By improving drainage, you ensure that the roots receive both the water and air they need to thrive. Additionally, consider using a pot with drainage holes if the current one lacks them; any stagnation in water can be detrimental. If you can’t repot the herb, elevate the pot with a few rocks or pot feet to facilitate air circulation and drainage. A common mishap during this recovery process is overdoing fertilizer in a bid to quickly revitalize your herbs. This can overwhelm already stressed roots; fertilizer should be introduced only after the plant shows signs of recovery. This approach fosters a gradual recovery rather than instantaneous pressure on the sensitive botanicals.
Step 4 – Water Potted Herbs Wisely in Hot Weather
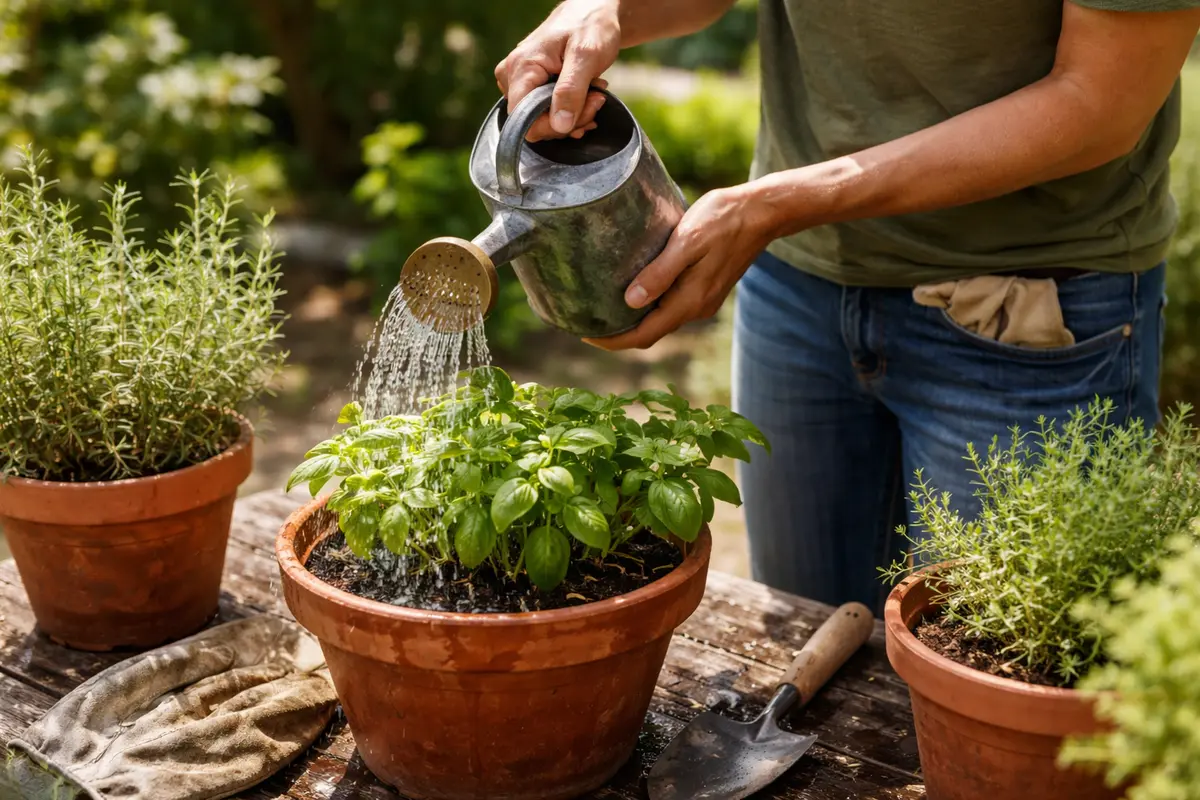
Water your potted herbs deeply but infrequently to foster deep root growth. This method allows for a consistent moisture level without oversaturation; you should notice a healthier growth pattern following this new routine. Watering should be done in the early morning or late evening to minimize evaporation and maximize absorption. Allowing the water to penetrate deeply encourages the roots to search deeper in the soil for moisture, improving their resilience.
During the hot summer months, it is essential to monitor soil moisture levels carefully. The roots of potted herbs can dry out quickly, leading to stress if the plant is underwatered or decaying if it’s overwatered. Employing a moisture meter can help provide a clear measurement of the soil’s condition, which is especially useful if you struggle to gauge dryness with touch alone. By establishing a watering regime that balances moisture with drying periods, you promote optimal growth and reduce the risk of root rot recurrence. Furthermore, adjusting your watering amounts based on accurate environmental conditions, such as humidity and temperature, will lead to greater success; for instance, hotter days often necessitate more frequent checks. If possible, also consider grouping pots together, as this microclimate can help retain moisture, but be mindful not to overcrowd them if one shows signs of rot.
If you find your herbs are experiencing extreme heat, consider temporarily relocating them to a more shaded area where they can still receive indirect sunlight. This can be especially beneficial for younger plants, which are more susceptible to sudden temperature shifts. If you do not notice improvement after adjusting soil moisture and shading, it may indicate that the pot size is inappropriate or that the current potting mix is too heavy, necessitating further changes. Ensure you’re assessing not only water levels but also the overall environment where the herbs are growing. An occasional light misting alongside properly timed watering can also support rejuvenation during peak heat.
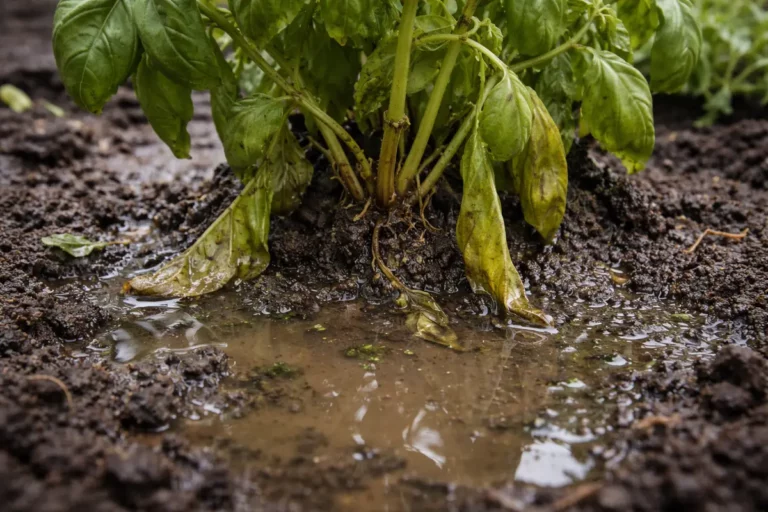
Step 5 – Inspect Herb Roots for Fresh Signs of Rot
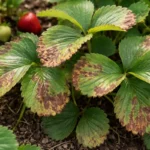
Start by checking your potted herbs at least every few days for early signs of disease, particularly wilted or yellowing leaves and an unpleasant, sour odor from the soil. Observe the root system by gently removing the plant from its pot; diseased roots often appear brown, mushy, or have black spots. These signs indicate the early stages of rot infection, which must be identified promptly for the best chance of recovery. Be vigilant, as the longer rot is allowed to progress, the harder it becomes to reverse.
A fully recovered plant will showcase vibrant, green foliage with sturdy stems and roots that appear white and firm. In contrast, if disease returns, you might notice yellowing leaves or a slimy texture on the roots, indicating ongoing rot. If the leaves droop and lack turgor, re-examine the root system; dark spots suggest that the issue may be returning. If you see swelling at the base of stems, this indicates moisture retention and stress. Frequent inspections will enable you to catch any potential problems in their infancy, allowing for rapid countermeasures.
If the problem returns despite taking precautions, consider removing and replacing the contaminated soil and rinsing the roots with clean water to eliminate remaining pathogens. Fresh, disease-free soil will offer your herbs a healthier foundation when repotted. If symptoms persist, escalate the situation by isolating the affected plant; applying a targeted fungicide may be necessary to curb the disease’s spread. Be cautious during this application; follow the instructions closely to avoid harming your plants further.
A fully recovered plant will exhibit bright, green leaves and healthy stems, showing no further signs of wilting or discoloration. Ensure that any regrowth happens at the points you trimmed; this signifies that the plant is redirecting energy to heal and regrow. On the contrary, early indications of returning rot may manifest as yellowing leaves or softness at the stem base, signaling a need for immediate action. Regular checks help catch any issues early allowing you to act quickly before the damage exacerbates. If signs of rot reappear, use sharp scissors to trim any affected materials and revisit your watering and drainage protocols.
If you do notice signs of rot returning, consider repeating earlier steps such as trimming affected parts and improving drainage. It may also be necessary to reassess your watering routine or the potting soil used, shifting to a mix that enhances drainage. Proliferation of rot can happen quickly if the watering frequency hasn’t been adjusted adequately; take care to let the soil dry out as needed between watering to ensure root health. Keeping a close eye on your plants and adjusting conditions as needed will facilitate their ongoing health. The interactions between water exposure, soil quality, and plant resilience form an intricate balance critical to the maintenance of healthy herbage.
FAQ
How long does it take for herbs to recover from root rot?
Recovery from root rot can take anywhere from a few days to a few weeks, depending on the extent of the damage and conditions. After making the necessary adjustments, watch for new growth or improvement in existing leaves, indicating vitality. In cases of severe rot, recovery may be slower; however, be sure to remain vigilant with care to facilitate gradual healing.
Can root rot spread to other herbs in the same container?
Yes, root rot can spread through shared soil moisture and contact, particularly if the roots of the affected plant touch others nearby. It’s crucial to isolate the affected plant and take immediate actions to prevent the problem from spreading. Regularly changing the soil and keeping containers clean can also help mitigate cross-contamination issues, aiding in overall plant health.
Should I remove all affected parts of the plant?
Yes, all visibly affected leaves and stems must be removed to limit the spread of rot. However, be sure to leave healthy sections intact to give the plant a chance to recover. Always inspect the roots to ensure the base is sound before deciding how much to trim away. Remember to ensure your cutting tools are sanitized to avoid introducing new pathogens through small cuts, further jeopardizing your plant’s recovery. A direct examination will empower you to determine how extensive the trim should be, ensuring as much remains for recovery as possible.