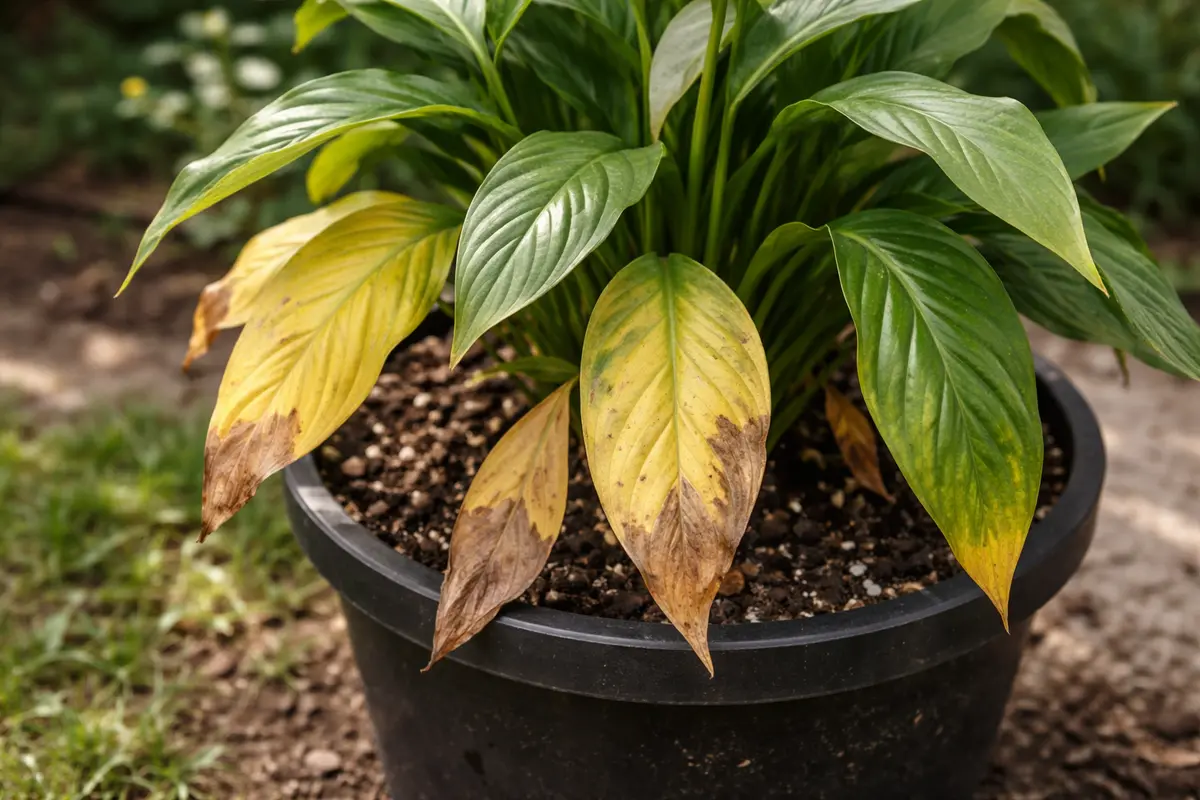
You may notice your peace lily’s vibrant leaves shifting to a dull yellow shortly after repotting, which is why you need to know, “Why is my peace lily turning yellow after repotting.” This yellowing occurs due to stress from root disturbance or inconsistent watering during the transition. If ignored, this issue can worsen, leading to further damage and weakening the plant, but fixing it is possible now by checking the soil moisture and adjusting your watering routine.
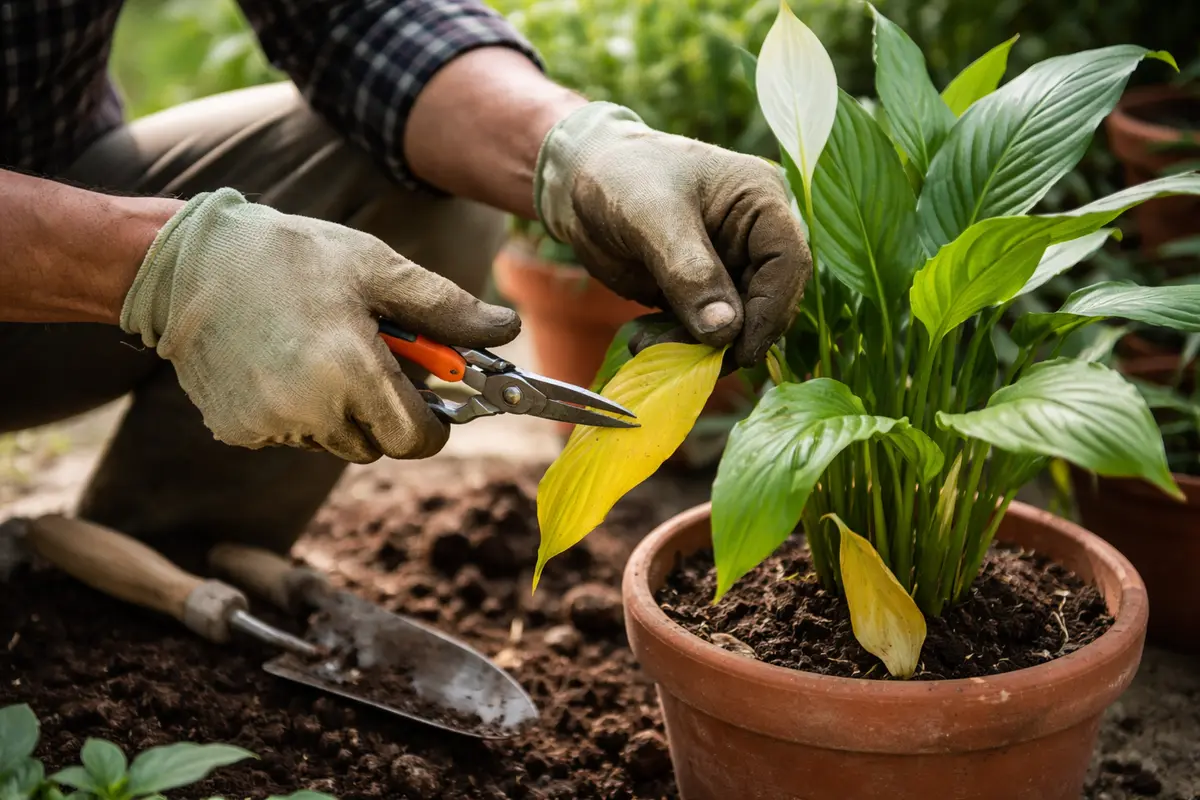
Step 1 – Trim Yellow Leaves from Peace Lily
Start by checking the root ball of your peace lily for signs of overwatering or root rot. Carefully remove the plant from its pot and inspect the roots; they should be firm and white. If you find mushy or brown roots, trim them back to healthy tissue and repot in fresh, dry potting mix while ensuring the pot has proper drainage. Do this promptly, as you should see any remaining yellowing halt if you’ve removed affected roots.
Acting quickly is crucial because peace lilies are sensitive to changes in their environment after repotting. If you delay, the damaged roots can lead to reduced nutrient absorption, ultimately resulting in more leaves yellowing and even drop. Conversely, a healthy, intact root system will promote quicker recovery and prevent further yellowing, highlighting the importance of immediate action.
A gardener might experience significant differences in their plants when they address yellowing right away. For example, one person noticed their peace lily revived quickly after a root inspection, while another allowed theirs to sit with yellow leaves for weeks, ending up with substantial root damage and an even worse state. If yellow leaves persist, check for other issues like inadequate light, as that too can be affecting your peace lily’s condition.
Removing yellow leaves allows the peace lily to focus its energy on healthier foliage and roots. When a plant suffers from stress, it may prioritize survival over growth, leading to yellowing of leaves due to reduced chlorophyll production. Clean cuts made with sharp scissors will minimize damage and allow the plant to initiate recovery faster. Notably, clear signs of improvement can be seen three to seven days post-trimming, as you witness new leaf growth beginning to emerge.
A common mistake gardeners make is waiting too long to remove the yellow leaves, which can lead to increased moisture around the base of the plant and invite pests or root issues. For example, if yellow leaves are left too long, they may harbor fungal spores that can negatively impact the healthy parts of the plant. Trimming the leaves promptly ensures your peace lily has the best chance of focused recovery and reduces the risk of further damage. Additionally, always use sharp, sterilized scissors to avoid introducing bacteria during the trimming process; unsterilized tools can introduce pathogens that complicate recovery, amplifying the stress and yellowing across the plant.
Step 2 – Diagnose Overwatering Causes in Peace Lilies
Check the soil moisture level immediately to determine if overwatering is causing the yellowing. If the soil feels soggy, you need to let it dry out completely before watering again. This can take anywhere from a few days to a week, heavily influenced by the humidity and temperature of your home environment. If you notice the top layer of soil remains wet after a week, it might indicate a drainage issue that needs addressing.
Overwatering prevents the roots from getting the oxygen they need, leading to root rot and the subsequent yellowing of leaves. Peace lilies thrive in well-drained soil; when water accumulates, it creates an anaerobic environment, which can lead to root decay. During the first few weeks after repotting, it’s particularly vital to monitor soil moisture closely, especially right after introducing a new soil mix that may retain moisture differently than the previous one.
If the soil is consistently soggy and exhibits a sour smell, consider repotting the plant into a dryer, well-draining mix while ensuring your pot has adequate drainage holes. A well-draining soil mix might include components such as peat, perlite, or orchid bark to improve drainage effectively. Alternatively, if the soil feels dry but the yellowing persists, inspect the roots for signs of damage or disease, checking for brown, mushy roots indicative of rot. Be aware that letting the soil get too dry followed by over-correcting with too much water can also stress the plant, thus requiring vigilance about moisture levels. For example, if you allowed the soil to dry excessively, followed by a heavy watering, it may shock the roots, compounding the yellowing issue.
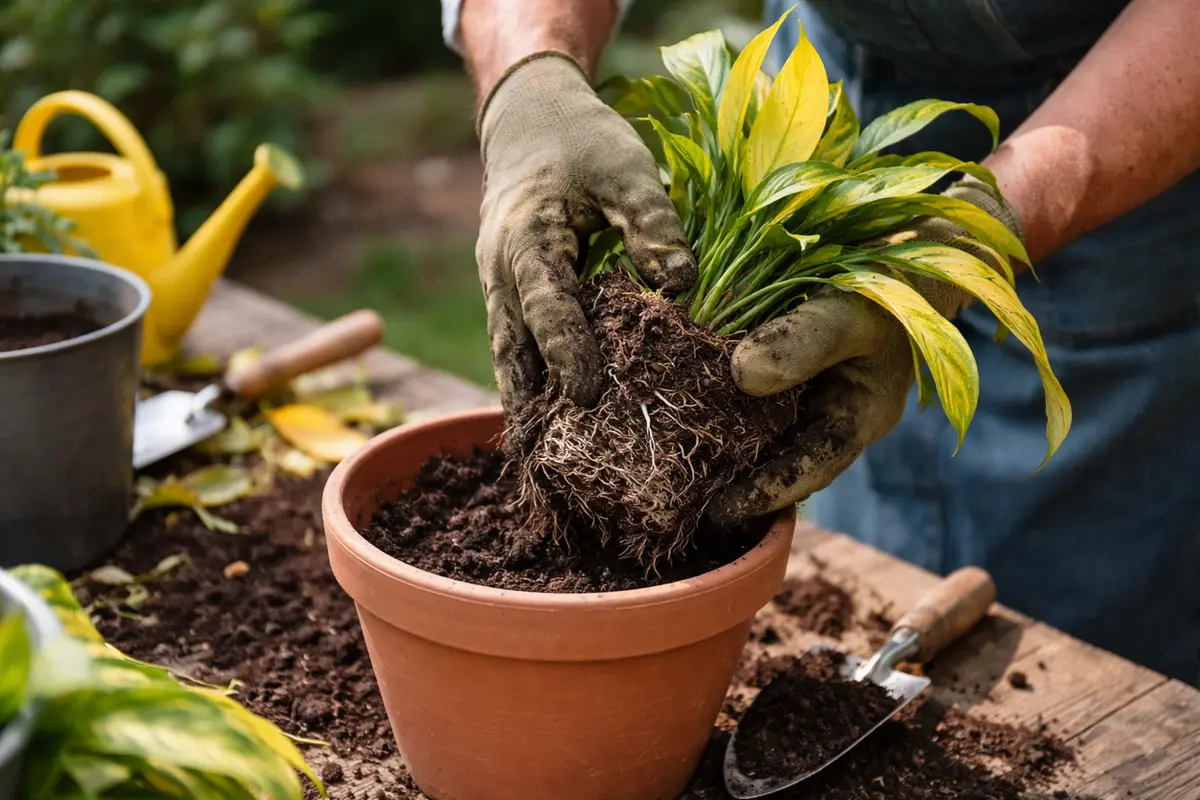
Step 3 – Repot with Fresh Soil for Optimal Recovery
Start by reducing the frequency of watering your peace lily to allow the roots to acclimate to their new potting mix. Monitor the leaves for signs of recovery, such as improved color and firmness, ideally transitioning from yellowing to a healthy green shade within a few weeks.
Recovery takes time, typically around 4 to 6 weeks for a peace lily to fully bounce back. During this period, you should expect to see new leaf growth, which indicates a successful adaptation to the new environment. Conversely, if the yellowing progresses, check for root rot, which can be exacerbated by poor drainage or excessive moisture.
Avoid over-fertilizing your peace lily during recovery, as this can lead to nutrient burn and worsen yellowing. Instead, use a diluted, balanced fertilizer only after you notice new growth. If the plant shows no improvement, check the lighting conditions; too much direct sunlight can hinder recovery, while too little can stall regrowth.
Fresh soil often contains beneficial microbes that aid in plant recovery while also providing essential nutrients. After a repot, the peace lily may struggle due to shock from changes in soil composition or water retention. By introducing a nutrient-rich soil, you can stimulate robust growth and support the plant’s recovery. Incorporating materials such as peat moss or perlite into the mix will enhance drainage and create a breathable root environment, which is crucial for healthy root development.
Acommon pitfall during this process is watering the plant too soon after repotting. To ensure stability, it’s ideal to wait at least a week before watering again, allowing the roots to acclimatize to the new environment. If the initial stress is combined with excess watering, the plant may suffer more than from environmental transitions alone. Additionally, to avoid excessive moisture retention, if you’re unsure about soil moisture, consider the “finger test” by inserting a finger into the soil up to the second knuckle. If it feels cool and wet at that depth, hold off from watering; this precaution helps avoid excessively soggy conditions that lead to root rot.
Step 4 – Water Peace Lily Sparingly to Prevent Yellowing
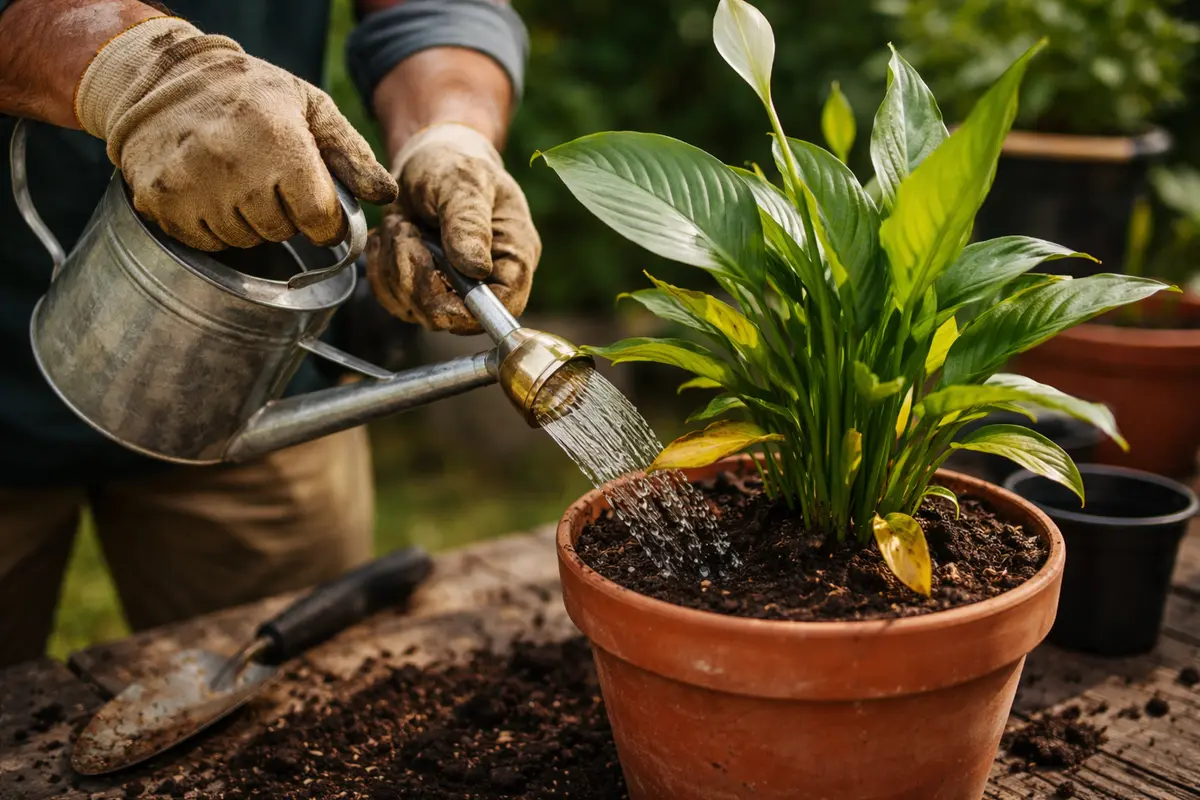
Start by ensuring that your peace lily is not sitting in overly wet soil after repotting; use a well-draining potting mix to see the leaves regain their vibrant green color within a couple of weeks.
Yellowing often occurs when roots are unable to access oxygen due to waterlogged soil, and this can happen especially in heavy, compacted mixes. By using a mix designed for improved drainage, such as one with added perlite, you can significantly reduce the likelihood of recurring yellowing leaves, ensuring that your plant’s roots can breathe easily. If the soil remains soggy post-repotting, check that the pot has adequate drainage holes.
During the winter months, it’s wise to slightly reduce watering frequency since lower light levels can slow down the plant’s growth. As a second layer of prevention, adding a layer of pebbles at the bottom of the pot before repotting can help further enhance drainage and support the peace lily in thriving through seasonal changes.
Overwatering is a frequent issue leading to yellow leaves, but too little water can also send the plant into a stress response, further compounding the yellowing. By establishing a consistent watering schedule, you can ensure that the peace lily receives the right amount of moisture, enhancing its health and diminishing the likelihood of stress-related symptoms. Seasonal factors significantly influence watering frequency; during the summer months, you may find yourself watering more frequently due to higher temperatures and increased evaporation.
Throughout warmer months, increasing humidity around your peace lily can also help prevent yellowing. Increasing humidity might involve misting the leaves or placing a humidity tray filled with water and pebbles beneath the pot. However, during winter, remember to reduce watering as the plant’s growth slows down. Overlooking these seasonal adjustments often leads to overwatering, which could cause immediate yellowing; ensuring you adapt your routine based on observed drying patterns in the soil is critical for maintaining plant health. For example, if you notice the leaves curling or the soil feels constantly damp, it could be indicative that the watering frequency needs immediate adjustment.
Step 5 – Check Leaves for New Yellowing Weekly
Monitor your peace lily’s leaves for new yellowing at least once a week. You should observe visible signs of recovery, such as firm, green leaves and new growth emerging from the plant. Early identification of issues can mitigate further damage and help you gauge the effectiveness of your corrective measures.
As you monitor your peace lily, look for the return of vibrant green leaves as the plant responds to your care. The emergence of new growth is a promising sign that the plant is recovering and can often be witnessed within a few weeks post-treatment. If you observe any new yellowing, inspect soil moisture again and assess your watering habits closely. Adapting your approach based on the plant’s response is essential; for instance, if yellowing reappears despite changes in watering, it may signal a need to evaluate environmental factors such as sunlight exposure, room temperature, and air circulation.
If problems persist, consider consulting a gardening expert or local nursery for deeper issues potentially affecting the plant’s health, such as pest infestations that often go unnoticed until their symptoms appear significantly. Furthermore, regular inspections can help identify any emerging infestations, like spider mites or aphids, which can cause stress and subsequent yellowing if not promptly addressed. Remember to keep an eye out for webs or sticky residue, which can indicate unwanted visitors on your plant.
FAQ
How long will it take for my peace lily to recover from yellowing?
The recovery timeline can vary, but you should see improvements within a few weeks if proper care is resumed. New leaf growth typically indicates that the plant has started to bounce back, often seen within 3-4 weeks. Keeping a consistent care routine during this period is crucial to support recovery and enhance resilience. However, note that older plants or those that have suffered severe yellowing may require additional time to fully rebound.
Should I remove the yellow leaves permanently?
Yes, it is advisable to remove yellow leaves as they can harbor pests and diseases that potentially harm the plant. Removing unhealthy foliage allows the plant to redirect its resources to healthy leaves and roots, fostering better overall health. However, ensure that you are not removing too many leaves at once; excessive trimming can cause additional stress on the plant, potentially resulting in more yellowing. Aim to maintain a balance by taking off only those leaves showing significant yellowing.
Can overwatering cause permanent damage to my peace lily?
Overwatering may lead to root rot, which can be permanent if not caught early. If you notice signs of root decay, such as mushy roots or a foul smell emanating from the soil, immediate action is necessary to save the plant. In cases of severe root damage, it is often crucial to repot with fresh soil and cut away the affected roots to facilitate recovery. The sooner you address these issues, the better chances your peace lily will have to recover fully.