You may notice yellowing leaves and wilting stems on your viburnum during humid months, which is why you need to know how to treat root rot in viburnum during humid months. This condition typically arises from overwatering or prolonged soil saturation, leading to mushy roots that hamper nutrient uptake. If ignored, root rot can spread and weaken the plant, making it harder to fix later on, but you can still improve the situation by inspecting the roots and adjusting watering practices.
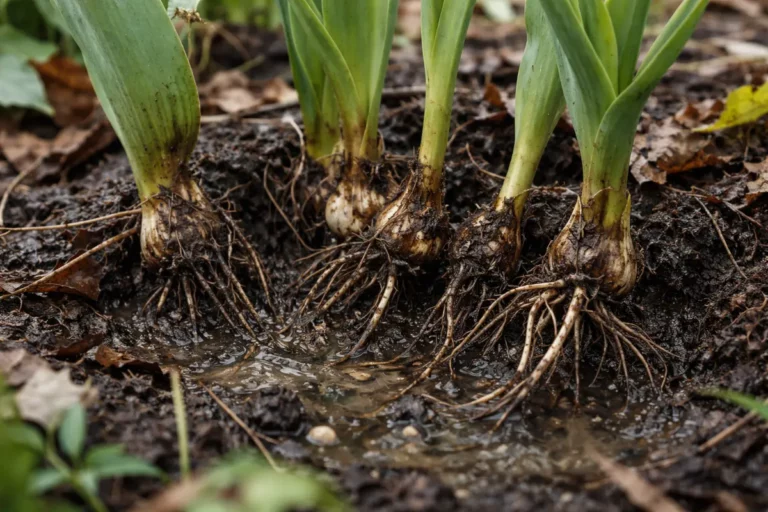
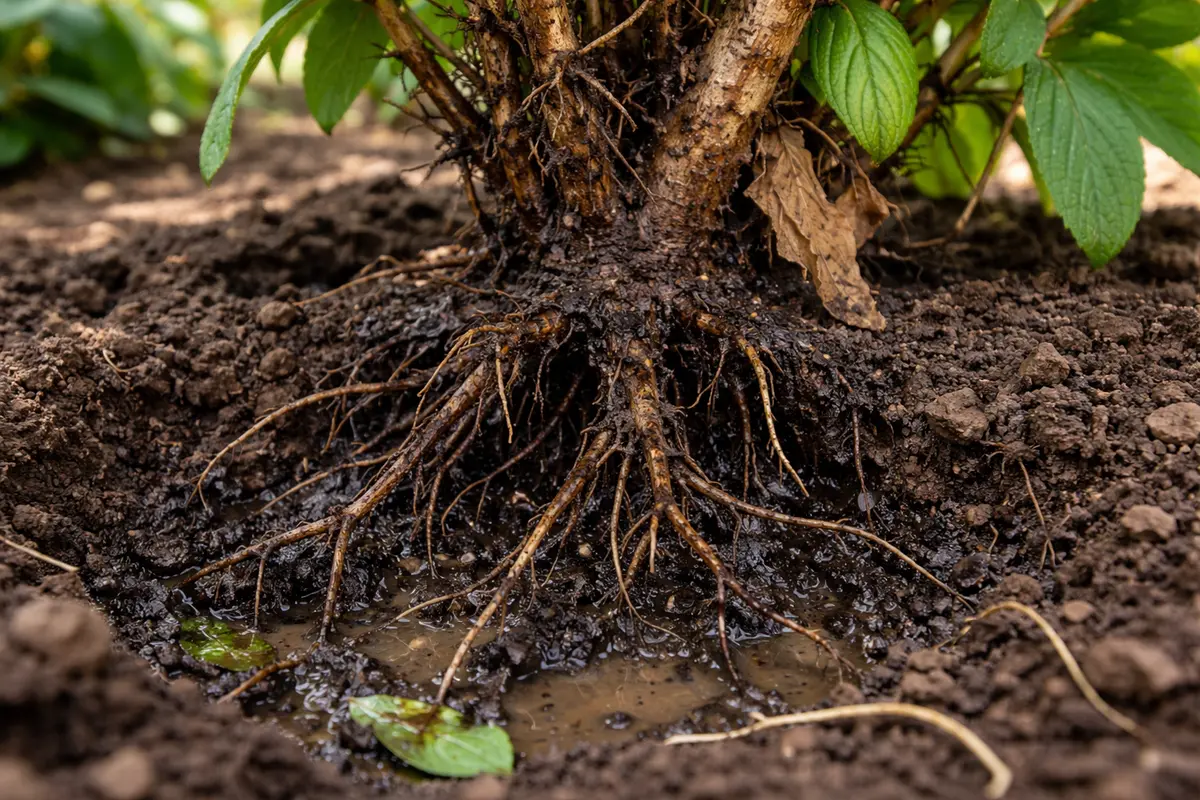
Step 1 – Prune Dead Viburnum Roots Immediately
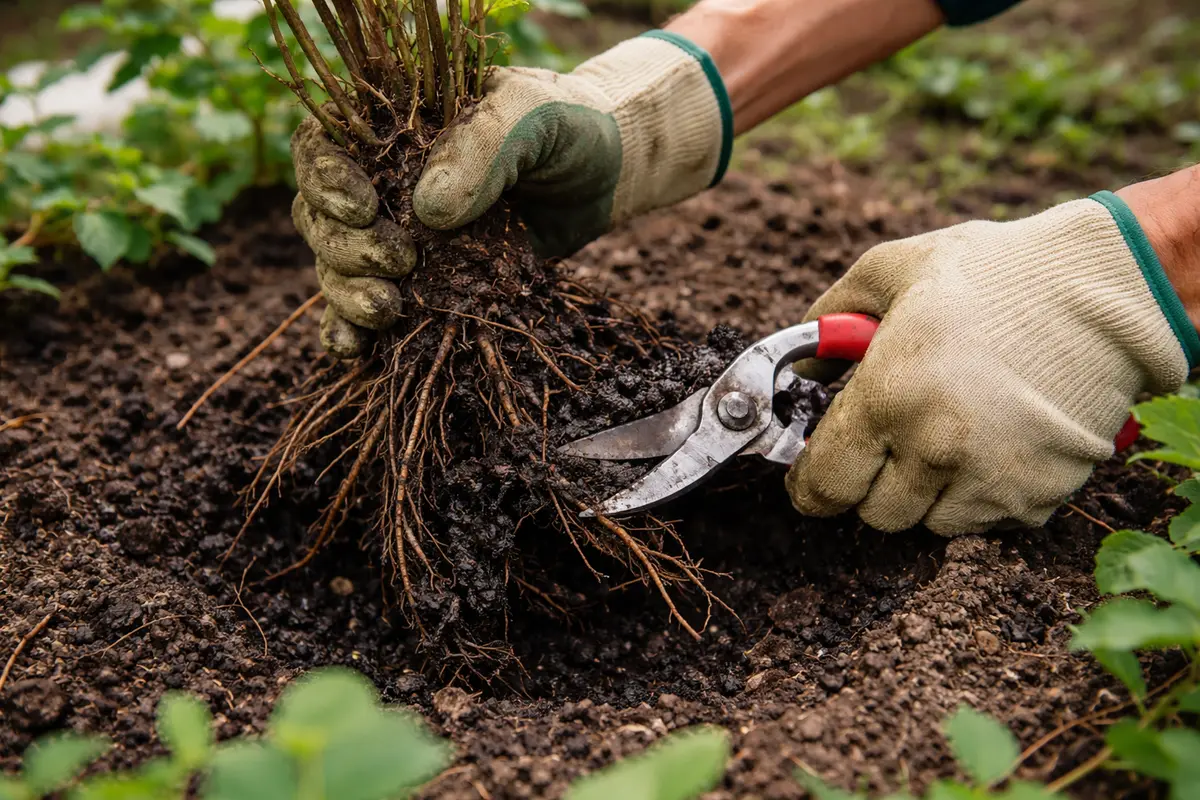
Start by removing any visibly damaged roots or stems. You will see the immediate improvement in the vigor of surrounding leaves as they begin to perk up within hours. Use clean, sharp pruning shears to make precise cuts, which minimize trauma to healthy tissue. Ensure your tools are sterilized using rubbing alcohol to prevent any potential introduction of pathogens during the pruning process.
Pruning away any dead or mushy roots is crucial because it prevents the spread of decay throughout the plant. In root rot scenarios, damaged roots cannot efficiently take up water and nutrients, signaling the leaves to wilt and turn yellow. By cutting away the dead parts promptly, you create space for healthy roots to absorb moisture and nutrients, which accelerates recovery. When examining the roots, you should look for colors; healthy roots appear white and firm, while rotting roots will be darker and may have a mushy texture. If you encounter roots that are brown but still somewhat firm, consider leaving them, as they might still function adequately to support the plant until new roots grow in.
Many gardeners overlook the severity of root issues, often mistaking wilting leaves for underwatering instead of inspecting below the soil surface. A common mistake is to only check the visible portions of the plant while ignoring hidden root problems. Waiting too long to prune can lead to a more extensive loss of healthy roots, making subsequent treatments less effective. If you see roots that have started to blacken or turn brown, pruning them early can significantly improve recovery speed. Being proactive immediately can save your viburnum from further decline, enabling the remaining healthy roots to thrive. Regularly monitoring root conditions post-pruning will also allow you to adjust care strategies based on the plant’s recovery progress.
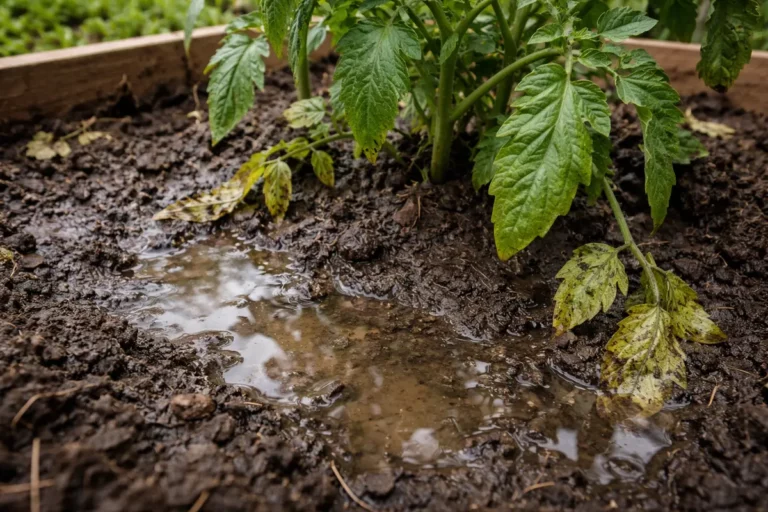
Step 2 – Diagnose Soil Saturation Around Viburnum
Next, check the soil for excessive moisture by digging about six inches down around the plant’s base. Within moments, you will determine whether the soil is soggy or adequately drained. Use your hand to feel for moisture or stick a finger into the soil; it should be moist but not excessively wet. If the soil clumps together and leaves a muddy residue on your hands, it indicates saturation.
Identifying soil saturation is essential because stagnant moisture directly contributes to root rot, particularly in viburnum that prefers well-draining soil. If the soil feels overly damp and sticky, this clogs air pockets in the soil, leading to anaerobic conditions that damage the root system. Healthy roots require oxygen to function optimally, and prolonged waterlogged conditions block that access. If you notice that water does not drain away quickly after heavy rains, consider the composition of your soil; clay-heavy soils are particularly prone to retaining moisture and suffocating roots.
If the soil smells sour, it indicates bacterial activity due to anaerobic conditions, which signals that further action is required. Under these circumstances, you may need to amend the soil with organic materials to improve drainage and aeration, especially if the viburnum is located in clay-heavy soil. Adding materials like perlite or shredded bark can lighten the structure and allow water to move freely. If you determine that the drainage is insufficient, consider elevating the planting area to enhance drainage or installing a drain near the root zone to divert excess water. Addressing saturation quickly ensures roots can breathe and reduces the risk of further root damage. If the issue remains unresolved, you may need to relocate the viburnum to a better-draining area entirely.
Step 3 – Treat Viburnum Roots with Fungicide Solution

Apply a systemic fungicide to the root zone as per the product’s instructions after diagnosing. You should notice healthier-looking roots and new leaf growth within one to two weeks. Make sure to follow application rates carefully, as overusing the fungicide can lead to phytotoxicity, damaging the plant, and inhibiting growth instead of promoting it.
Systemic fungicides work by spreading through the plant’s vascular system, fortifying it against pathogenic fungi responsible for root rot. During the recovery phase, the treatment helps inhibit fungal growth, allowing the remaining healthy roots to re-establish themselves. This treatment also effectively combats re-infection if conditions remain susceptible. It can stimulate new, healthy foliage development, signaling that recovery is taking place and providing a clear visual cue of success. Pay attention to any changes in leaf texture or color, as a shift from yellow or limp to vibrant green indicates the fungicide is working.
A common mistake during this phase is overwatering while waiting for results from the fungicide. Allowing the soil to dry out slightly between watering sessions encourages root growth; otherwise, you risk drowning the remaining good roots. Regular assessments of moisture levels can guide your watering habits better to support recovery. Additionally, if you don’t see improvement after two weeks, reassess your treatment routine, as the chosen fungicide may not be suitable or effective for the specific fungal pathogens at work. It might also be necessary to conduct a secondary treatment if the initial fungicide application shows little to no effect after the given observation period.
Step 4 – Water Viburnum Wisely During Humid Months
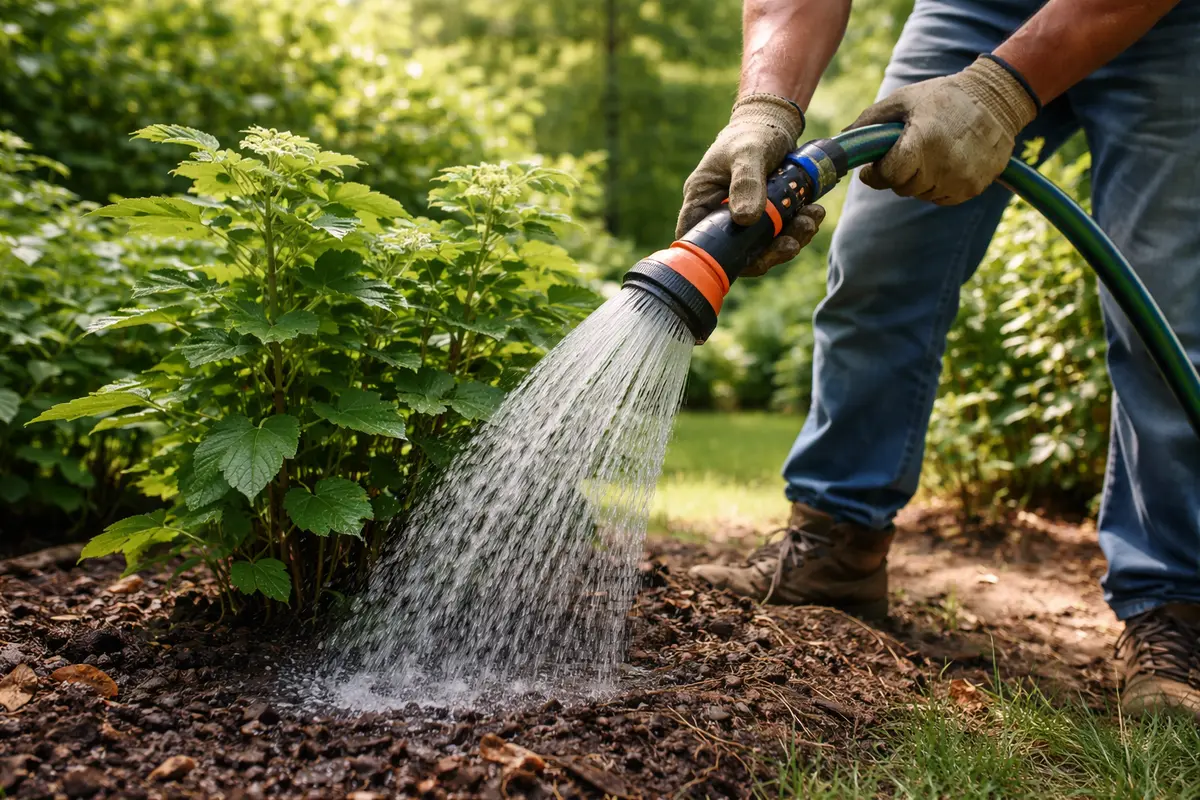
Water your viburnum only when the top two inches of soil feel dry to the touch. You will observe a healthier growth pattern in the leaves as they start to become more vibrant and robust. This approach minimizes the risk of creating a waterlogged environment that fosters root rot. Aim for a watering schedule that allows the tree to receive approximately one inch of water per week, adjusting based on rainfall and local humidity levels.
During humid months, the plant’s water needs decrease, and excess watering can lead to renewed root rot. Developing a consistent watering schedule while allowing the soil surface to dry prevents excessive moisture retention and promotes stronger root health. This balance is critical because it reduces stress on the roots and enhances their ability to uptake nutrients effectively. A practical method for determining when to water is to check the soil moisture using a moisture meter, which provides clear, quantifiable readings. If consistent checks show fluctuating moisture levels, revise your watering strategy to align better with observed conditions, perhaps by employing drip irrigation or a moisture retention setup.
Consider adjusting your watering based on the time of year; during peak humidity, a weekly check might suffice, whereas drier spells may necessitate more frequent waterings. If you notice that the plant begins to droop even with less watering, it could indicate inconsistent moisture levels that need to be addressed. This measured approach ensures that your viburnum can retain healthy moisture levels while avoiding the risk of root rot recurrence. If you’re using mulch to retain moisture, ensure it isn’t too thick, as this could further trap excess water around the stem. Moreover, if you notice signs of mold or fungus on the mulch, it’s a cue to alter your care routine to mitigate future issues.
Step 5 – Inspect Leaves for Signs of Recovery Weekly
Start by checking for signs of root rot during the humid months by inspecting the viburnum’s soil moisture and root condition weekly. Look for brown, mushy roots, and ensure the soil is not overly saturated; adjust watering practices if the soil feels soggy. Recheck the plant’s health every 7 days, noting any improvement or worsening signs.
A fully recovered viburnum will exhibit bright green foliage with firm stems and an even distribution of leaves. In contrast, early signs of returning root rot include yellowing leaves that feel soft to the touch and the presence of a foul smell near the roots. If the roots feel dry and crispy instead of plump, check for wilting or overall droopiness in the branches.
If the problem returns despite your efforts, consider repotting the viburnum in fresh, well-draining soil to provide a healthier environment. Should that not resolve the issue, escalate by consulting a local garden expert for specific treatments or considering the use of fungicides. In the meantime, ensure the plant is not waterlogged to avoid further stress.
Monitoring these changes offers insights into the plant’s health and can reveal whether the original restoration efforts were successful. A fully recovered viburnum will exhibit vibrant foliage and sturdy stems, indicating robust root functions. Meanwhile, any waning color or continued wilting could signal that issues persist; thus, addressing them early can stave off major setbacks. If leaves are browning at the edges or reverting to yellow, these are warning signs of inadequate moisture management or potential re-infection. Additionally, if a noticeable stunting of new leaf growth occurs, it might point to systemic issues that require further investigation.
If the recovery process stalls, consider re-evaluating your watering routine or inspecting for additional fungal infections. For example, if you notice new dark patches on the leaves, it could indicate that the initial infection was not fully cleared out. Addressing these setbacks quickly is crucial to maintaining progress and ensuring a complete recovery for your viburnum. Be diligent about your weekly checks; they are vital for spotting the return of root rot symptoms early and taking corrective action before the issue escalates. Don’t overlook the importance of soil health during this phase; ensuring the right acidity and composition can greatly support revitalization efforts.
FAQ
How long does it take for viburnum to recover from root rot?
The recovery timeline for viburnum can vary based on the severity of the root rot and the effectiveness of treatments applied. Generally, you may begin to notice signs of recovery, such as new growth, within two to four weeks after treatment, assuming the root rot was not extensive. Keep in mind that a full recovery may take longer if the plant has suffered significant damage to its root system.
Can root rot spread to other nearby plants?
Yes, root rot can spread to other nearby plants, especially if they share soil or are in close proximity. To prevent this, you should immediately prune infected plants and monitor nearby species for any signs of distress; early detection can make all the difference in stopping the spread. Using sterilized tools between plants can also help prevent cross-contamination.
Should I remove all affected parts of the viburnum?
Yes, it is advisable to remove all affected roots and stems to prevent the further spread of rot. Leaving infected parts can hinder recovery and increase the risk of decay reoccurring in other parts of the plant, so thorough pruning is essential. Further, if you find that even after pruning the plant shows minimal signs of recovery, it may be indicative that the root system has been severely compromised, prompting the need for drastic measures such as replanting or professional assessment.