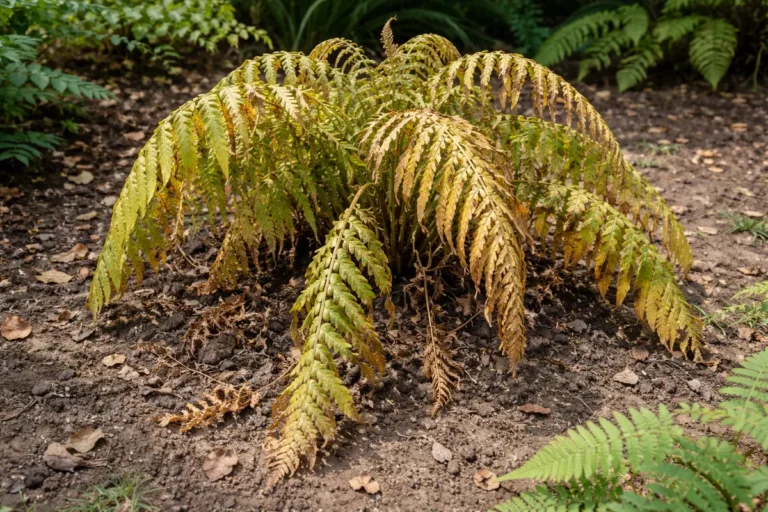
You may notice your potted fern showing signs of distress, particularly yellowing leaves that appear soon after transplant, which is why you need to know about fixing yellowing leaves on potted fern after transplant. This yellowing often occurs due to transplant shock, where the plant struggles to adjust to new conditions, leading to wilting and dropping leaves. If left unaddressed, this issue gets worse, weakening the plant’s health and potentially stalling growth, but you can take action now by adjusting the watering schedule and inspecting the soil for proper drainage.
Step 1 – Trim Yellowing Fern Leaves Promptly
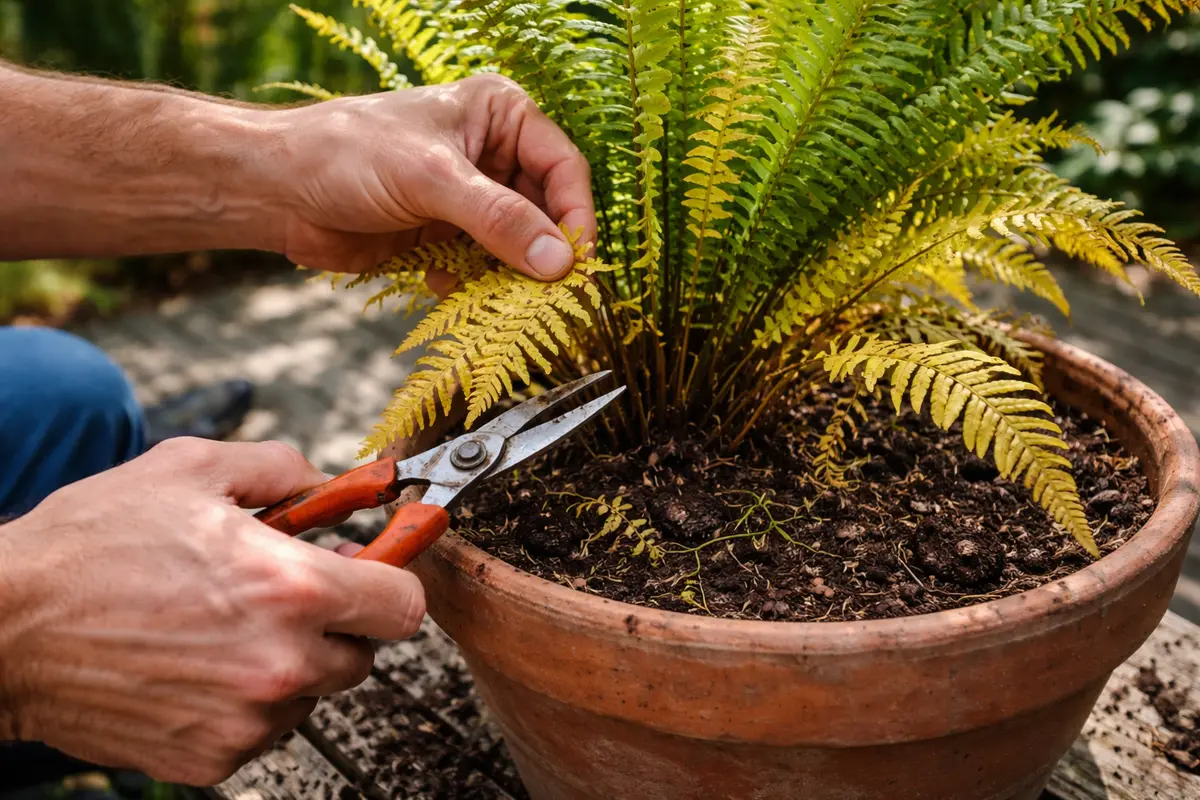
Begin by trimming away any yellowing leaves from your potted fern. You will notice a cleaner appearance immediately, as removing the damaged foliage allows the plant to focus its energy on healthy growth. This clean-up can also prevent the yellowing from spreading further to healthy leaves, which is a crucial aspect of maintaining the plant’s vigor. Aim to use clean, sharp pruning shears to make precise cuts just above the base of the affected leaves. Disinfect the shears with alcohol before use to prevent spreading any possible pathogens. After trimming, check for any signs of stress in the remaining leaves, as even slight yellowing can indicate ongoing care issues.
Acting quickly is essential; yellowing leaves indicate that the plant is struggling, potentially due to transplant shock or improper care. Removing these leaves reduces the burden on the plant, helping it redirect resources toward healthier growth. This is particularly important for ferns, as the stress of transplanting can lead to further yellowing if not addressed promptly. Regularly keeping track of the leaf condition will help you identify whether to continue pruning or if the plant is recovering effectively. Observe how many leaves have turned yellow; if more than 30% of the foliage is affected, this may indicate a more systemic issue with care that needs addressing. If the yellowing stems from inadequate light, it might be beneficial to check where you have positioned the fern in your home and consider relocating it.
During this stage, a common mistake is to wait too long to remove the damaged leaves, thinking they might recover. In reality, neglecting to take immediate action can result in the spread of stress symptoms throughout the plant, making future recovery more difficult. Aim to prune yellowing leaves weekly until the plant stabilizes and no new yellows appear. If more than a few leaves show signs of yellowing, consider increasing your monitoring frequency to bi-weekly, as a rapid response can significantly help in reducing stress levels. If after about two weeks, you notice an uptick in yellowing even after diligent pruning, you might need to reassess environmental factors, such as moisture levels and lighting conditions to ensure they meet the ferns’ needs.
Step 2 – Diagnose Root Compaction in Potted Fern
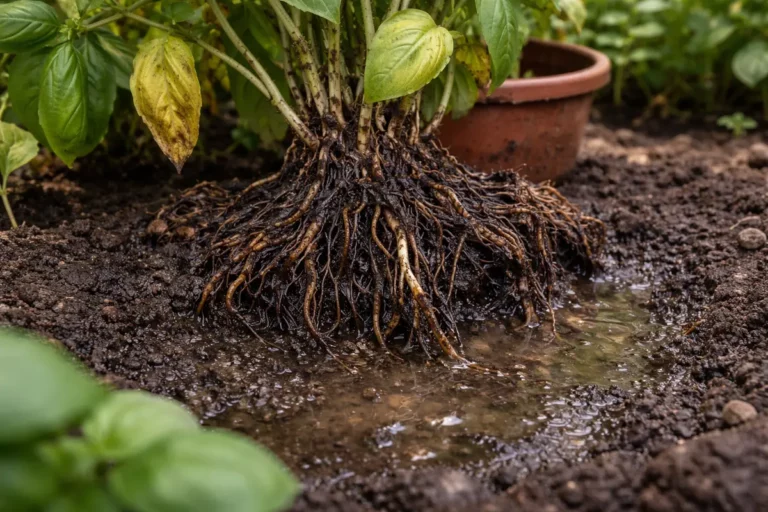
Check the root system of the fern by gently removing it from the pot to inspect for root compaction. If roots are tightly bound or appear damaged, you’ll likely see them trying to escape through drainage holes or wrapping tightly around the root ball. Before doing this, ensure the plant is well-watered; this softens the soil and facilitates easier removal. Inspect any areas where roots may be dark brown or mushy, as these often indicate stress or rot. If the roots are tightly wound around the root ball, this indicates a lack of growing space which can severely restrict the plant’s nutrient and water uptake, leading to continued yellowing.
This condition usually arises from inadequate space or overcrowding in the pot, leading to reduced nutrient uptake and water absorption. In potted ferns, healthy roots need to spread out; when compressed, they cannot absorb moisture effectively, which can lead to the yellowing leaves seen after a transplant. If more than one-third of the root mass appears compacted, immediate action is necessary to prevent further deterioration of the plant. Keeping an eye on how fast the root growth returns after a transplant provides an early signal of health; if roots remain stunted after a few weeks, reevaluating your pot and soil is essential.
If roots are compacted, it’s crucial to repot the fern in a larger container with fresh potting soil that provides better drainage. This ensures the roots have ample room to grow and avoid waterlogging—a condition that can suffocate roots. If repotting is not possible immediately, try gently loosening the roots by massaging the root ball; this can sometimes provide temporary relief until a full repot can be performed. Pay attention to the soil texture; if it feels waterlogged or sour, it may be too dense and should be replaced with a peat-based or chunky mixture that allows for better aeration to promote healthy root systems.
Step 3 – Revive Fern with Balanced Fertilizer Mix
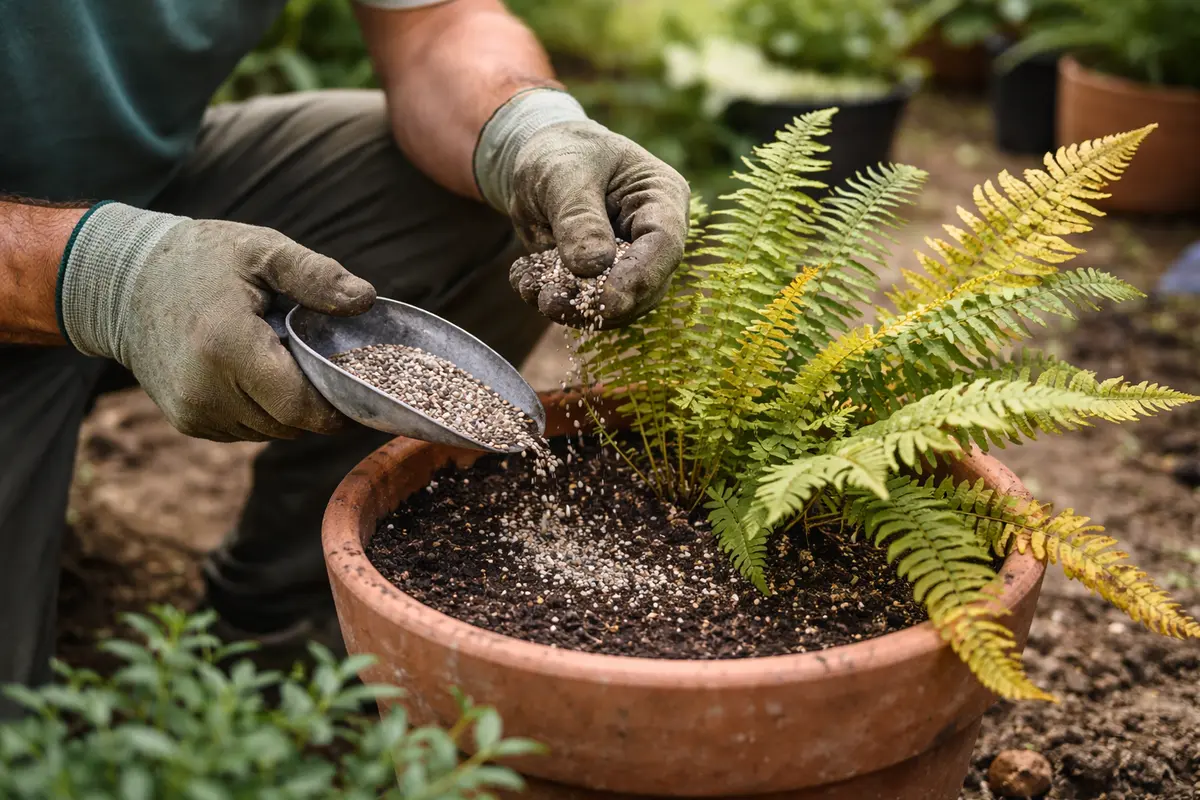
Apply a balanced, diluted fertilizer specifically formulated for ferns to rejuvenate your plant. Within a week, you should observe new growth indicating the care is effective, underscoring that nutrients are crucial in recovery. This quick response can revitalize the plant’s overall health and is essential after a stressful transplant period when nutrients may have been depleted. Using a diluted fertilizer at half strength can prevent nutrient shock and ensure a gradual infusion of vitamins, making it easier for the fern to absorb the necessary nutrients without overwhelming its currently stressed state.
This step promotes recovery by replenishing depleted nutrients in the soil that may have been exhausted during the transplant. Ferns thrive on regular feeding during the growing season, particularly after a transplant, as they require extra nutrients to support new leaf growth. Inadequately nourished ferns can exhibit persistent yellowing until essential nutrients are restored. Ensure the product label clearly indicates it is safe for ferns to prevent over-fertilizing, which can otherwise exacerbate distress. If the plants show signs of distress, consider using gentler organic fertilizers like fish emulsion or seaweed extract, as these often suit sensitive plants like ferns much better.
A common mistake in this phase is over-fertilizing, thinking that more is better. Ferns are sensitive to high concentrations of nutrients, which can lead to chemical burn instead of promoting growth. It’s crucial to follow the recommended dosage on the fertilizer package; too frequent applications or excessively strong mixtures can harm the plant. If you suspect that over-fertilization has occurred, temporarily stop feeding and thoroughly water the plant to help leach out excess nutrients from the soil. If leaf tips become brown and crispy, a clear sign of chemical burn, it may require returning to pure water until the plant stabilizes; this gives it a chance to recover without further interference from nutrient burns.
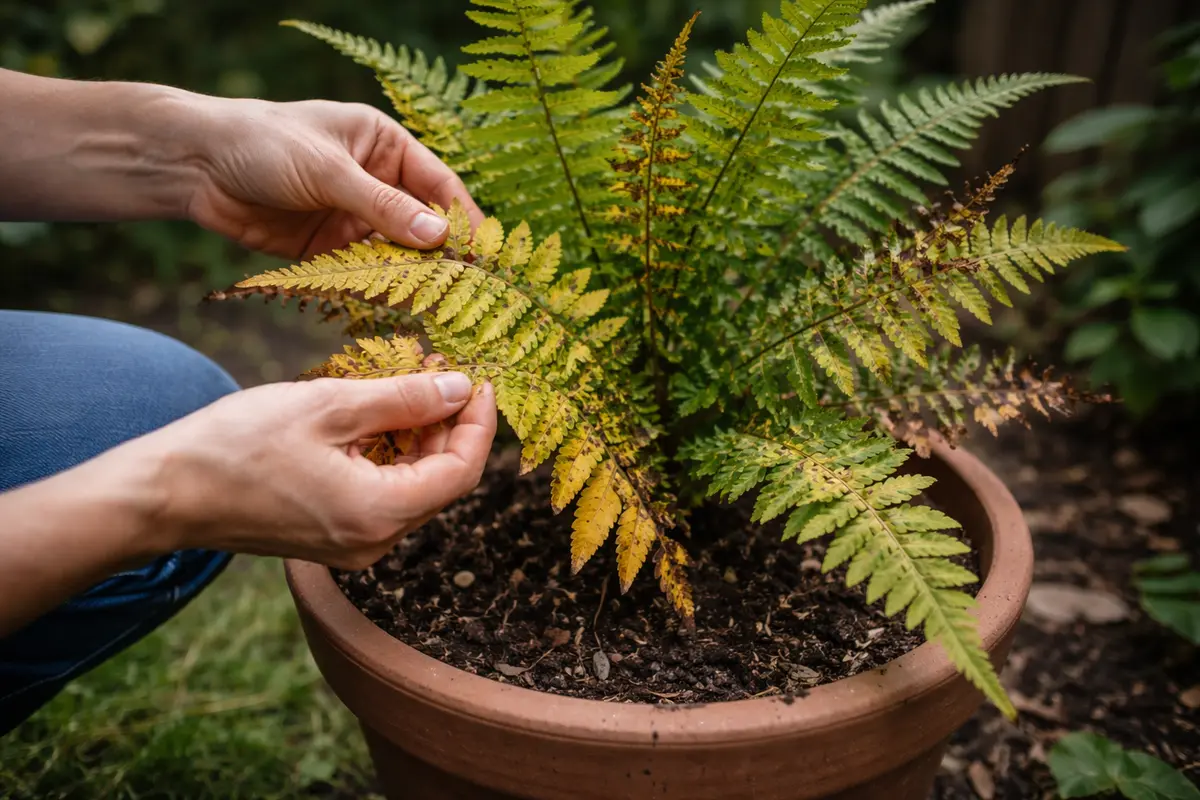
Step 4 – Inspect Fern for New Yellow Leaves Weekly
Next, check the moisture level of the soil in your potted fern, ensuring it remains consistently damp but not waterlogged. Observe the texture of the leaves; early signs of recovery include a gradual return of green color and firmness. Rechecking daily for the first week after your transplanting will help you note changes in color and leaf condition as the plant adjusts.
A fully recovered fern displays vibrant green leaves with a smooth texture, contrasting sharply with the initial yellowing and droopiness present after transplant. If the plant shows signs of new growth, such as unfurling fronds, it’s a positive indicator of improvement; however, if you notice yellow patches or curling leaves returning, the issue may still persist. If the leaves are crispy and brittle yet the plant otherwise appears vibrant, adjust your watering schedule to ensure moisture levels are maintained without oversaturation.
If yellowing recurs despite following these steps, consider reevaluating the potting mix for proper drainage or nutrient deficiencies. If these checks don’t resolve the issue and the plant continues to struggle, transferring it to a slightly larger pot can indeed provide more room for roots to grow, significantly improving nutrient access. Early intervention at this stage is crucial, particularly since ferns are more sensitive and take longer to bounce back; if new foliage fails to appear, these signs indicate that environmental conditions may still be unfavorable.
After making the adjustments, a healthy fern should have robust, green leaves without any new yellowing. Observe any changes in growth behavior, noting how many fronds are unfurling; if the plant is thriving once again, continue with the established care regimen. Regularly monitoring these signs gives insight not only into recovery but also ensures any past issues do not return. If you notice stagnant growth despite reassessing care routines, such as new ferns failing to appear within a couple of weeks, it may suggest remaining environmental stressors still need close inspection, whether that’s light, humidity, or temperature.
If you notice yellowing returning after following these steps diligently, reassess the watering routine more closely, and verify that the plant is not in direct harsh sunlight, which can burn fern leaves easily. Underwatering can also exacerbate existing issues even further, leading to yellowing. A healthy watering cycle combined with good light conditions is fundamental in lessening the chance of recurring yellow leaves. Additionally, examine for signs of pests or mold that could cause stress; if you see a white, powdery residue or detect an unusual smell, mold will need immediate attention to prevent widespread damage. If pests are suspected, applying insecticidal soap or neem oil can be an effective preventative measure, but ensure to treat the plant during cooler parts of the day to avoid burning the foliage.
FAQ
How long will it take for my fern to recover from yellowing leaves?
Recovery typically takes about 2-4 weeks after addressing the immediate causes of yellowing leaves. Nutrient replenishment and proper watering schedules will help your fern regain its vibrant green color during this period. However, if environmental conditions remain unfavorable, such as extreme temperatures or insufficient lighting, the recovery could be extended further. Maintaining consistent moisture and suitable light exposure throughout this period will significantly improve your plant’s revitalization.
Can yellowing leaves on a fern spread to other plants?
Yes, if the yellowing stems from a disease or pest infestation, it can potentially spread to nearby plants. Regular inspections of other plants are essential to prevent any cross-contamination, especially if they’re in proximity to each other. Proper sanitation is crucial, such as cleaning any tools used on the affected fern before interacting with other plants, to minimize the risk of pest transfer. If found on adjacent plants, treatment should be immediately initiated on all affected foliage to prevent rapid spread.
Should I remove all yellow leaves from my fern?
Only remove leaves that are completely yellow or show significant signs of damage. Leaving some green on the plant helps ensure it retains enough foliage to photosynthesize and draw in necessary nutrients for recovery. If the plant is very stressed, consider leaving a few more green leaves to support energy production, which is essential for recovering from severe yellowing. Continuous monitoring of remaining foliage can provide cues on the overall health of the plant as it recuperates from stress.