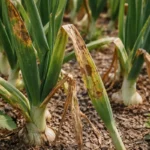
You may notice wilting, yellowing leaves and a foul smell from your shallots during periods of heavy rain, which is why you need to know how to treat root rot in shallot after prolonged wetness. This typically occurs when the roots become waterlogged, leading to mushy tissue and ultimately damaging the plant. Ignoring this issue only sets the plant back and can spread to surrounding shallots, but you can improve the situation by inspecting the roots, removing any rot, and adjusting your watering routine.
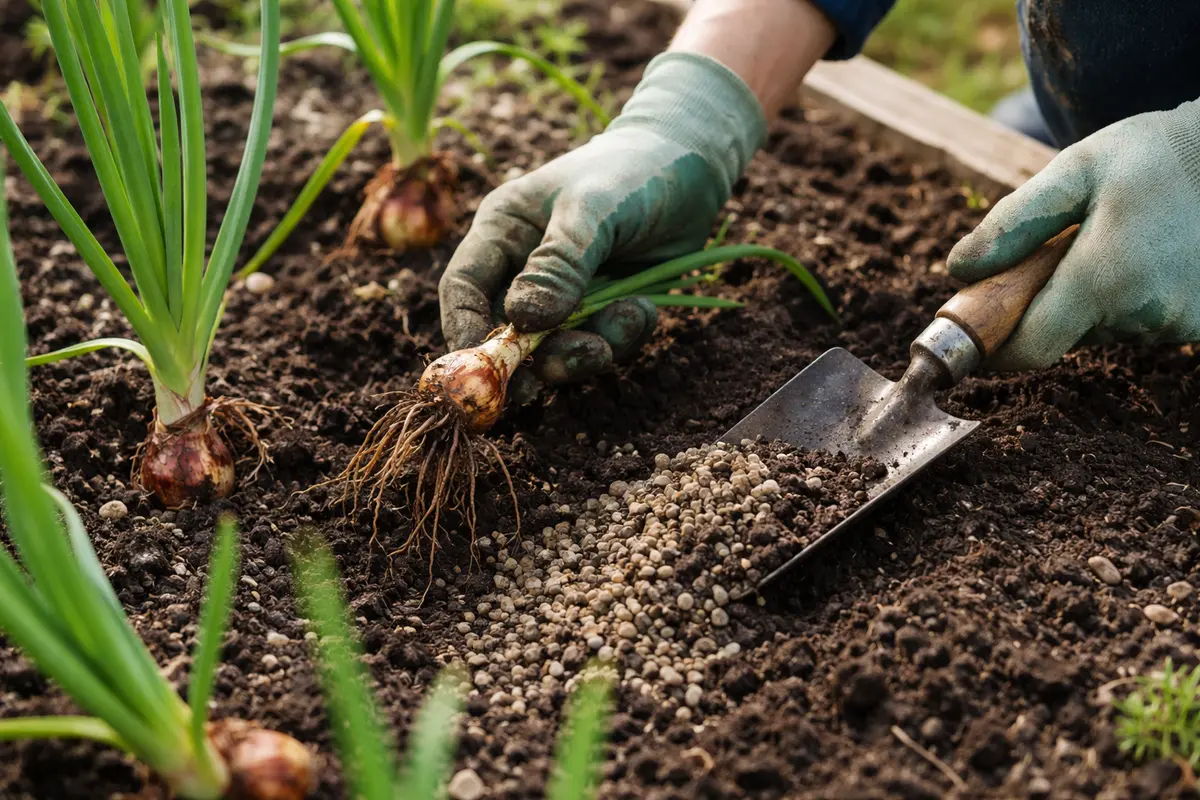
Step 1 – Trim Affected Shallot Roots Immediately
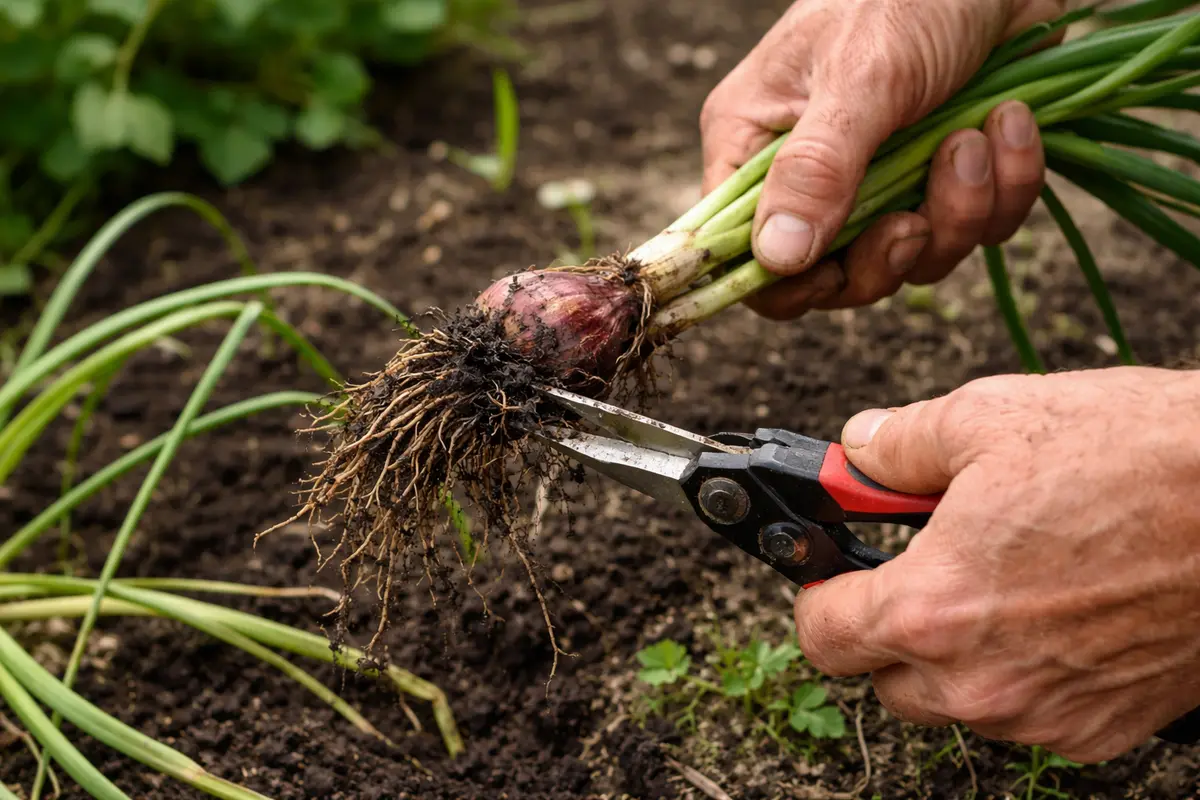
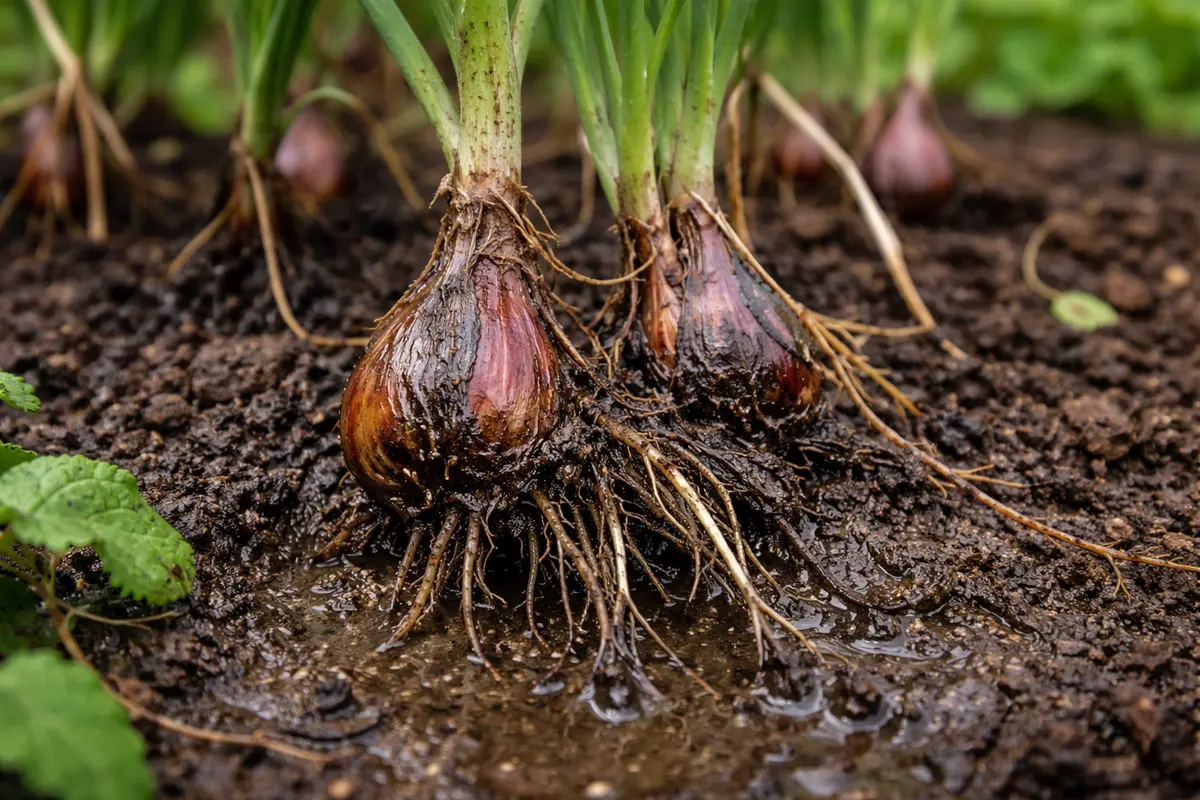
Trim away any visibly rotten roots and bulbs on your shallots. You will notice that the remaining roots begin to look healthier and firmer right away, often showing signs of resilience almost immediately. Removing the damaged tissues reduces the risk of further rot and allows the plant to focus its energy on recovering healthy roots. Trimming should be done carefully, using sterile pruning shears to prevent introducing any more pathogens. When you cut into the root system, aim to leave at least one-third of the healthy root intact to support the plant’s recovery.
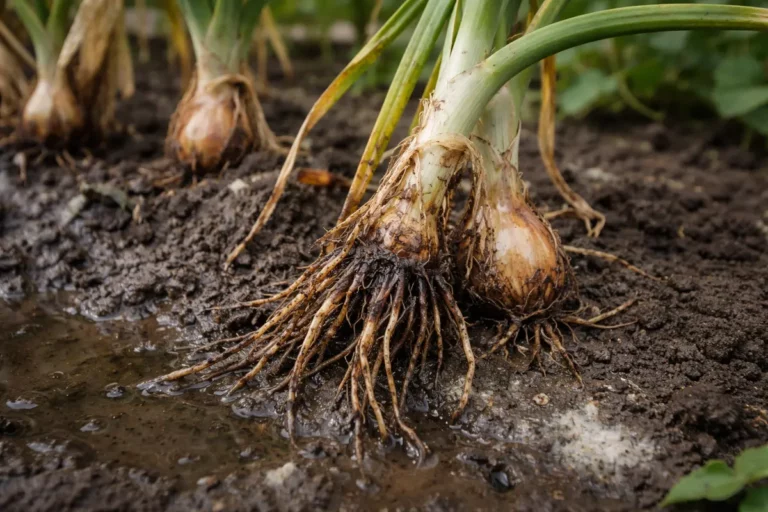
Trimming away affected shallot roots helps quicken the recovery process as it reduces the load on the plant. Shallots can have roots that turn brown and mushy due to prolonged exposure to excess water, which limits oxygen flow. Once you remove the decayed portions, healthier roots can regenerate, ensuring better nutrient uptake for the plant. Pay attention to the color and texture of the roots; healthy roots should be white or light tan and firm. If you notice brown or black discoloration or mushiness, that indicates advanced rot that must be removed immediately.
A common mistake gardeners often make during this stage is neglecting to assess the root system closely. Without proper inspection, you might leave behind some neglected rotten parts, which can lead to recurring root rot problems. After trimming, check for any lingering odor from the roots; a foul smell typically indicates remaining rot. If the soil feels particularly soggy or smells sour, it is crucial to act quickly to prevent compounding issues from setting in. You may find yourself trimming more than expected; this direct approach can ensure a healthier root environment.
Step 2 – Diagnose Waterlogged Soil Impacting Shallots
Start by removing any severely affected shallots from the soil immediately. Gently uproot the bulbs, trimming off any mushy or blackened roots while ensuring that healthy tissue remains intact. You should notice an improvement in the remaining shallots, as they begin to stabilize and show signs of new growth within a few days.
Root rot occurs when excessive moisture in the soil disrupts oxygen availability to the roots, leading to anaerobic bacteria thriving. This condition causes the roots to decay, evident through a dark, soggy texture, and foul odor. In contrast, healthy shallot roots are firm and white, indicating proper aeration and moisture levels. If the soil feels overly compacted and retains excessive water, it is essential to aerate or amend it with organic matter to restore balance.
If the soil smells sour, it indicates severe rot and the need for immediate change. In this situation, replace the affected area with fresh, well-draining soil and consider relocating the shallots to a spot with better drainage. Alternatively, if your shallots appear wilted, but the soil is dry, ensure you are providing consistent moisture without overwatering, as this condition can also mimic root rot symptoms.
Waterlogged soil restricts the oxygen needed by the roots to function correctly. When soil retains too much moisture, fungal pathogens thrive, which can deteriorate the roots’ health. If the soil texture is heavy and compacted, it may exacerbate moisture retention, directly contributing to rot-prone conditions. Delve into the soil and note its density and feel; if it is sticky and clumpy, this indicates poor drainage. If you find that soil resists crumbling in your hands, this may be a sign that it retains too much water.
If the soil smells sour when you dig down, it indicates anaerobic conditions that need further attention. In this case, aerate the soil by gently loosening it with a fork and adding organic matter like compost to improve drainage. Aim for a ratio of about one part organic matter to three parts existing soil to facilitate better aeration. Introducing perlite or vermiculite to the soil can also improve drainage capabilities, particularly if you’re dealing with heavy clay soil. This adjustment not only enhances drainage but also promotes beneficial microbial activity, which can help combat root decomposition.
Step 3 – Apply Fungicide to Restore Shallots
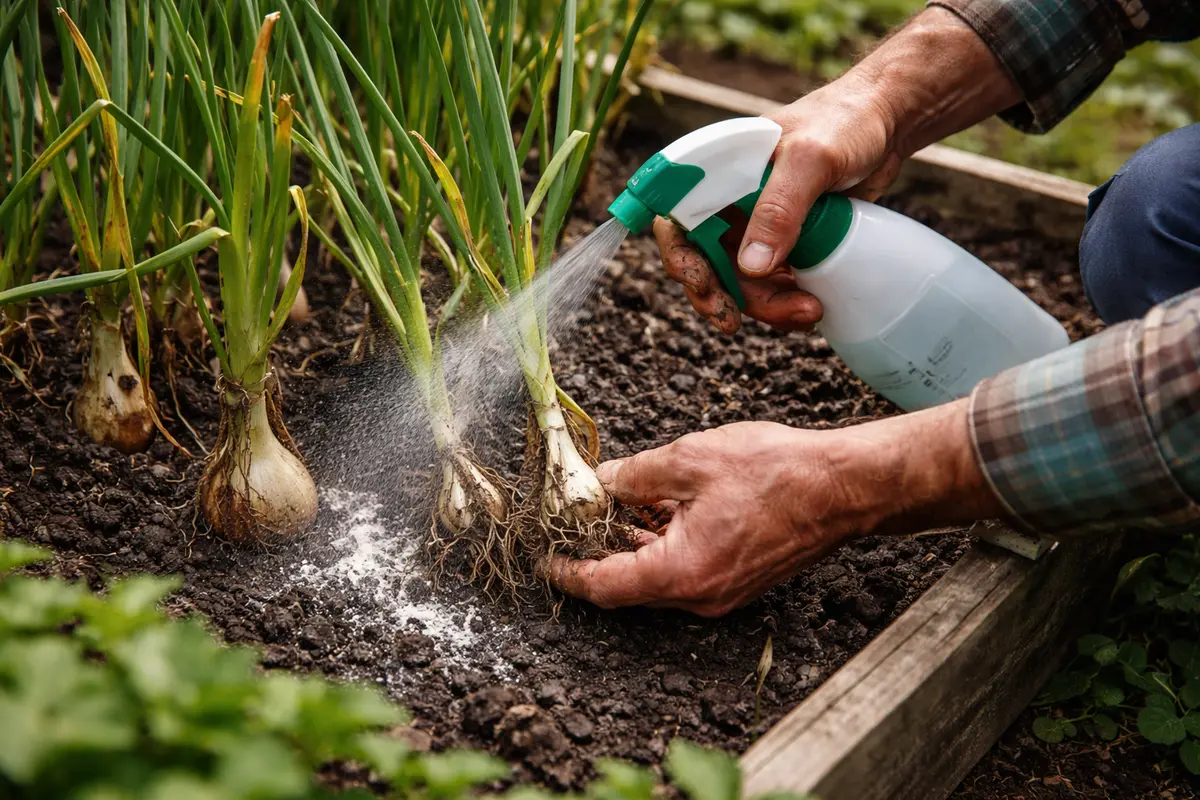
Apply a fungicide solution specifically designed for root rot to your shallots after assessing their condition. Within a week, you should see signs of healthier growth emerging as the rot is treated, usually characterized by robust new shoots. This application helps eliminate fungal spores that could further damage your plants. Follow the manufacturer’s instructions for the correct dosage and application techniques, as misapplication can worsen the condition. Always wear protective gloves to avoid skin contact and breathe in any chemical fumes.
Fungicides work by targeting the pathogens in the soil, effectively halting their progress. After applying these solutions, you may observe the appearance of new shoots, which is a positive indication that your shallots are recovering. Ensuring that the soil remains properly aerated after this application can further accelerate recovery. Often, applying water cautiously post-application can help initiate the fungicide’s action, so make sure to water the soil gently without flooding it.
A mistake often made during recovery is over-fertilizing in an attempt to enhance growth. This can lead to a nutrient burn, especially when the plant is still under stress from root rot. Instead, observe the recovery closely, and focus on consistent monitoring and adjusting fertilizer application as the shallots demonstrate signs of healthy growth. Apply fertilizers sparingly—only when you see vigorous new growth—typically about a quarter of the recommended strength to avoid overwhelming the recovering plants. Additionally, avoid applying fertilizer within the first two weeks following the fungicide treatment to allow the shallots to focus on healing without extra stress.
Step 4 – Ensure Drainage to Prevent Future Root Rot
Start by ensuring your shallot beds are well-drained and avoid overwatering during periods of prolonged wetness. This practice will help prevent root rot and can lead to stronger, healthier shallots over time, as they thrive in drier conditions that encourage robust root development.
Root rot often occurs in waterlogged soils where anaerobic bacteria flourish, leading to decomposing roots. By improving drainage through raised beds or incorporating organic matter to enhance soil structure, you significantly reduce the risk of root rot, preventing the conditions that lead to its recurrence. If you notice wilting while the soil is wet, check for soil compaction, which may inhibit drainage.
In the spring, as rainfall tends to increase, adding a layer of mulch around your shallots can help maintain soil moisture balance and improve drainage. Conversely, during dry spells, monitor soil moisture carefully to avoid desiccating the roots, as insufficient moisture can also stress your shallots.
Improving drainage reduces the likelihood of root rot occurrences. Ensuring that shallots are planted in raised beds or using well-draining soils can alleviate excess moisture levels. It’s wise to perform a drainage test by watering the area lightly and observing how long it takes for water to disappear; if it pools for more than an hour, adjustments are necessary. Aim to test the soil with a moisture meter to establish a baseline before replanting. These practices help promote airflow within the soil, leading to healthier root systems.
Seasonal rains can complicate drainage issues, so adjusting your planting practices during periods of heavy rain is crucial. Consider incorporating mulch to protect plants against saturated conditions, ideally using a mix of straw and compost to absorb excess moisture while also providing additional nutrients as it breaks down. Additionally, landscape fabrics in garden beds can further assist in maintaining moisture balance. This layered approach builds resilience against root rot in the long run, making your shallots less susceptible in the next growing cycle. If you are considering replanting, choose disease-resistant varieties to further mitigate risk.
Step 5 – Check Shallot Leaves for Signs of Recovery Weekly
Start by inspecting the shallot plants regularly, focusing on the base of the stems and the soil condition. Look for signs of yellowing leaves, wilting, or a foul odor emanating from the soil, which indicates root rot. Recheck these symptoms every few days to closely monitor changes or improvements in your plants.
A fully recovered shallot plant exhibits vibrant green leaves that stand upright, with firm and healthy bulbs below the surface. In contrast, early signs of returning issues include wilting leaves that droop and roots that feel mushy or brown when touched. If leaves turn yellow again while the soil remains damp, check for persistent moisture contributing to the problem.
If the issue returns despite following the initial steps, consider uprooting the affected plants to inspect the roots for further decay. Escalate your actions by applying a fungicide specifically designed for root rot or improving soil drainage to prevent moisture accumulation. If persistent symptoms continue, re-evaluate your watering schedule and consider relocating the shallots to a drier area to ensure a healthier environment.
Healthy shallots will exhibit bright green leaves that appear plump and firm, contrasting with the earlier wilting symptoms. Watching for these changes provides a clear metric for recovery. Take note that the growth rate might vary; rapid growth typically indicates a successful recovery, while stunted growth could signal lingering contamination in the soil or further rot development. If yellowing or wilting leaves occur despite your interventions, this could indicate a need for immediate re-evaluation. Documenting growth patterns can help track recovery effectiveness over time.
If the symptoms of rot reappear, be prepared to revisit the drainage and moisture control around your shallots. Adjust the soil composition again and consider reapplying the fungicide as needed, focusing specifically on the areas that show deterioration. Regularly monitoring and maintaining the right conditions ensures the long-term health of your plants, avoiding similar complications in the future. Make sure you document your findings each week to establish a clear record of progress, which could also help pinpoint recurring issues. If it becomes clear recovery mechanisms aren’t enough, considering the addition of soil amendments like gypsum may assist with heavy clay soil.
FAQ
How long does it take for shallots to recover from root rot?
Recovery can take several weeks, typically 2-4 weeks after you’ve taken corrective actions like trimming and applying fungicide. You’ll begin to see new growth during this time, which is a good indicator that the situation is improving. However, remain vigilant, as the recovery rate can vary based on environmental factors and the severity of the initial rot.
Can root rot spread to other plants in the garden?
Yes, root rot can spread if the soil remains overly saturated, as fungal pathogens can move through shared soil structures. To prevent this, ensure good drainage and consider quarantining affected areas of your garden until the problem is resolved. If nearby plants begin showing similar wilting symptoms, act swiftly to address soil conditions in those areas as well.
Should I remove all affected roots from my shallots?
Only remove the visibly rotten and mushy parts, as excessive pruning can stress the plant further. Focus on clearing out dead tissue to promote healthy regrowth while keeping as much healthy root structure intact as possible. Removing too much root can slow recovery, particularly if healthy portions are still present to support the plant during its healing process.