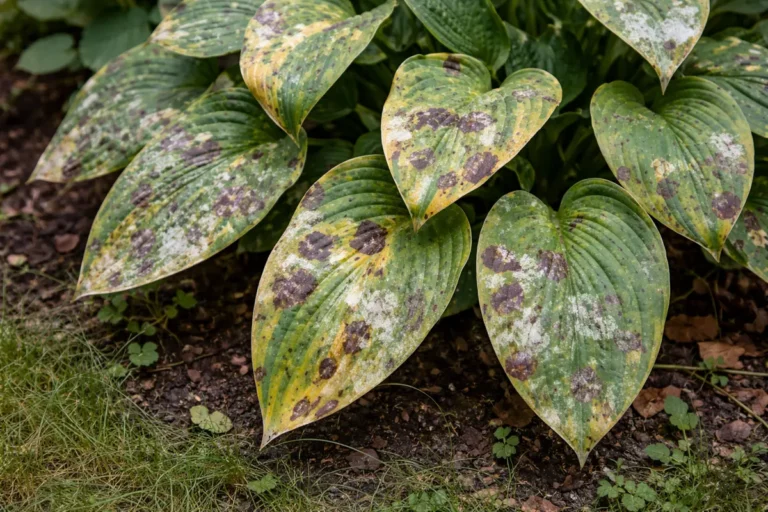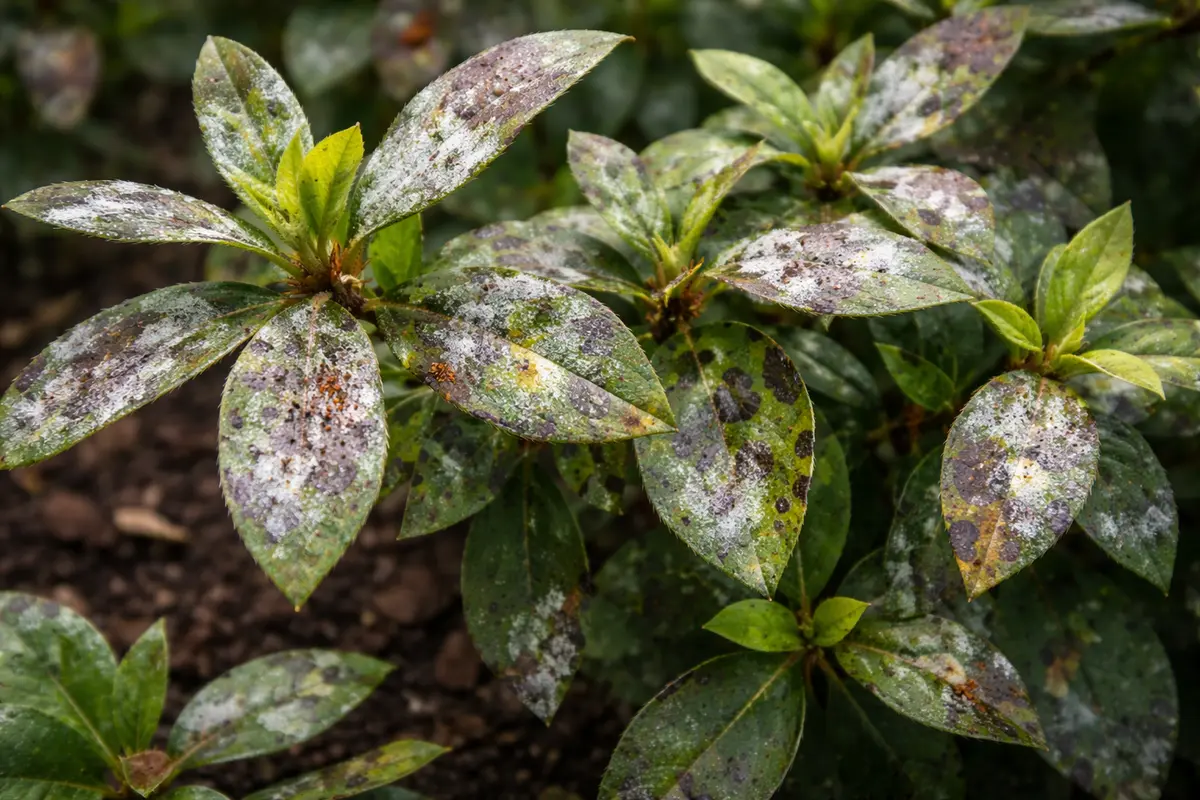
You may notice unsightly brown or black spots appearing on the leaves of your azaleas during those humid weeks, which is why you need to know how to treat fungal spots on leaves of azaleas in humid weeks. This fungal infection causes the leaves to develop spots, leading to premature leaf drop and weakening the plant’s health overall. If left unaddressed, the condition can spread and lead to more damage, but fixing it is possible now—inspect your plants and remove any affected foliage to help restore their vigor.
Step 1 – Cut Off Fungal Spots on Azalea Leaves

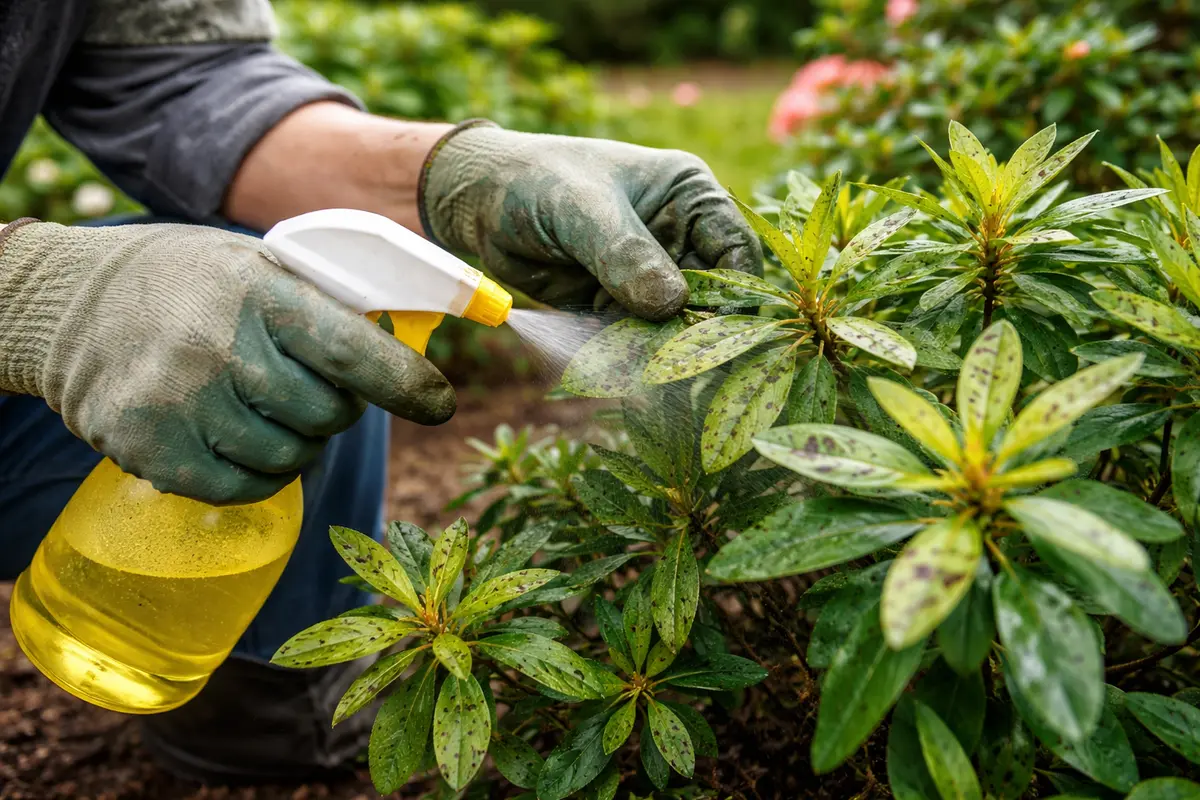
First, remove any affected leaves showing fungal spots by cutting them at the base with clean, sterilized scissors. Immediately afterwards, check the remaining foliage for signs of spreading, and ensure to maintain good air circulation around the plant. You should see fewer spores developing on nearby leaves within a few days as proper airflow reduces humidity levels around the plant.
Acting quickly on fungal spots is crucial for azaleas, as these plants are particularly sensitive to prolonged wet conditions that promote disease proliferation. If not addressed, the fungus can penetrate deeper into the leaves, leading to wilting and eventual death of the affected tissue. In contrast, many azaleas left untreated may display extensive foliar damage, while those given prompt care start to show improved leaf appearance within a week.
A common mistake gardeners make at this stage is to only notice the visible spots without inspecting for underlying conditions such as dense foliage. In one instance, a gardener lost half their azalea bush because they delayed action, allowing the fungus to spread unchecked. If you find more spots after removing affected leaves, check for excessive moisture in the soil, which can indicate root rot and further issues.
By removing affected leaves, the azalea can redirect its energy towards healthy growth instead of fighting off the infection on damaged foliage. Fungal diseases thrive particularly in humid conditions, and can spread quickly if the infected leaves are not removed diligently. Taking this immediate action not only halts the progression of fungal spots but also promotes better airflow around the remaining leaves, reducing the moisture that fungi love. An azalea in a crowded space with many leaves can suffer severe stress due to overlapping foliage, which creates still air pockets that encourage fungal growth.
A common mistake at this stage is to overlook the necessity of cutting back visibly infected foliage. Many gardeners might focus solely on treating the spots with fungicides instead of tackling the source of the problem. If this neglect continues, you open the door for the disease to worsen, compounding the issue and necessitating more intensive treatments later on. As a rule of thumb, never hesitate to remove more than you think is necessary; a quick pruning can save the whole plant. If the fungal spots return even after removal, this suggests the initial infection was more widespread than initially determined. Especially in cases where the foliage was densely packed, cutting back leaves can provide better light penetration, which assists in the recovery process.
Step 2 – Diagnose Humidity Effects on Azalea Plants
Start by removing any visibly infected leaves and ensuring that the azaleas have adequate air circulation. Notice how the remaining foliage appears healthier and less prone to new fungal growth after this initial intervention.
The presence of fungal spots on azalea leaves indicates that there is excess moisture combined with poor air circulation, which creates an ideal environment for fungi to thrive. In humid conditions, moisture can accumulate on leaves, leading to infection as fungal spores germinate in damp environments, showcasing symptoms like discoloration and wilting. If leaves retain moisture longer than the soil, fungi can proliferate, exacerbating the situation. Monitoring leaf sheen is key; if leaves appear overly shiny and won’t dry out within a couple of hours after a rain, it suggests high humidity levels, indicating a need for attention.
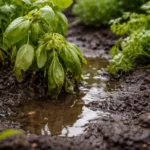
If the soil smells sour, it indicates root rot, which often coexists with fungal issues but requires prompt drainage improvement. In contrast, if the leaves show isolated spots but the plant’s growth seems otherwise steady, focus on enhancing airflow and applying fungicide treatments rather than altering soil conditions. Be aware that root rot can happen swiftly if conditions remain damp for too long, so checking the density of the soil is critical. If the soil feels compact or you observe puddling around the base, this is a clear sign to enhance drainage. A simple test is to stick your finger about an inch deep into the soil; if it remains wet at that depth after several sunny days, the drainage needs to be improved.
Humidity can lead plants to develop fungal issues due to stagnant air or waterlogged soil, which prevents normal transpiration and oxygen absorption. Azaleas need well-draining soil and spaced placements to ensure efficient moisture management. Overly damp environments foster fungal growth, which not only affects the leaves but can also impact roots if the situation is left unchecked. Checking humidity levels can be as simple as using a hygrometer; if the reading exceeds 70% during the day, it’s likely too humid for conducive growing.
If the soil around the azaleas appears soggy or emits an earthy, sour smell, consider changing your watering habits. Reducing watering frequency and improving drainage can significantly alleviate the humidity issues that hinder recovery. If the roots are consistently waterlogged, fungal infections may develop further, leading to root rot, which can be fatal for your plants. Moving your azaleas to a raised bed or amending the soil with sand or perlite could also aid in improving drainage. If you find that the humidity levels are significantly high in the region continually, consider using barriers or creating gaps that allow air to circulate freely around the plants. Observe the azaleas; if they are well established but drooping leaves appear, indicating excess moisture around the root zone, this signals a drainage relocation is needed urgently to alleviate further stress.
Step 3 – Water Azaleas with Fungicide for Recovery
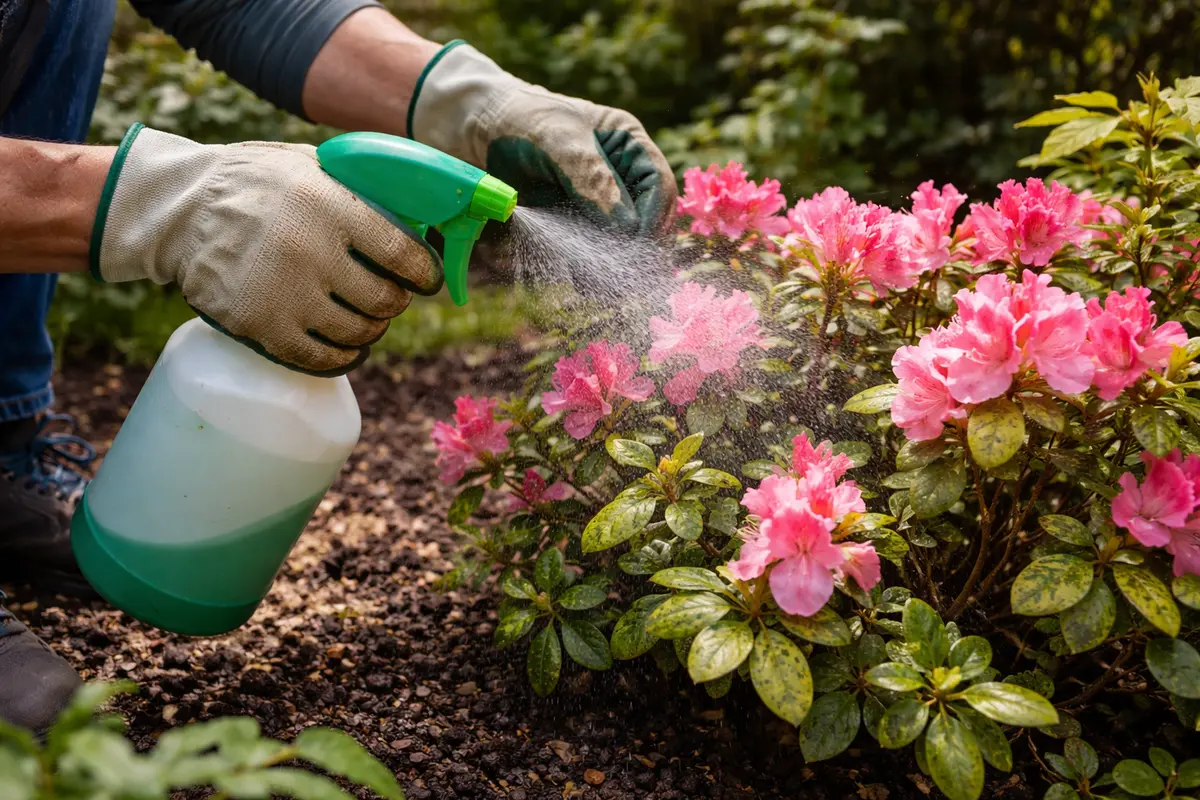
Apply a fungicide specifically designed for azaleas to the affected areas and the surrounding soil. You will see the remaining leaves begin to look healthier and less stressed within a few days, indicating that the fungicide is working effectively. This treatment is essential for halting the spread of any residual fungal spores from the initial infection. Be sure to follow the manufacturer’s instructions on application timing and frequency, as this varies with different products. Additionally, applying fungicide early in the morning can limit evaporation, maximizing the effectiveness of the treatment.
Fungicides target the pathogens responsible for the spots, and benefiting from their use creates a protective barrier against further infections. The azaleas will begin to show signs of recovery through new growth, indicating that the treatment process is yielding results. Timing is key; applying the fungicide promptly after identifying the initial infection can make a substantial difference in reducing the severity of the fungal infection. If the application coincides with periods of high humidity, the effectiveness tends to be enhanced as the moist environment allows the fungicide to penetrate more efficiently. Make sure to cover not just the tops of the leaves but also the undersides, where spores often lurk undetected.
Avoid overapplying fungicides, as excessive amounts can sometimes burn tender leaves or lead to other forms of stress. This generally happens when gardeners think a higher concentration will yield faster results, but that can backfire. Instead, stick to the recommended dosage on the fungicide container and monitor plant health over the following weeks. If you observe discoloration or burning on foliage after application, it could indicate overuse or a reaction to the product used. Regularly check the new growth for any signs of re-infection; if fresh spots appear, it may necessitate a stronger treatment or application of a systemically acting fungicide that penetrates beyond leaf surfaces.
Step 4 – Protect Azaleas from Future Humid Conditions
Start by regularly applying a preventive fungicide specifically formulated for azaleas every 14 days during humid weather. This proactive approach will significantly reduce the appearance of fungal spots on leaves and promote overall leaf health. Notice how the leaves remain vibrant and free of spots when consistently treated, reflecting the ongoing management of fungal threats.
High humidity creates a breeding ground for fungal spores, which thrive in damp conditions and can quickly spread if not managed. By implementing a consistent fungicide application regime, you disrupt the lifecycle of these spores, preventing them from establishing themselves and causing damage to the foliage. For example, azaleas showing early signs of spots should be treated immediately, while those without spots require ongoing preventive care. Consider marking your calendar or setting reminders for fungicide application; consistency is key to prevention.
During particularly wet months, increase the frequency of fungicide applications to once a week for an added layer of prevention. Additionally, ensure good air circulation around your azaleas by pruning any overcrowded areas, which can further help in lowering humidity levels around the plants, thus reducing the risk of fungal outbreaks. Many gardeners underestimate airflow; however, good air circulation can drop the localized humidity levels significantly, further suppressing spore development. Also, monitor the nights; if you notice heavy dew forming, those are prime nights for applying treatments that prevent fungal growth.
Good environmental management is critical in preventing the recurrence of fungal issues. When azaleas are tightly clustered or shaded by taller plants, the humidity around them can increase, leading to a situation ripe for fungal infections. By cultivating a routine that emphasizes good airflow and consistent monitoring of general health, you considerably decrease the risk of fungal spots returning. A well-planned garden layout where azaleas are positioned strategically to benefit from both sunlight and ventilation will yield better results. Pay attention to surrounding plants; if any show signs of issues, step up your monitoring efforts on your azaleas.
Additionally, incorporating mulch can provide benefits; however, be cautious with how it is applied, as adding too much can lead to excessive moisture retention at the base of the plants. If your area experiences consistent high humidity, consider adjusting the mulch type or frequency. A lighter mulch can serve to retain moisture without allowing it to stagnate, giving azaleas the balance they require. The right type of mulch, such as shredded bark or pine needles, can assist in preventing an overly moist environment and improve soil texture, whereas a thick layer of peat moss can lead to suffocation of roots; thus, find that ideal balance.
Step 5 – Inspect Azalea Foliage for New Fungal Signs
Start by checking your azaleas at least once a week for any resurgence of fungal spots on the leaves. Observe the leaves closely for changes, noting any reduction in the size or number of spots, as well as an overall improvement in leaf color. Recheck every few days in humid weeks, as environmental conditions can quickly change the plant’s status.
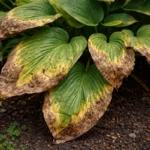
A fully recovered azalea will display bright, unblemished leaves that feel firm to the touch, indicating healthy growth. In contrast, early signs of the problem returning include dark, water-soaked areas on the leaves or a fuzzy texture developing, suggesting fungal reinfection. If the leaves appear dull and brittle rather than vibrant, check for moisture retention around the base of the plant.
If the fungal spots return despite following previous steps, remove any heavily infected leaves immediately to help prevent further spread. Additionally, consider applying a targeted fungicide as a fallback action, ensuring it’s specifically labeled for fungal issues in azaleas. Monitor the plant closely after treatment and adjust your care based on the ongoing observations.
A fully recovered azalea will display robust, vibrant green leaves without any signs of spotting or yellowing. If you begin to notice the faintest rustling spots again, it could mean the initial treatment wasn’t enough, or the conditions have reverted. Any persistent or new fungal growth could jeopardize the health of the entire plant. This could also signify that the environmental adjustments made were insufficient to create a proper growing environment. Keeping a notebook or log of your observations can assist you over time, establishing patterns related to humidity levels and infection cycles.
If fungal spots reappear, consider revisiting your watering methods and treatment routines. Sometimes, despite our best efforts, conditions can lead to new fungal outbreaks. A robust response may involve additional fungicide treatments or assessing whether other environmental factors, such as plant placement or neighboring plants, need adjustment. For instance, if another plant with known fungal issues is nearby, it could very well affect your azaleas, so address that promptly as well. If conditions remain unresolved, you might consider consulting with a gardening expert or local extension service for tailored advice, especially if the problem persists over multiple growing seasons.
FAQ
How long does it take for azaleas to recover from fungal spots?
Recovery from fungal spots can typically take 1 to 3 weeks, depending on the severity of the infection and environmental conditions. With proper care, including trimming affected leaves and applying fungicides, you should begin to see improvements within a few days. Areas with consistently humid weather might see a slower recovery due to ongoing conditions that favor fungal growth, so continued attention to environmental factors is essential.
Can fungal spots spread to nearby plants?
Yes, fungal spores can be easily transmitted to nearby azaleas or even other plants, especially in humid conditions. To prevent spreading, ensure that you remove any infected plant material immediately and monitor your garden closely. If you detect fungal spots on other plants as well, your treatment regimen will need to be expanded to cover potential additional outbreaks, potentially requiring a shift to systemic fungicides that address root issues.
Should I remove all infected leaves from my azaleas?
Yes, it’s best to remove all severely infected leaves to limit the spread of the fungus. However, only remove leaves that are visibly damaged, as excessive removal can stress the plant further. Focus on creating a healthy environment for regrowth by ensuring proper spacing and airflow. If you are unsure how much to remove, a good practice is to check for leaves that are at least 50% covered in spots and prune those back cautiously to encourage newer, healthier growth without risk of stress-related issues resulting from severe pruning.