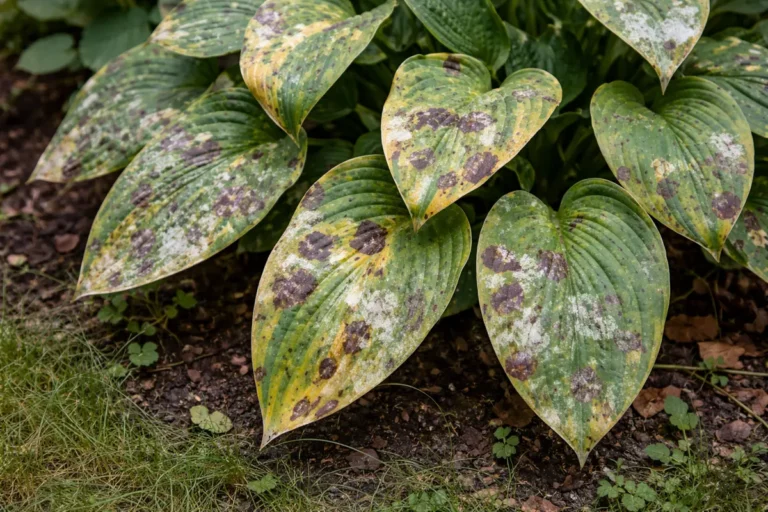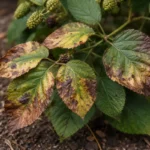
You may notice unsightly dark spots on your caladium leaves after periods of rain, which is why you need to know how to treat leaf spots on caladiums after periods of rain. These spots are often caused by fungal infections that thrive in damp conditions, leading to unsightly damage and decline in your plants. If left untreated, the problem gets worse and can spread, weakening the plant and making recovery harder, but taking action now can help; simply inspect for affected leaves and remove them, while also improving air circulation around your plants to reduce moisture.
Step 1 – Trim Affected Caladium Leaves Immediately

Start by removing any heavily spotted leaves from your caladiums using sterilized scissors. The plant will immediately look cleaner with fewer visible damage signs, allowing for a fresh start. Once this step is completed, you will create a more favorable environment for healthy growth to occur.
Acting quickly is crucial for caladiums, as prolonged moisture after rainfall creates a breeding ground for harmful fungi that cause leaf spots. If left untreated, these pathogens can proliferate, leading to significant leaf decay and weakening of the plant; healthy leaves can quickly become compromised, resulting in stunted growth and poor foliage. If you see yellowing around the edges of the leaves, check for these fungal infections to prevent further spread.
A gardener once failed to act when spotting symptoms after a heavy rain, resulting in rapid decay for many caladiums. This experience underscores how immediate action can be the difference between saving a beloved plant and suffering a complete loss. Remove damaged foliage promptly to avoid this dire outcome, as many underestimate the severe consequences of waiting too long.
By acting quickly, you limit the potential for leaf spots to escalate into larger areas of decay. Compromised tissues allow pathogens to invade systemically, leading to wilting or further leaf loss. As you observe plant responses, an unremoved affected leaf may continue to show discoloration, while a treated plant exhibits resilience in the healthy foliage that remains.
Timing was critical for one gardener who delayed pruning dull, spotted caladiums after a rainy spell. These plants suffered from widespread rot after two weeks, while a neighbor who acted swiftly experienced regrowth in just a week without severe damage. If you do not address the leaf spots promptly, check for waterlogged soil conditions that could exacerbate the issue.
Acting quickly after rain is vital for caladiums, as prolonged wet conditions can lead to fungal infections thriving in humidity. Delaying the removal of damaged leaves allows pathogens to penetrate deeper into the plant’s tissues, causing more serious rot and additional leaf loss. If you notice moisture lingering, examine the healthy leaves; you may observe wilting versus vibrant, upright ones shortly after trimming.
For instance, a gardener neglected to remove leaf spots swiftly after a heavy rain, leading to rapid fungal spread affecting the entire plant. In contrast, some gardeners mistakenly wait too long to assess the situation, failing to act before conditions worsen, often resulting in extensive overhead damage while the plant remains weak below. If adjacent leaves develop more spots, check the weather for upcoming rain and address the issue promptly.
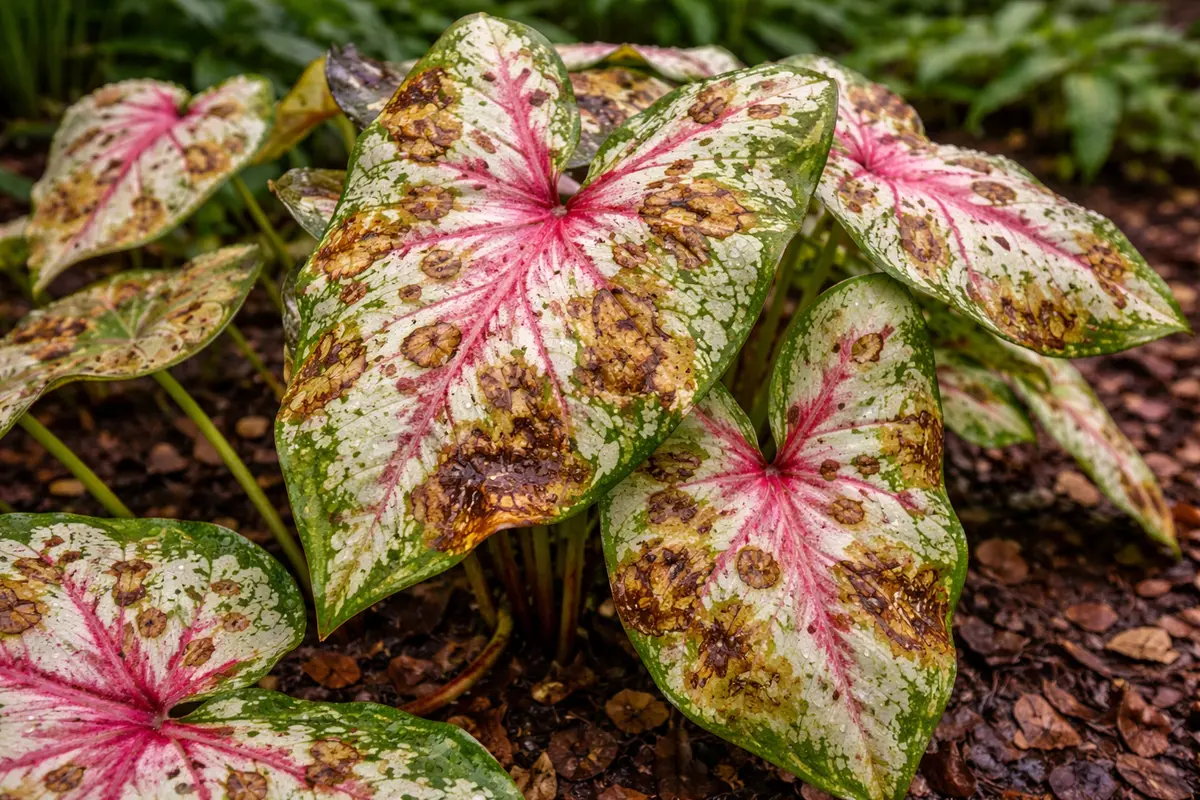
Trimming the affected leaves is essential as it eliminates a potential source of infection and reduces the number of fungal spores present. By removing the infected tissue, the plant can refocus its energy toward healthy growth rather than attempting to heal damaged areas. This newly cleared space promotes better light penetration and air circulation, vital for preventing further fungal growth. Neglecting to trim can facilitate the infection’s spread to other parts of the plant, particularly in humid and damp conditions, potentially leading to even greater foliage loss.
A common mistake gardeners make is only removing surface-level spots without inspecting surrounding leaves and stems. Always check the undersides of leaves, where disease often hides, as well as the stems for any infection signs. If left unchecked, what begins as a few leaf spots can quickly evolve into a widespread issue affecting the entire plant. If only a few leaves are pruned, the fungus may continue to thrive in nearby tissues, resulting in additional spots appearing shortly after treatment.
Step 2 – Diagnose Excess Moisture Issues in Soil
Inspect the soil moisture levels around your caladiums right after heavy rainfall. You will likely notice the soil feels overly saturated or even soggy, which can lead to root rot and promote fungal infections. Excess moisture causes the roots to become deprived of oxygen, which stresses the plant and leads to more leaf spots as the tissue begins to die.
Leaf spots often arise when water remains on the foliage, creating an ideal environment for fungal spores. Additionally, yellowing leaves may indicate root rot is affecting nutrient uptake, suggesting the need for corrective action. A clear contrast can be seen if the leaves start turning yellow while leaf spots are present—indicating both disease and root issues.
If the soil has a sour odor, immediately switch the caladium to a more suitable, well-draining potting mix to address potential root rot. This will help provide the roots with necessary oxygen and prevent further fungal infection. If you suspect that the leaf spots are the only issue without signs of yellowing, verify whether water splashes caused by overhead irrigation are damaging the leaves, as this may also introduce soil-borne pathogens.
Caladiums require well-draining soil because excess water can lead to root rot and fungal issues that appear as leaf spots. After rain, high humidity can exacerbate moisture retention in the soil, further stressing the plant. If you spot standing water around your caladium, this indicates poor drainage and the need for immediate corrective actions. Addressing moisture levels proactively is essential to keeping the roots healthy and preventing further damage.
If the soil continues to feel soggy, reassess your watering regimen and ensure the pot has adequate drainage. For example, if you detect pooling water in the pot, incorporating gravel at the base or repotting into fresh, well-draining soil can significantly enhance drainage. Always check if the pot size is appropriate; a too-small pot can retain excess water, inhibiting root growth. If these issues remain unresolved, leaf spot symptoms are unlikely to improve, making it vital to monitor soil conditions continuously after rainy periods.
Step 3 – Treat Caladiums with Fungicide for Recovery
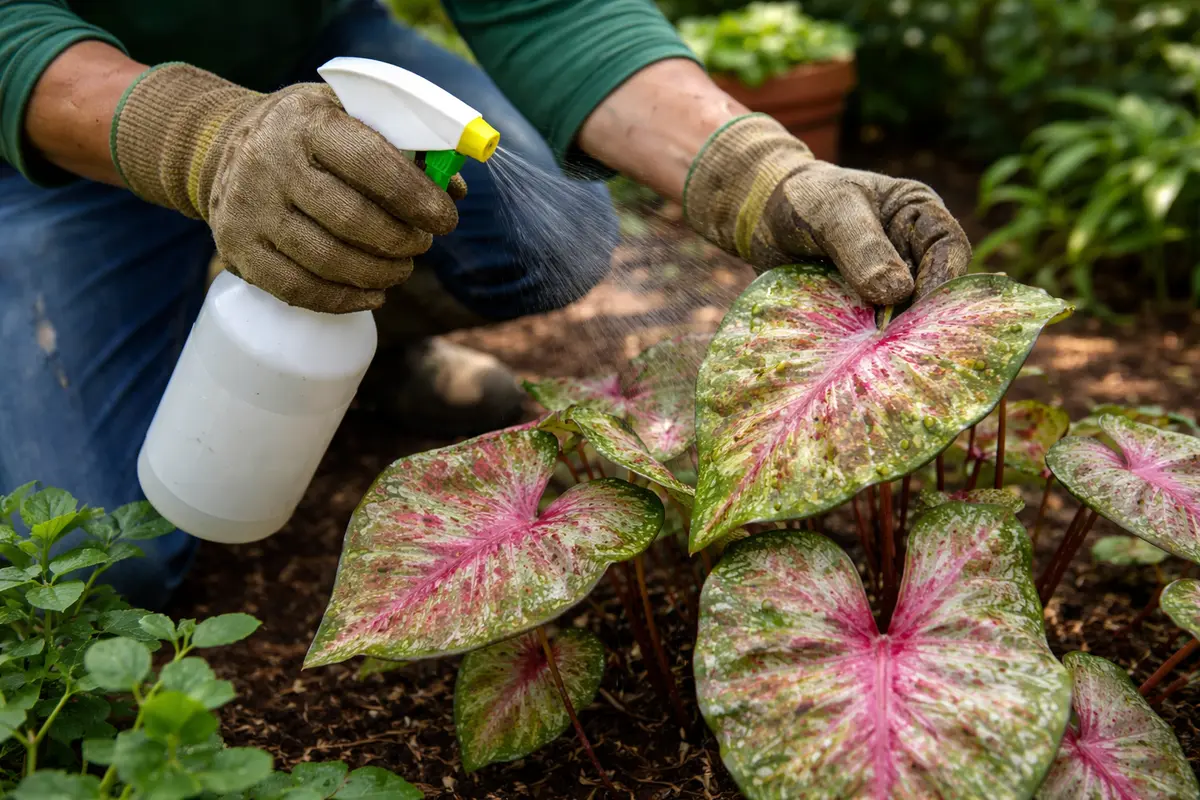
Apply a fungicide specifically designed for leaf spot diseases to the affected caladiums to facilitate recovery. This treatment will help eliminate lingering fungal spores, and within a week, you should see reduced leaf discoloration and the emergence of new, healthy foliage.
Recovery begins when you observe vibrant green shoots unfurling from the base of the plants, contrasting clearly with any remaining yellow or wilted leaves. It’s essential to continue monitoring growth over the next 2-3 weeks; optimal warmth and humidity can accelerate recovery. If you see healthy leaves developing, it indicates that your caladiums are successfully overcoming the stress caused by rain-induced leaf spots. On the flip side, if no new growth appears after this period, check for excessive moisture around the roots, as soggy conditions can significantly disrupt recovery.
Once the initial fungicide application is made, avoid the urge to overwater in response to past leaf spots. While you might feel the need to provide extra hydration, too much water can lead to root rot, particularly if drainage remains compromised from the prior rain. Aim for moist, well-draining soil that doesn’t become waterlogged. If, despite careful watering practices, you notice stunted growth or lack of improvement, inspect the soil for signs of water retention or poor drainage.
As you care for your caladiums during this recovery phase, expect the timeline for visible results to range from one to three weeks based on weather conditions. Observing vibrant green leaves without discoloration will confirm that your plants are healing. Factors like consistent light exposure and warm temperatures will speed up healing, while cool winds or prolonged cloudy conditions might impede your plants’ progress, resulting in sluggish growth.
During recovery, maintain an even approach to watering and fertilization; overdoing either can result in further complications for your caladiums. If leaf spots appear again, revisit your watering technique to confirm the soil isn’t remaining too wet after rainfall. A good balance helps ensure the roots are healthy and prepared to support new growth.
Typically, the recovery period for caladiums after rain-induced damage can last from two to four weeks, depending on environmental conditions. For instance, caladiums situated in well-drained soil with partial shade will usually exhibit growth more quickly than those in overly saturated areas or direct sunlight. Should you observe stunted growth, examining for excess moisture is crucial as prolonged dampness can hinder recovery.
Avoid the common pitfall of over-fertilizing during this recovery period. While boosting nutrient levels might seem beneficial, excessive input can stress the plants further. If your caladiums continue to show drooping leaves or develop new spots, scrutinize potential underlying issues like root rot or pest problems that could be affecting their health.
Following up on the fungicide treatment is vital; consistent application according to label directions will ensure all spores are treated effectively. Keeping to a proper watering schedule during this stage will support the plants’ recovery and health. Watch for any new leaf spots where treatments may have been ineffective; persistent issues could call for a stronger fungicide or a different treatment strategy. Remember, the active ingredients of your chosen fungicide will impact its efficacy based on varying soil and temperature conditions.
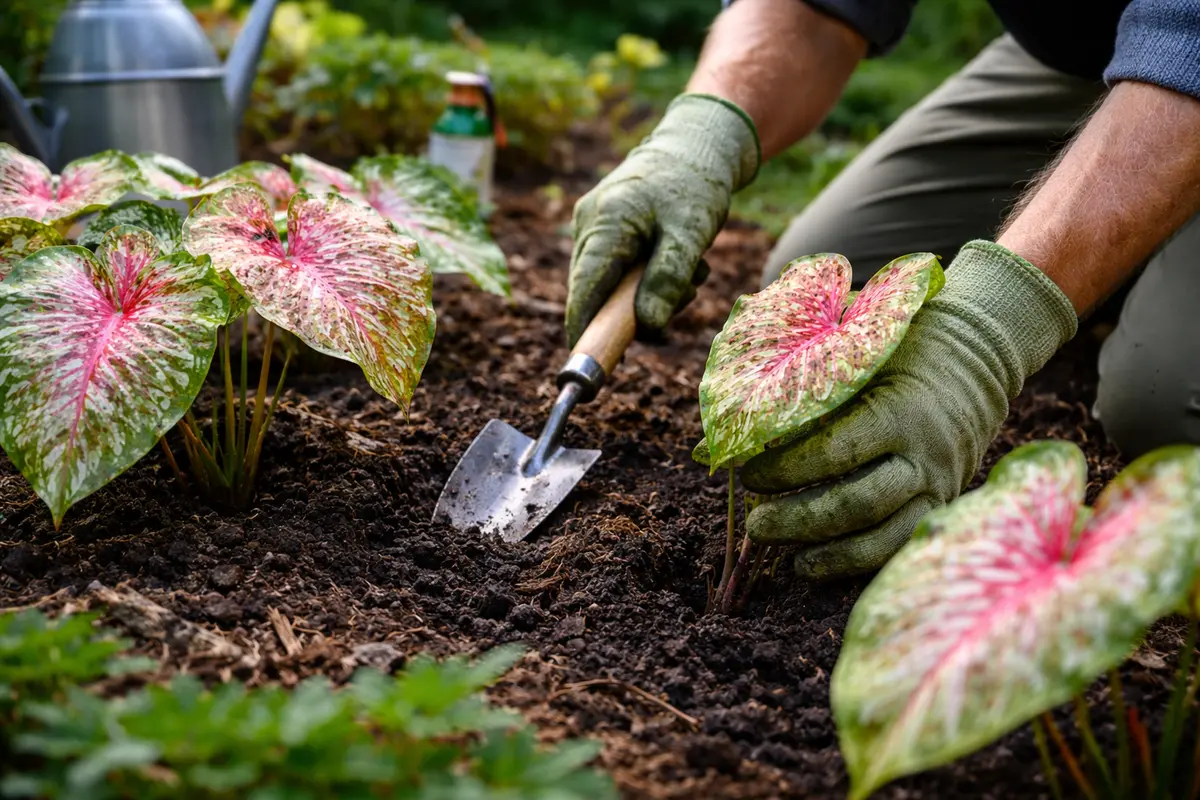
Step 4 – Protect Caladiums with Proper Spacing Techniques
Begin by ensuring proper spacing between caladiums to facilitate airflow and reduce humidity around the plants. Improved airflow will prevent moisture accumulation on leaves and deter fungal growth, making your plants less susceptible to leaf spots.
From here on, maintain a minimum of 12 to 18 inches of space between plants in any arrangement, especially during periods of high humidity. If your caladiums are already planted too close together, consider transplanting some to wider areas, as this will significantly enhance drying time after watering or rain.
During rainy seasons, regularly inspect the spaces around your caladiums. If neighboring plants hinder airflow by creating stagnant areas, trim or relocate them promptly to optimize the growing environment. Note that congested foliage can trap moisture; hence, ensuring open spaces leads to healthier plants.
In addition to spacing, prioritize the use of raised garden beds or containers. This setup promotes better drainage and airflow, further mitigating the risk of fungal diseases. If you choose to utilize containers, ensure they have adequate drainage holes and are elevated off the ground to allow excess moisture to escape.
For your next gardening assessment, evaluate whether excessive foliage from surrounding plants restricts air movement. If airflow issues persist, consider implementing additional pathways between plantings for improved access and ventilation. Moreover, switching from overhead to drip irrigation helps prevent water from lingering on leaves, minimizing the chance of leaf spot disease.
Step 5 – Inspect Caladium Foliage for New Spots Weekly
After a period of rain, check your caladiums for leaf spots at least every few days. Focus on the undersides of the leaves and areas where water may have pooled, as these are often hotspots for infection. Observe for any signs of new spots, discoloration, or a mushy texture, and plan to recheck in three to five days to monitor progress and adjust treatment as necessary.
A fully recovered caladium will exhibit vibrant, unblemished leaves that are firm to the touch, while early signs of the problem’s return include faded patches or wet spots that feel softer than healthy foliage. Note the contrast: a thriving plant will have crisp, intact edges, whereas one showing distress will exhibit browning along the margins beyond what is typical for the species. If the leaves start losing firmness again, check for remaining moisture in the potting mix and ensure proper drainage.
If symptoms persist despite following your care routine, consider applying a fungicide labeled for leaf spot diseases specifically after rain. Ensure adequate air circulation around the plants to prevent further fungal growth. If the problem returns frequently or worsens, escalate by consulting a local extension office for tailored advice on disease management in your area.
Monitoring your plants closely helps ensure that any signs of leaf spot disease are caught early. If new spots appear despite taking preventive steps, it’s essential to reassess your watering habits and environmental conditions, as leaf spots typically resurface in high humidity. Inspecting not only for spots but also for any leaf wilting or discoloration can help ascertain the overall health of the plant. Healthy plants will show firm, vibrant leaves, while signs of returning issues will include soft, wilting, or spotted foliage.
If you notice any new spots appearing, it would be wise to reassess your current treatment plan. Consider reapplying fungicide or adjusting moisture levels based on the ongoing conditions, especially if the area has seen recent heavy rains. Early intervention is always key—catching problems early can significantly improve your plants’ chances of making a full recovery. Additionally, if persistent leaf spots develop despite treatment, explore professional diagnostics, as this may indicate deeper underlying issues, such as root rot or long-term fungal infections.
FAQ
How long does it take for caladiums to recover from leaf spots?
Recovery typically takes about 2-4 weeks after proper treatment, including trimming and fungicide application, depending on the severity of the infection and environmental conditions. Observing new growth without new spots is a good indicator that your caladiums are recovering. However, if conditions remain unfavorable, this recovery period may extend significantly.
Can leaf spots on caladiums spread to other plants?
Yes, leaf spots can spread to other plants, particularly in humid conditions or if spores are carried by water droplets. Controlling humidity levels and maintaining plant spacing can significantly reduce the risk of transmission. If you frequently observe leaf spots on neighboring plants, consider adopting a more proactive approach to plant health across your garden.
Should I remove all affected leaves at once when treating leaf spots?
It’s best to remove all infected leaves promptly but do so without removing all foliage at once. Retaining some healthy leaves allows the plant to continue photosynthesis during the recovery process. Always aim to balance between clearing infected areas and ensuring the plant can sustain its health through optimal leaf coverage.