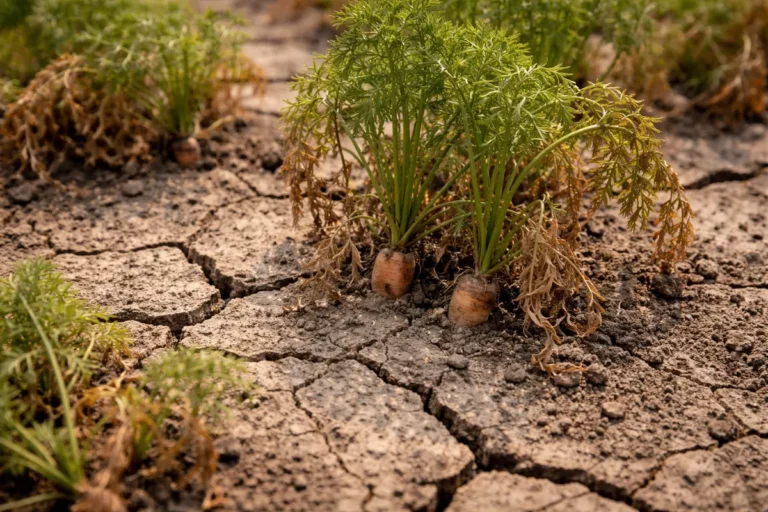
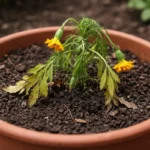
You may notice that your container carrots are struggling to grow, often presenting with yellowing leaves and stunted growth during a dry spell, which is why you need to know what to do when container carrots are stunted in compact soil. This issue arises from the soil’s density, preventing the roots from expanding properly, leading to wilting and overall decline. If left unchecked, these problems can worsen and ultimately weaken the plant, but fixing this is possible now; simply inspect the soil, adjust your watering schedule, and improve drainage. It’s crucial to take immediate action, as a delay can prolong recovery and hinder growth.
Step 1 – Water Stunted Carrots Right Away
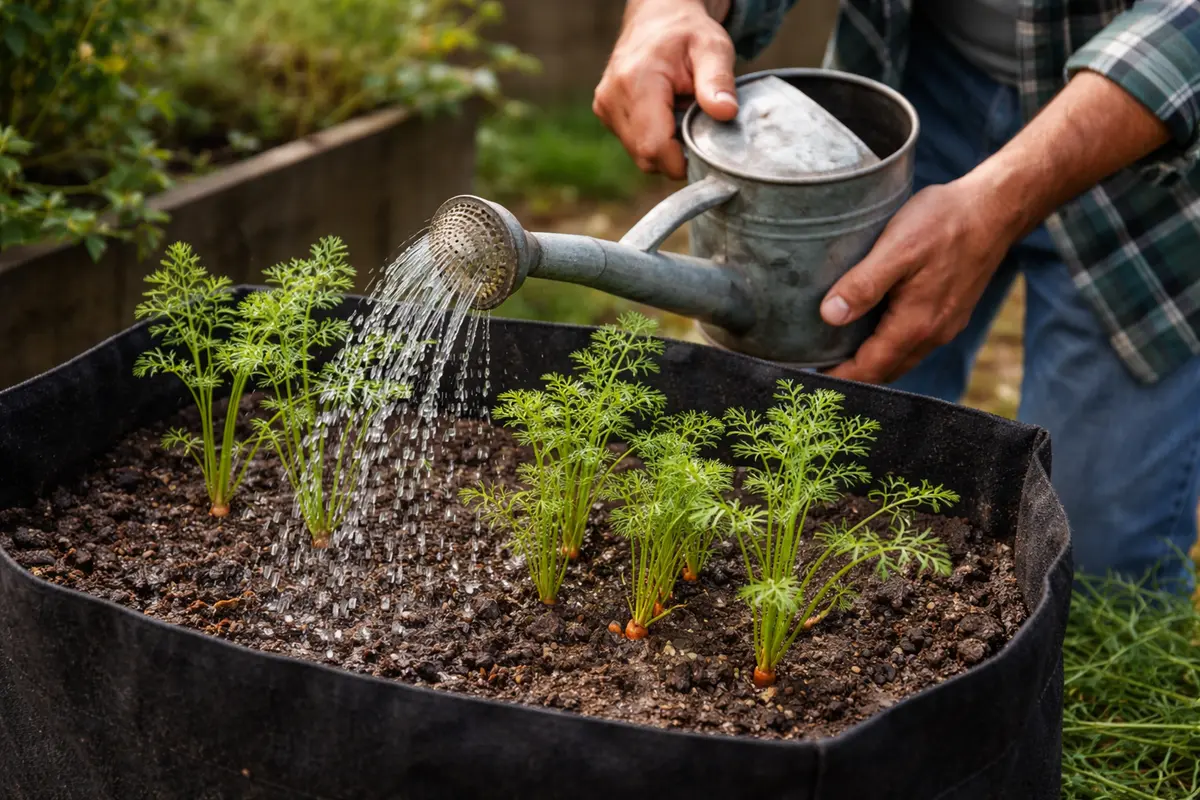
Water the carrots thoroughly to moisten the soil, aiming to uniformly saturate the area until drainage appears through the bottom of the container. You will see a change in the soil texture within an hour, as the usually dry, hard soil begins to absorb the water more evenly. Ensuring that every bit of soil gets adequate moisture is essential for the carrots since it sets the foundation for their recovery. Monitor the soil as you do this; if the water pools on top without penetrating, then deeper action is required to alleviate compaction.
Providing ample water to your carrots right now is vital. It helps alleviate soil compaction and allows root access to oxygen and nutrients. When soil is compacted, water tends to puddle on the surface rather than soak into the root zone, preventing roots from getting the moisture they need. This quick action will start reviving your carrots almost immediately, with the soil feeling more pliable and accessible within hours. If you are using a container with drainage holes, be vigilant about monitoring the output to ensure it provides an even spread of moisture. The aim is to see some moisture consistently draining out; if this doesn’t happen after an hour, significant compaction issues are at play.
Many gardeners overlook checking the soil’s moisture level before watering. If the soil appears dry on top, it can still be hard as a rock beneath. This makes it crucial to ensure that when you water, you do so deeply; aim to saturate the soil down to around six inches to maximize root access, especially after heavy rains. If you discover that the water is pooling rather than being absorbed, this is a telltale sign that you must first break up the compacted soil to promote better drainage. Use a soil probe to test moisture levels at different depths if needed; observing moisture at six inches deep can clarify how urgently you need to address compaction. Remember, if the topsoil seems moist but deeper layers remain dry, it indicates the upper layer’s absorption is misleading about the overall soil condition.
Step 2 – Analyze Soil Compaction Impacting Carrots
Inspect the carrot roots for signs of compaction. If you find that the roots are tightly bound or have difficulty spreading out into the soil, then the soil is likely too compacted. Carefully remove a carrot to observe how far down the roots extend, and examine if they’ve stunted midway. Look particularly for vertical “j-bends” where the carrot root has to curve due to compact soil; encountering these will confirm severe compaction issues. If the roots only extend a couple of inches down rather than several inches, this necessitates addressing root growth obstruction immediately.
Identifying soil compaction is essential because it directly limits root space and nutrient access. When the soil compacts, it creates an oxygen-deficient environment and restricts the ability of roots to grow. Roots need space to expand and absorb nutrients, and compact soil hampers this process, leading to poor overall growth. Look for root deformities, as carrots may take on unusual shapes due to confinement. If roots are brittle or split, it could signal that they have been under stress and require immediate corrective action. If you observe multiple roots clustering rather than extending, it may suggest that the container is too small, necessitating a larger pot.
If, during your inspection, the soil is sticky or smells sour, then it may be overly saturated and at risk of suffocating roots. In that case, consider letting the container dry out completely for a day or two before replanting. Additionally, if the soil is difficult to break apart, consider taking a fork or trowel to loosen it gently; this also aerates the space. Pay attention to the texture—if it’s dense like clay, dealing with this compaction is crucial, whereas sandy soils will have different watering needs. Should you find the soil easier to work with but still compacted, you may need to carefully loosen the soil with a hand trowel. If you must aerate, ensure this is done gently—as breaking the roots in a vulnerable state can cause further setbacks to growth.
Step 3 – Add Nutrients to Help Carrot Recovery
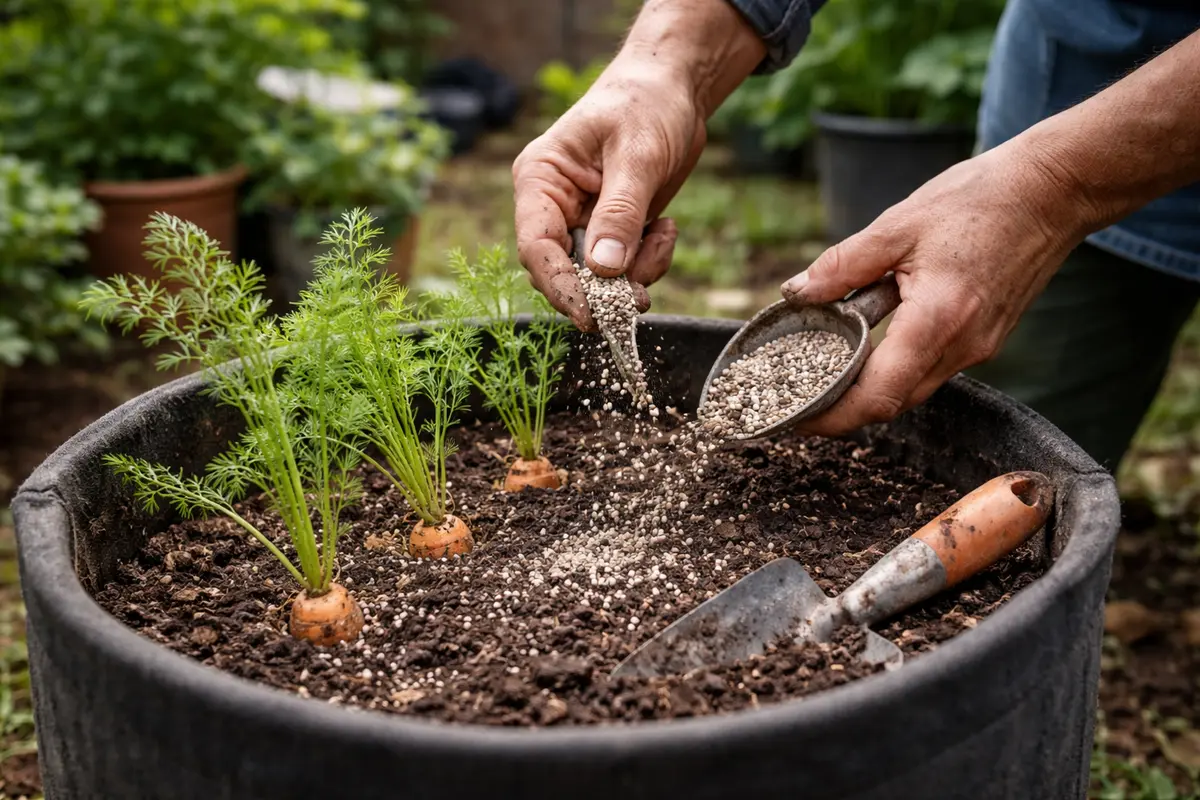
Fertilize immediately using a balanced organic fertilizer, aiming for a mix that contains approximately a 5-10-10 ratio of nitrogen, phosphorus, and potassium. This balanced approach will encourage both root growth and foliar development, optimizing the recovery process. Expect to see the effects of this, with new growth likely appearing healthier and greener within a week of application. When fertilizing, water it in gently to encourage absorption; if done incorrectly, it can lead to uneven application and poor plant health.
The addition of nutrients recovers your stunted carrots as they replenish lost minerals and energize growth processes. Carrots thrive when nutrients like nitrogen, phosphorus, and potassium are available, as these play key roles in root development and foliar growth. After fertilization, anticipate seeing greener, upright foliage geared towards healthy root production, coupled with a more robust flavor profile as the plants recover. Additionally, applying nutrients means you’ll start to see a shift in structure within a couple of weeks—look for improved leaf density, which indicates healthier foliage. However, avoid fertilizing if rain is predicted within a day, as this could wash away the nutrients you’ve applied before the plant can absorb them.
However, be cautious about the potential of over-fertilizing, as this can lead to burning the carrot roots or excessive leaf growth at the expense of root development. Monitor the plant’s response post-fertilization; if you observe any signs of leaf wilting or browning, reduce the fertilizer application and consider switching to a lower concentration product next time. It’s essential to remember that applying fertilizer before a rainstorm can wash nutrients away, so timing your applications can help ensure a successful bloom. Additionally, a soil test before application will help identify any specific deficiencies your soil may have, ensuring you provide precisely what your carrots need for robust growth. After heavy rain washes nutrients, stop drooping ferns during is possible.
Step 4 – Improve Soil Aeration for Stronger Carrots
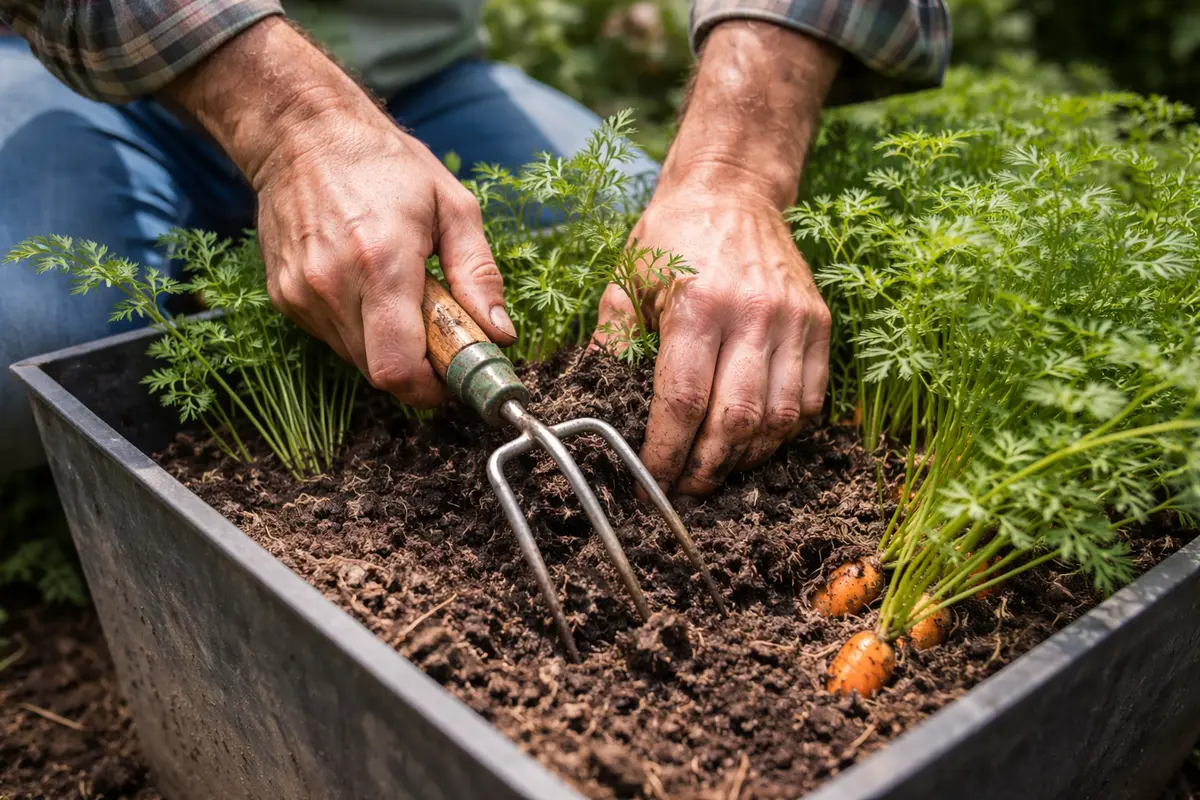
Start by loosening the compact soil in your container carrot garden with a garden fork or trowel, ensuring the soil is crumbly and well-aerated. This action will allow roots to expand, preventing stunted growth and promoting healthier carrots. Aim for a crumbly texture, which fosters good airflow and moisture retention; if the soil feels like clay, it likely needs more organic matter added.
Stunted growth often occurs when the soil becomes too dense, restricting root expansion and nutrient uptake. By breaking up the soil, you directly address the issue, creating an environment where carrot roots can grow freely. Without this step, you may notice your carrots remaining small and underdeveloped, while those in well-aerated soil thrive and mature properly. After aeration, water the soil again to settle any displaced particles and enhance nutrient availability.
Follow up by adding organic matter such as compost or peat moss into the soil during the spring growing season. These additions can substantially improve soil texture and nutrient availability. If the weather is particularly dry, regularly check the moisture levels, as both conditions influence root health. If you observe wilting or yellowing leaves, consider checking the soil for adequate moisture levels as an additional preventive measure. This is crucial during early growth stages, as young plants are particularly sensitive to drying out.
The incorporation of organic matter breaks up compacted soil and introduces beneficial microbes that enhance soil health. These materials help create air pockets that allow roots to access oxygen and nutrients efficiently. Without this step, even after watering and fertilization, growth can still be stunted by the underlying root environment. Regularly amending your soil yearly to combat compaction and nutrient depletion is recommended, ideally in early spring or fall when the plants are less active. Scheduling the addition of organic materials at the beginning of the growing season allows them to integrate into the soil as the temperatures rise.
Seasonal changes can affect how you adjust your soil’s aeration. During the winter months, for instance, you may not need to amend the soil as frequently because biological activity slows down; however, during the spring and summer, plan to enhance soil structure before planting new carrots. After adding organic materials, always check back with an aeration probe or shovel to assess whether the soil remains loose; comparing how easily the soil crumbles versus how it held together previously can help set a foundation for strong growth in the following seasons. If roots struggle even after adding organic matter, increasing container size might be necessary to give more room for growth, allowing for healthier carrots. If new toppings of organic material don’t improve conditions, reassessing your overall gardening strategy and potentially altering the synchrony of planting may be needed.
Step 5 – Inspect Carrot Foliage for New Growth Signs
Check the carrot foliage every few days for signs of new growth. Healthy carrot leaves should appear noticeably more vibrant green and sturdier within a week or two. Witnessing bright new growth is a promising sign that the remedial measures you instituted are taking effect, indicating that your carrots are no longer stunted due to compact soil. Keep a close watch for any development; any delay may signify that your efforts need additional intervention.
A consistent check-in schedule allows you to gauge whether your remedial measures are effective. Healthy carrot leaves will appear firm and upright, contrasting with the earlier wilting or yellowing manifestations. Any new growth signifies that the carrots are adapting and recovering from the stress they faced in compact soil. Note that new foliage is a positive development, but be vigilant for any lasting discoloration, which may indicate underlying issues in nutrient availability. If stunted growth continues, look closely for any signs of root rot or pest damage, which could hinder recovery. If you consistently see poor foliage correlating with compact soil indicators, it may also suggest that pests have taken residence in the area, competing for nutrients.
If you notice the yellowing recurring or stunted growth, it indicates that either the nutrient levels are still low or that the soil remains too compact. Return to your earlier checks—if the soil is still hard, moisture must be evaluated, and nutrient levels should be reassessed to identify ongoing needs for improvement. If progress stalls, consider revisiting your fertilizing schedule or even introducing a foliar feeding of micronutrients as a boosting agent. In situations where growth stalls despite best efforts, consider rotating your crop; growing different plants in the same soil can sometimes prevent nutrient depletion and soil degradation. Keeping a garden journal of your carrot condition can be beneficial as it allows you to track changes and identify successful strategies for healthier carrots in future plantings.
FAQ
How long will it take for stunted carrots to recover?
Recovery can take anywhere from one to four weeks, depending on the severity of the stunting and soil conditions. Generally, after addressing watering and soil compaction issues, you should begin seeing visible progress within a week. If growth does not resume, consider re-examining factors such as pH levels and soil drainage, which may be inhibiting root development. Observations made during this period become critical for determining any additional steps, such as re-fertilization or revising water management strategies.
Should I remove stunted carrot tops?
No, it’s usually best to keep the tops attached as they continue photosynthesis, which aids in the recovery process. Removing them can stress the plant further, especially if it is already struggling. In some situations, however, proactively trimming excessively damaged leaves may channel the plant’s energy towards healthier growth instead, allowing the roots to focus on regaining strength without competing against weak foliage. This can also help manage diseases that may fester in dying leaves, improving overall plant vigor.
What would cause a reoccurrence of stunted growth?
Reoccurrence typically arises from persistent compaction issues, insufficient nutrients in the soil, or environmental stressors like inconsistent watering practices. Regular monitoring and amending the soil as needed will significantly reduce the chance of these problems returning. Establishing preventive measures such as crop rotation and interplanting crops with better nutrient retention can also help maintain optimal conditions, allowing your container carrots to flourish throughout the season.