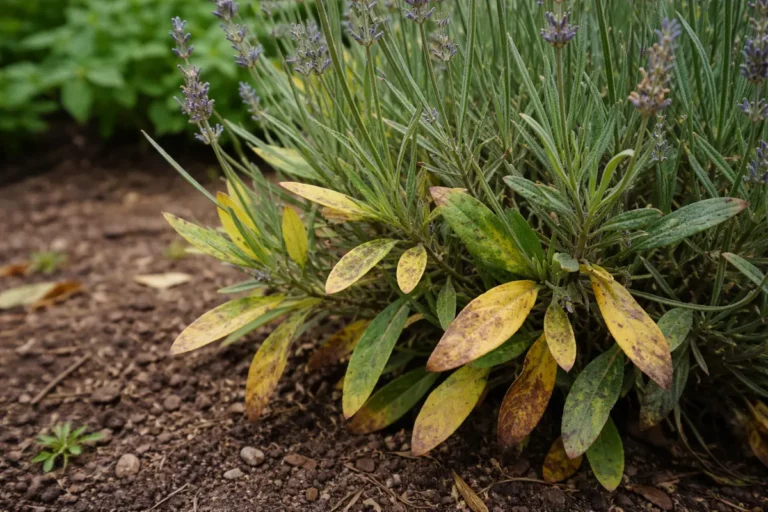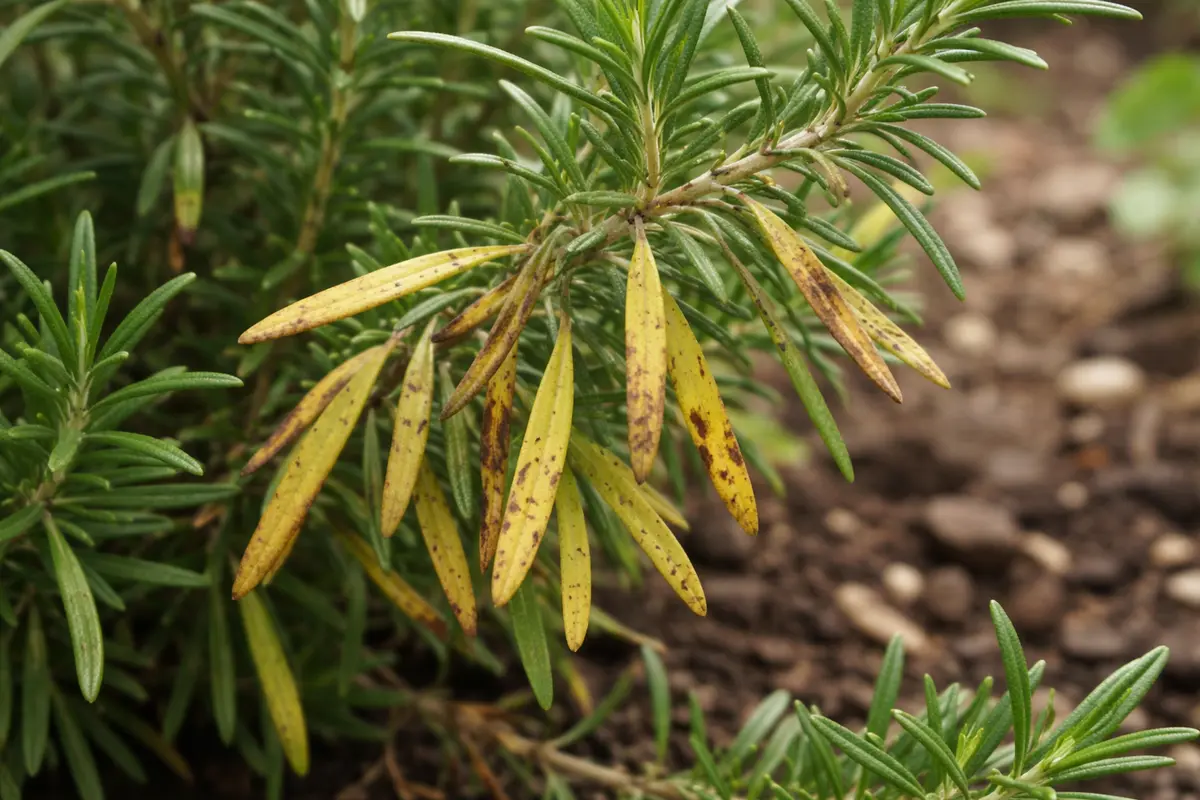
You may notice your rosemary plants showing signs of distress when summer heat intensifies, which is why you need to know why are my rosemary leaves turning yellow in summer. This yellowing often indicates issues like nutrient deficiency or improper watering, leading to wilting and potential leaf drop. If left untreated, the problem can spread and weaken the plant significantly, but you can fix it now by inspecting the soil moisture, adjusting your watering routine, and checking for any nutrient imbalances.
Step 1 – Inspect Rosemary Leaves for Pests Quickly
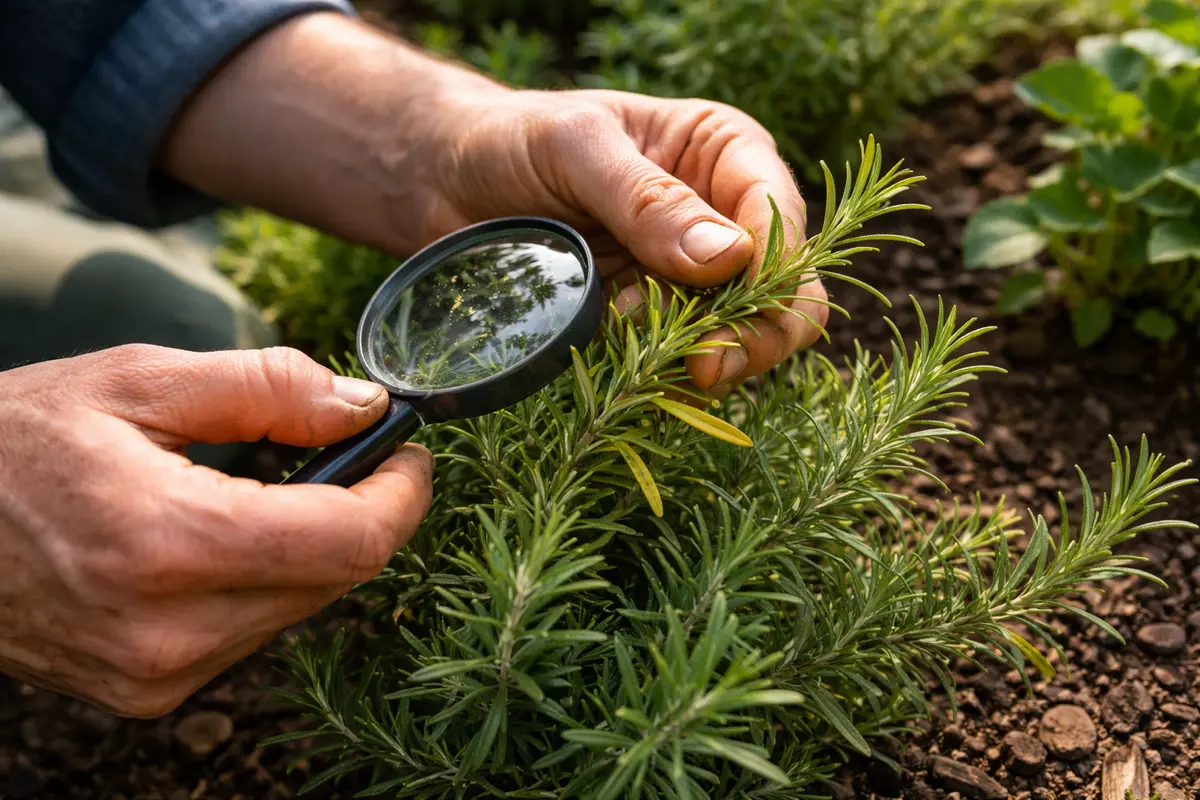
Begin by examining the undersides of your rosemary leaves for tiny insects and webbing. You will likely see any pest infestation immediately, which could be damaging your plant. Checking for pests quickly allows you to respond before they multiply and spread to the healthy parts of your plant. An effective inspection technique involves gently shaking the branches to dislodge any hidden pests. A good practice is to inspect early in the morning or late afternoon when pests may be more visible due to reduced activity at those times.
Pests such as spider mites and aphids can weaken your rosemary significantly. These insects suck the sap from the leaves, leading to yellowing and eventually causing the foliage to fall off. A clear observable symptom of infestation is stippling on the leaf surfaces, appearing as tiny yellow flecks against the green foliage. If caught early, you can often prevent further damage by tackling the problem right away. Using a magnifying glass can help you spot even the tiniest insects that are not easily visible with the naked eye.
Many gardeners overlook pest inspection, focusing instead on watering or fertilizing. A common mistake is assuming that yellow leaves simply need more nutrients. However, if pests are the real issue, attempting to feed the plant may worsen the problem by further stressing it during an infestation. If you notice the leaves curling or a sticky substance on the plant, these are signs of aphid or scale pest problems, making it crucial to take immediate action. If you discover pests, you might opt for a gentle insecticidal soap or neem oil solution to treat the infestation, applying it directly to the leaves and stems every 5-7 days until the issue resolves.
Step 2 – Diagnose Watering Issues Causing Yellowing
Start by examining the soil moisture levels around your rosemary plants; if the soil is too dry or waterlogged, adjust your watering schedule accordingly. Once corrected, you should notice a gradual return of color in the leaves as the plant recovers from stress.
Yellowing leaves often indicate root distress caused by improper watering practices. When soil is consistently dry, rosemary roots may struggle to absorb nutrients, leading to yellow leaves. Similarly, overly saturated soil can suffocate roots, causing nutrient deficiencies and yellowing; if the soil feels muddy, your rosemary is likely suffering from excess moisture. Check for drainage issues if you observe this condition.
If the yellow leaves remain and the soil appears compacted, aerate the soil by gently loosening it with a fork to improve airflow and water penetration around the roots. Additionally, if you notice any signs of pests like spider mites, treat the plant with insecticidal soap to prevent further damage, as pests can contribute to yellowing leaves.
Understanding the moisture requirements of rosemary is vital. This herb thrives in well-drained soil that allows its roots to breathe. Overwatering can create a soggy environment, leading to yellowing leaves due to lack of oxygen and nutrients. The roots may instead begin to decompose, resulting in a sour smell. Inspecting for root rot, you might find blackened or mushy roots—these roots should be trimmed away—while underwatering leads to stress and can turn leaves yellow. A good warning sign involves the leaves appearing dry or crispy as they lose turgidity from lack of water.
If your soil smells sour, indicating it is waterlogged, you should repot the rosemary in fresh, well-draining soil immediately. This process involves carefully removing the plant, trimming away any rotten roots, and repotting it in a mixture that includes sand or perlite for better aeration. On the other hand, if you find that the soil is too dry, start a regular watering schedule — water deeply until moisture reaches at least 6 inches down and ensure the top inch of soil is allowed to dry out fully between waterings. This drying process promotes root health and prevents yellowing in the future. Make a habit of observing the plant after watering; healthy rosemary will perk up within hours of receiving adequate moisture, showing firm, upright leaves in contrast to its previous drooping state.
Step 3 – Fertilize Rosemary to Revive Discoloration
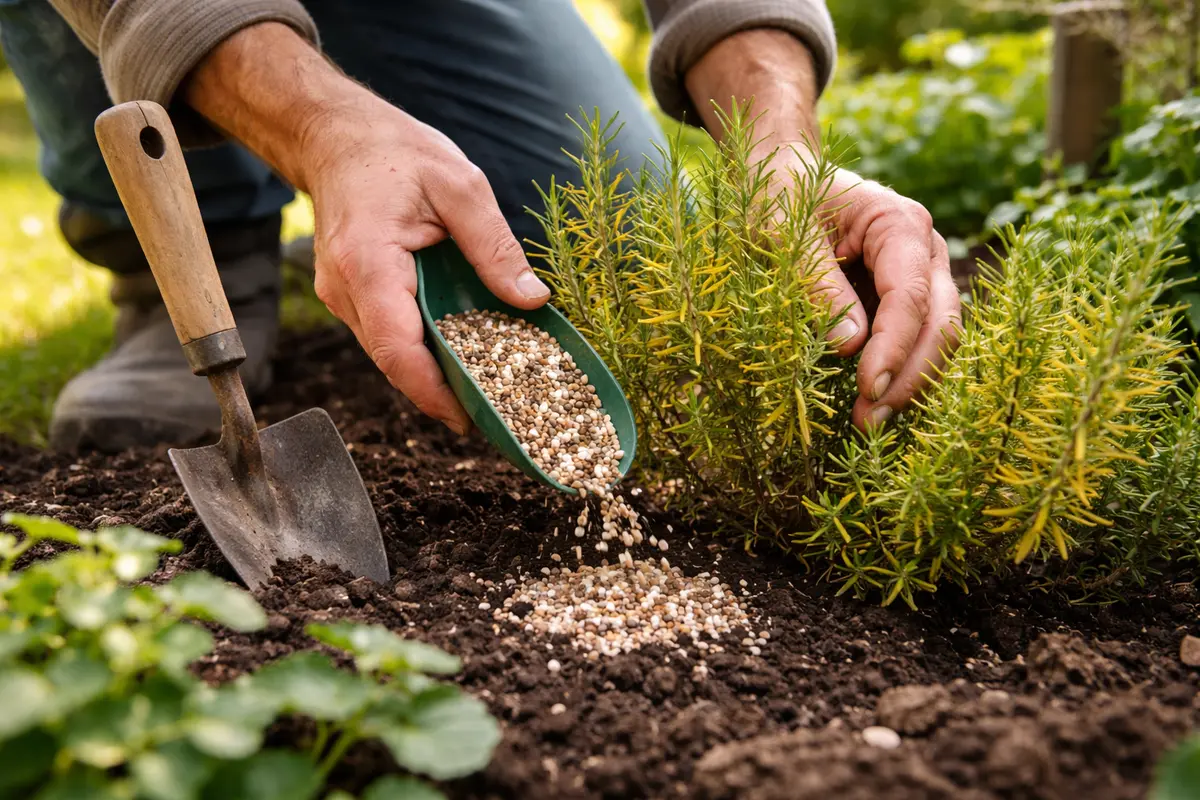
Apply a balanced, slow-release fertilizer soon after addressing water issues; observe the label for specific measurement instructions. Within a week of fertilizing, you should notice that the new growth appears greener and more vibrant. This incremental recovery indicates that your rosemary is regaining its health and vitality. For instance, consider using a fertilizer with an N-P-K ratio of 10-10-10 or 14-14-14 to ensure a balanced nutrient supply; mix it according to package specifications to avoid burning the roots.
Fertilizers provide essential nutrients such as nitrogen, phosphorus, and potassium which are vital for leaf health and overall plant growth. Without these nutrients, rosemary can exhibit yellowing leaves as it struggles to produce chlorophyll, the critical pigment aiding in photosynthesis. If your rosemary appears to be growing sluggishly even after fertilizing, this could indicate nutrient lockout from over-fertilization or poor soil conditions. A helpful observation is that healthy soil should feel crumbly and well-aerated, while compacted soil can retain excess moisture and prevent nutrient absorption.
A frequent mistake during the recovery phase is over-fertilizing, which can result in nutrient burn. It is crucial to follow instructions on any fertilizer you choose and to notice the condition of the leaves — burnt edges can tell you that you may have applied too much. If leaf tips are browning or crispy, consider flushing the soil to remove excess fertilizer salts by watering thoroughly until the water runs clear from the drainage holes. Watch for new growth as a sign that the plant is absorbing nutrients properly; if this does not occur within two weeks, consider confirming your watering schedule and soil conditions again, and perhaps test the soil for pH levels to rule out inappropriate acidity.
Step 4 – Water Deeply to Prevent Summer Stress
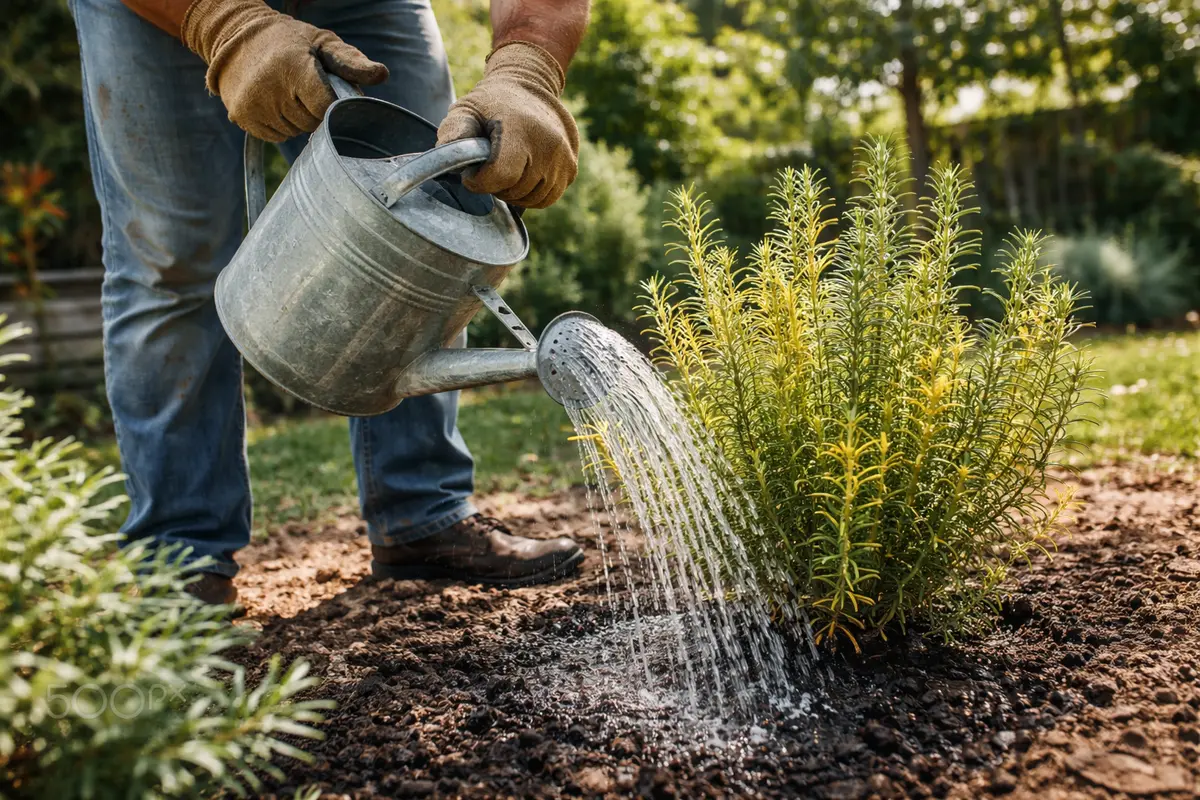
Start by checking the moisture levels of the soil surrounding your rosemary plants. Adjust the watering schedule to ensure the soil remains well-draining yet consistently moist, leading to healthier, greener leaves within a week.
Excess moisture can lead to root rot, causing yellowing leaves, unlike rosemary thriving in dry conditions. By maintaining a balanced watering routine, you promote optimal soil conditions that prevent water accumulation, targeting the root cause directly. If the soil remains soggy, check for drainage issues or consider repotting your rosemary into a container with better aeration.
During extremely hot summer months, increase the frequency of checks on soil moisture, especially if there is little rain. Additionally, mulching around the base of the plant can help regulate soil temperature and moisture levels, providing an extra layer of protection against drought stress that may trigger yellowing.
Excess moisture and inadequate sunlight are primary conditions that trigger yellowing in rosemary. If your rosemary is in a shaded area during peak summer hours, coupled with heavy rainfall or overwatering, the leaves will start to yellow. This prevention routine maintains optimal soil conditions and sunlight exposure, helping to address root-level problems effectively.
As summer temperatures rise, enhance your prevention routine by adjusting your watering schedule to ensure the soil dries out more quickly between waterings. If you notice prolonged dry spells, increase your watering frequency but remain cautious of drainage. If not bright sunlight → check for any nearby trees or structures that might be casting shade on your plants.
Watering deeply encourages the roots to grow downwards, building a stronger root system that can withstand heat and drought. Shallow watering often leads to weak roots that can’t absorb moisture effectively, causing distress that results in yellowing leaves. If you notice that the leaves are curling and the soil remains dry even after watering, this could indicate a need for deeper watering or even a need to amend the soil with organic matter to improve moisture retention. Regularly reach down to feel the moisture level; a balanced approach includes allowing the soil to dry slightly without letting it fully dry out to avoid stress.
Consider the seasonal climate; in extremely hot and dry conditions, you may need to water more frequently, while in cooler or more humid periods, the rosemary will require less. Adjusting your routine based on weather patterns—taking care to note any irregular changes—ensures that your rosemary remains healthy and thriving throughout the summer. During rainy periods, observation is necessary to avoid over-saturation; if drainage is poor, consider relocating the pot or amending the soil to improve flow by incorporating sand or perlite, especially if some roots begin to surface, indicating that the plant is struggling for space and nutrients.
Step 5 – Check Rosemary Growth for New Yellowing Weekly
Check on your rosemary once a week to monitor its progress and look for any signs of recurring yellowing. You should notice new green shoots and firm leaves by this stage, indicating that your efforts have been effective. If yellowing returns, it’s time to re-evaluate your previous actions. Be prepared to inspect the leaves and the soil again before making any changes to care routines. Record observations about new growth and any changes in leaf color, which can guide your next actions.
A fully recovered rosemary plant should exhibit rich green foliage and robust new growth. In contrast, if yellowing reappears, you may spot limp leaves that feel soft or mushy, suggesting that water retention has once again become an issue or that there is another underlying problem. Regular inspections help catch any incongruities early; if found, tightening your care regimen immediately can ultimately save the plant. Common indicators of water stress include wilting and browning edges of the leaves, both of which require immediate corrective actions, ideally within 48 hours.
If new yellowing arises despite your best efforts, consider the potential for pests, nutrient needs, or environmental factors that could be influencing the plant. For example, if you notice new insect activity or any signs of disease, immediate action is necessary. Adjusting care routines and being proactive about conditions can help prevent the problem from escalating further. Pay close attention to any changes and be ready to act quickly—if infestation or environmental stress is indeed the cause, acting promptly can shield your rosemary from long-term damage.
FAQ
Can yellow rosemary leaves spread to other plants?
Yes, if the cause is a pest infestation, the pests can easily spread to nearby plants. Addressing the yellowing leaves promptly helps mitigate the risk of spreading the problem, which often happens through contact or airborne transmission, especially with pests like aphids.
Will my rosemary recover if I follow these steps?
With consistent care and attention to watering, fertilizing, and monitoring, rosemary has a strong potential to bounce back. Typically, new healthy growth emerges within a few weeks after correcting the initial stress factors. However, remember that recovery can vary based on the plant’s previous health conditions and the environment; extreme conditions can delay this process although most plants respond positively with the right care.
Should I remove yellowing leaves immediately?
It’s best to wait until you’ve diagnosed the problem before cutting away the yellow leaves, as they may still be photosynthesizing. However, if they remain yellow for too long or start to wilt significantly, trimming helps the plant focus its energy on healthier parts. If the yellowing is extensive and affects a larger number of leaves, cutting them back will allow the plant to redirect resources to producing new, healthy growth. Make it a habit to assess the overall appearance of the entire plant rather than focusing on individual leaves to guide your cutting decisions.