You may notice that your rose bushes have developed yellow leaves after heavy rain, which is why you need to know what to do when rose bushes show yellow leaves after heavy rain. This yellowing typically occurs due to over-saturation, leading to root stress and potential leaf drop. If left unaddressed, the issue can spread and weaken the plant, but fixing it is possible now; just be sure to check the soil moisture and adjust your watering routine accordingly.
Step 1 – Inspect Rose Leaves for Damage After Rain
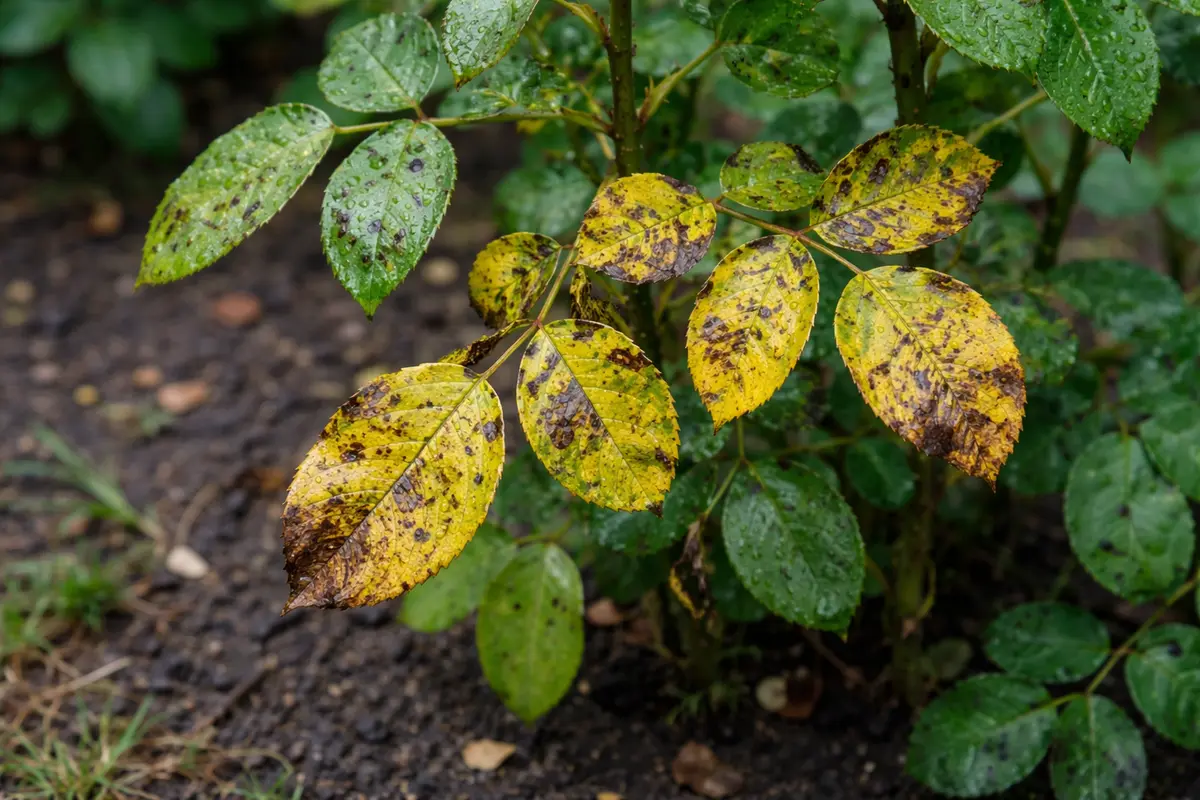
Look closely at the leaves for signs of yellowing or spots. You will see if the leaves are limp or curling within a few hours of inspection. If there is a discolored area on the leaf, even small, it suggests that the plant is experiencing distress, which could also be an early sign of fungal infection. Within hours of heavy rain, the leaves can appear saturated and heavy, causing them to droop. Weigh the condition of the leaves against the time since the last rain; if it’s been more than 48 hours and the leaves stay yellow, deeper issues may be at play.
Inspecting the leaves immediately helps identify any damage caused by the heavy rain and may provide clues to underlying issues such as fungal infections or nutritional deficiencies in your rose bushes. Pay particular attention to the leaf veins; yellow leaves that have green veins may indicate a nitrogen deficiency, while leaves with even color could suggest water root rot issues. If the yellowing is patchy and accompanied by dark, water-soaked spots or black streaks, it’s a sign of a potential fungal issue that may spread quickly, making it critical to act promptly. Over time, signs of distress could escalate, leading to wilting and leaf drop, which further compromises the overall health of the plant and could ultimately kill it if left untreated.
One common mistake gardeners make is assuming that all rain is beneficial for their plants. For example, if there is excessive rain and the leaves begin to yellow, many gardeners skip vital checks that could prevent more serious issues. A timely inspection ensures that you can address any problems as soon as they arise. Furthermore, if you notice that the yellowing begins at the bottom of the plant and moves upward, this can suggest an environmental shock due to the heavy rain, indicating that immediate steps need to be taken to mitigate further stress. Additionally, look for any excess water pooling around the base of the plant, as standing water can exacerbate leaf yellowing and create ideal conditions for root rot and other diseases.
Step 2 – Evaluate Soil Drainage Around Rose Bushes
Check the soil around your rose bushes for drainage issues. You will notice whether the soil is overly saturated or muddy after a downpour. Take time to dig down at least 6 inches to assess how wet the soil remains; surface-level dryness might mask deeper problems. If the soil remains compacted and heavy even days after rainfall, you may be facing severe drainage issues that compromise root viability.
Soil drainage is critical for the health of your rose bushes. If the soil retains too much moisture, it can drown the root system, making it difficult for the plants to absorb essential nutrients and water. A key indicator of poor drainage is soil that remains muddy for more than a few hours after rain; this condition increases the risk of developing root diseases such as root rot. This situation often leads to root rot, a debilitating condition that can ultimately kill the plant if not corrected. It’s advisable to conduct a soil percolation test, where you dig a hole about 12 inches by 12 inches and fill it with water to see how long it takes to drain. Ideally, the water should drain within an hour; if not, it may be time to strategize on soil amendments or changes in planting layout.
If the soil feels particularly soggy and has a sour smell, this indicates that there could be root rot developing. Additionally, if the soil appears dark and crumbly versus light and airy, the conditions could be unfavorable for rose growth. In this case, try digging up the roots gently to examine their condition; examine them for signs of rot or disease. If the roots are mushy, dark, or falling apart when disturbed, you may need to trim them and improve drainage by adding organic material like compost or perlite to the soil. Evaluate whether you may need to create raised beds or install a French drain to redirect excess water away from the rose bushes, as poor drainage can persistently invite future problems. Also, if your garden is prone to flooding or water accumulation from nearby sources such as driveways or downspouts, consider using landscape fabric to help guide excess moisture.
Step 3 – Provide Nourishing Water for Rose Recovery
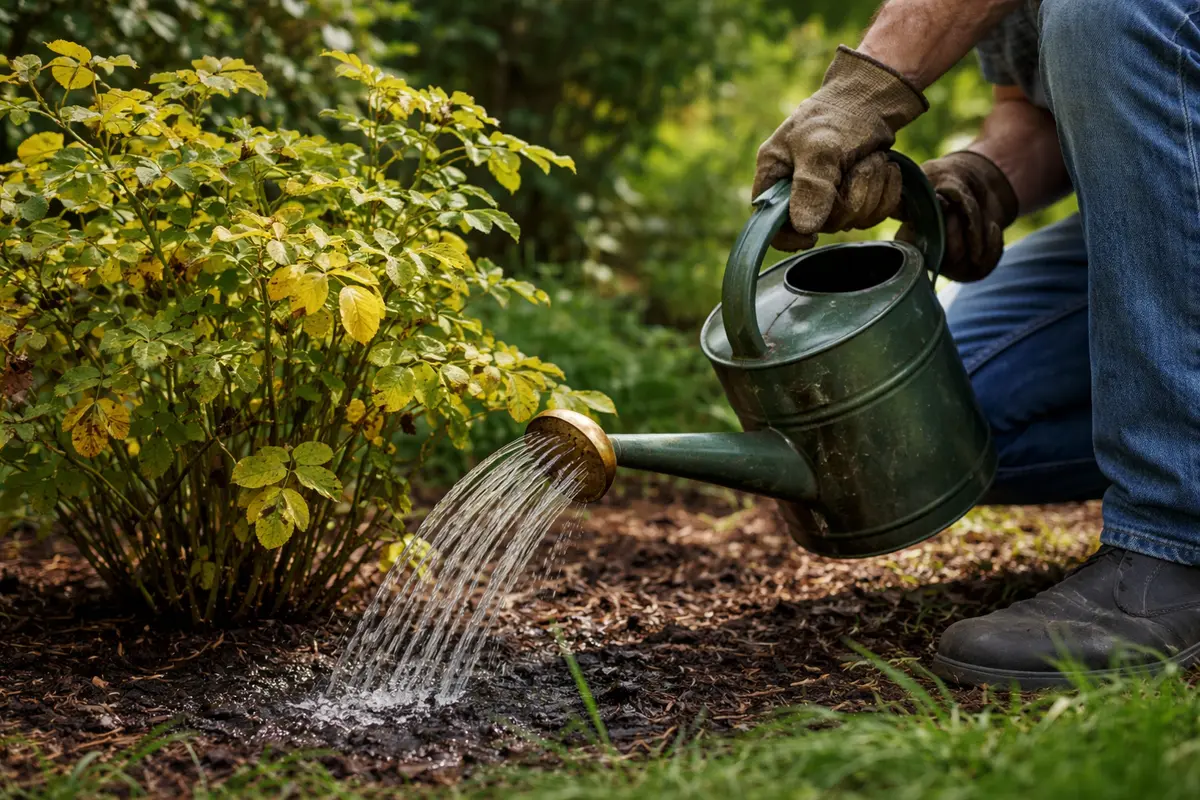
Apply a deep watering to the base of the rose bushes, soaking the soil but allowing it to drain well. You should notice the soil around your roses becoming moistened evenly, encouraging healthy root function. Aim to deliver approximately 1 to 2 inches of water slowly, but always check how quickly the soil is absorbing it; doing so minimizes the risk of over-saturation. After the heavy rains, this step focuses on rehydrating the roots without causing additional stress.
Providing adequate watering during this recovery phase ensures that nutrients are replenished in the soil, allowing the plants to recover from nutrient depletion or root damage. Be sure to test the moisture level by inserting your finger 2 inches into the soil; it should feel moist without being waterlogged. Proper moisture balance is vital; too much or too little can hinder recovery progress, especially as the plants are attempting to rebuild their energy reserves. Expect to see healthy green new growth within a week or two if your roses begin to respond positively. If you see leaf curling or persistent yellowing after a week despite watering, this could signal further nutrient deficiencies needing attention.
A mistake to avoid is over-watering immediately after heavy rain, as this can worsen the initial problem and create further stress. Instead, wait for the top 2 inches of soil to dry before reapplying water; a good practice is to wait up to 48 hours after rainfall before checking soil moisture. Also, sticking to this interval helps prevent drowning new roots that are recovering. To further aid recovery, consider applying a balanced organic fertilizer after you’ve assessed the soil moisture—this will give your roses an added boost without overwhelming their recovering systems. Keeping an eye on both weather conditions and soil moisture will enable better long-term maintenance and help ensure your roses thrive. Remember that if you notice that your roses display signs of stress like continued yellowing or wilting despite regular watering, it’s imperative to assess the quality of the soil and test for essential nutrients like nitrogen and potassium.
Step 4 – Adjust Watering Patterns to Prevent Yellowing
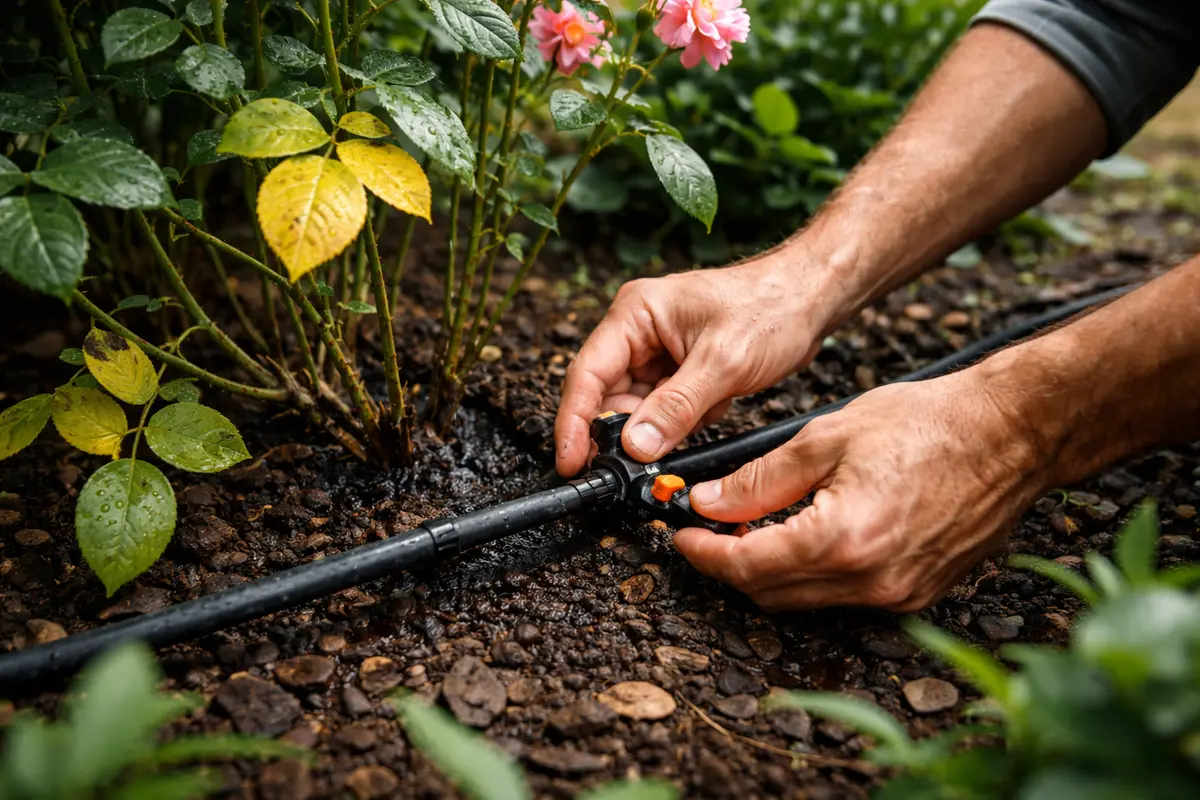
Start by ensuring proper drainage around your rose bushes by elevating the soil and adding mulch to create a barrier against excess water. This will prevent yellowing of the leaves and promote robust root systems over time. Begin by applying 2 to 3 inches of mulch around the base of the plants as well, ensuring it does not touch the stems directly, which can trap moisture and invite disease. Watch as the soil retains moisture while mitigating excessive drainage directly around the root zone.
Excess rain can saturate the soil, leading to root rot and nutrient deficiency, which manifests as yellow leaves. By improving drainage and maintaining mulched beds, you reduce the risk of these conditions recurring, ensuring your roses maintain healthy green foliage despite heavy storms. It’s advisable to monitor the area for standing water, as conditions can change rapidly after heavy rainfall.
During the rainy season, check and adjust the drainage system more frequently, especially after prolonged rain. Test soil moisture more regularly; if you notice persistent yellowing even with proper drainage, test the soil for pH levels and nutrient balance to identify potential deficiencies. Also, as temperatures rise or fall, your roses might require adjustments—reducing watering frequency during hot, dry spells can help avoid root stress.
Establishing a regular watering regimen helps prevent future incidents of yellowing leaves due to over or under-watering. Rose bushes ideally require about one inch of water per week; however, during the growing season, they may need more frequent watering due to high evaporation rates. Monitor rainfall amounts using a rain gauge to adjust your supplemental watering accordingly, as the goal is for the soil to remain consistently moist but never saturated. If rainfall exceeds your watering schedule needs, reduce the amount of additional water provided; aim for a balance that keeps the roots happy without creating excess water pooling. If soil remains too humid, fungal issues may manifest, leading to greater stress.
As seasons change or weather patterns shift, you might need to adjust your watering schedule further. For example, if damp spring conditions escalate into hotter or drier summer weather, reduce the frequency of watering; otherwise, over-watering could reactivate root rot issues, leading to a new wave of yellowing or wilting. Keep an eye on weather forecasts and adjust your irrigation accordingly; cloudy weather may extend drying times, and intense sun can dry the soil much faster. This dynamic observation can help prevent recurring issues, such as leaves turning yellow and then curling, further signaling your plants are in distress. Keeping a garden journal, noting rainfall logs, soil moisture, and general plant health observations could be beneficial for future care.
Step 5 – Check for New Yellow Leaves After Treatment
Next, check the soil moisture around the rose bushes to determine if it remains overly saturated after heavy rain. Observe the yellowing leaves for signs of wilting or discolored stems, as these indicate stress from excess water. Recheck the moisture levels every few days, particularly after continued rainfall, to ensure your findings remain current.
A fully recovered rose bush should display vibrant green leaves and strong stems, while early signs of problems returning include slow growth and a dusty texture on the leaves. Additionally, if the leaves begin to curl or develop brown edges, those are clear indicators of distress. If you see good color and turgidity in the new growth, that’s a positive sign.
If the yellowing persists despite addressing soil moisture, consider inspecting for root rot, which can develop from prolonged saturation. If the roots feel mushy or emit an unpleasant odor, take immediate action by pruning affected roots and repotting in well-draining soil. If the plant continues to decline, escalate by contacting a local horticulturist for further guidance.
A fully recovered rose bush displays vibrant green leaves and robust blooms, reflecting a healthy state. In contrast, if the yellow leaves reappear alongside withering blooms, it’s a clear sign that the problem is returning. If the leaf texture feels soft and mushy instead of firm and resilient, check for potential root or water issues.
If the yellow leaves return despite following the previous steps, consider applying a balanced fertilizer to boost nutrient levels. If the problem persists after a few weeks, investigate for root rot by gently loosening the soil around the base; if roots appear dark and mushy, it’s time to repot your rose bush in fresh, well-draining soil.
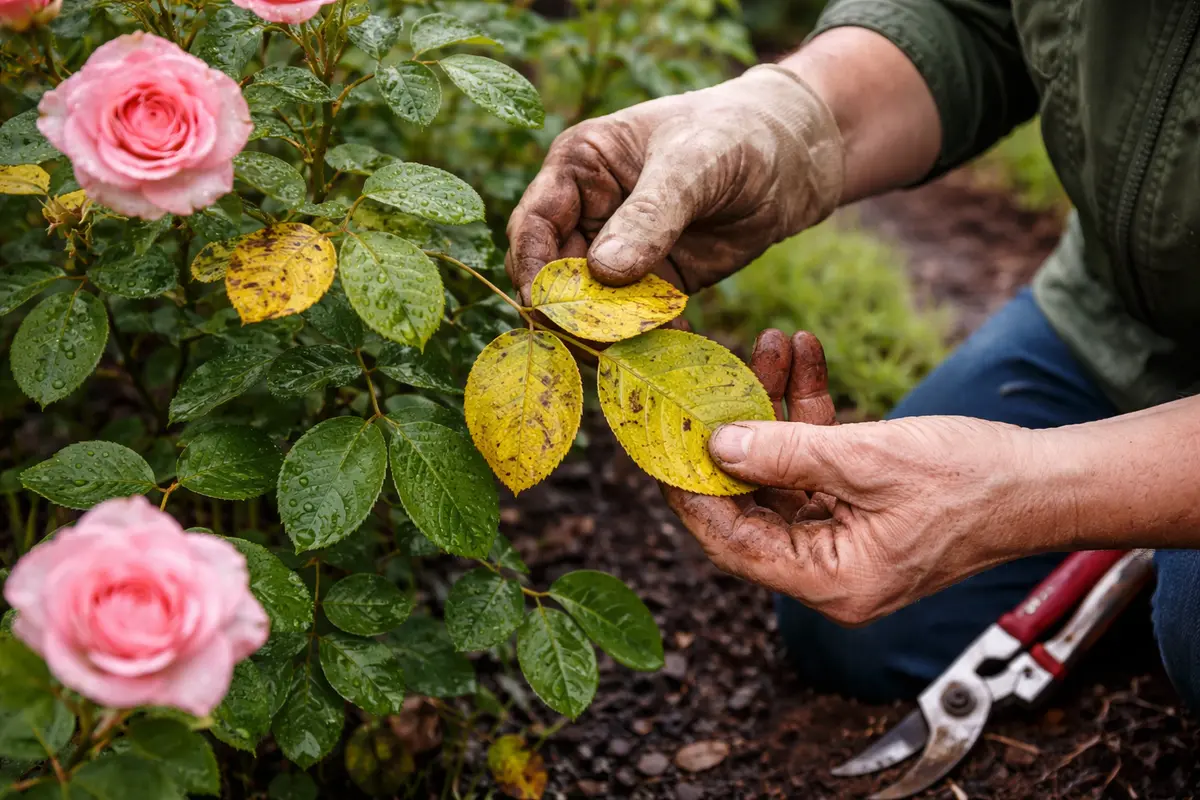
After treatment, it’s crucial to keep an eye on your plants for at least a week to actively track their recovery. If the yellowing recurs or worsens, it might indicate persistent root issues or nutritional deficiencies that remain unaddressed. While inspecting, identify dead or dying leaves and remove them to prevent any further strain on the plant; this allows improved air circulation and minimizes stress on the remaining foliage, enabling the plant to direct more energy toward healthy growth. However, avoid removing too many leaves at once, as this can shock the plant further when it is already stressed.
If yellow leaves return despite consistent care, consider whether there may be a new environmental factor at play. For example, heavy heatwaves or inadequate drainage could resurface problems. Additionally, keep an eye out for signs of pests like aphids or spider mites that may cause secondary stress through sap consumption. In such cases, evaluate the soil amendments or drainage solutions implemented earlier to see if they remain effective. Regularly examining the balance of nutrients, light exposure, and pest control measures is essential to ensure no lingering problems impede recovery efforts. An unexpected yellowing could be due to a sudden drop in temperatures or damaged roots once again, underscoring the continual need for detailed checks throughout the growing season.
FAQ
How long does it take for roses to recover from yellow leaves?
Recovery from yellow leaves typically takes 1-3 weeks once proper care is established, depending on the extent of the issues that precipitated the yellowing. While visible improvements might start to show within this timeframe, it’s important to monitor the health of the plant over a month for the best indicators of recovery. Consistent care during this period lays a strong foundation for robust growth moving forward.
Can yellow leaves spread to other plants?
If the yellowing is caused by a disease, there is a risk of spread to other plants nearby. To mitigate this risk, make sure to remove any infected leaves and treat them appropriately, as this helps reduce crossover contamination among neighboring flora. It’s also advisable to routinely check surrounding plants for similar symptoms to catch any issues early, preventing a cascade of health problems across your garden.
Should I remove yellowing leaves on my rose bushes?
Yes, removing yellowing leaves helps improve air circulation and reduce the risk of diseases spreading. Be careful to prune only those leaves that are noticeably unhealthy, ensuring you do not stress the plant further; aim to use clean, sharp tools to avoid introducing pathogens during this process. Trim back any dead or dying stems as well to focus the plant’s energy on healthy portions, allowing for a fuller recovery and potential new blooms. Pruning during the right conditions can also encourage fullness in the plant’s shape.