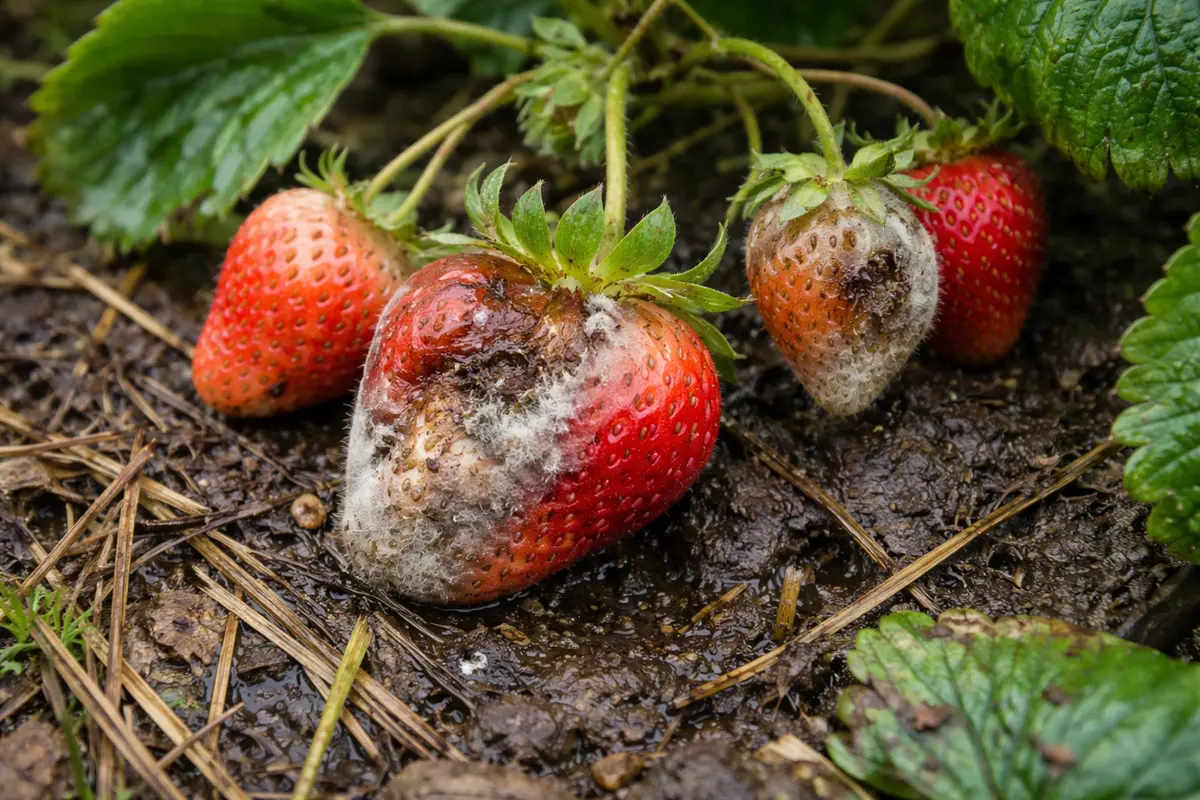
You may notice your strawberries looking less than perfect after heavy rainfall, which is why you need to know how to prevent fruit rot in strawberries after heavy rainfall. The excess moisture can lead to rotting and mushy spots, compromising the quality of your fruit. If left unchecked, this issue can spread throughout the plant, weakening it and making it harder to fix. Taking action now can help inspect your plants and reduce moisture levels to safeguard your strawberry harvest.
Step 1 – Trim Moldy Strawberry Fruits Right Away
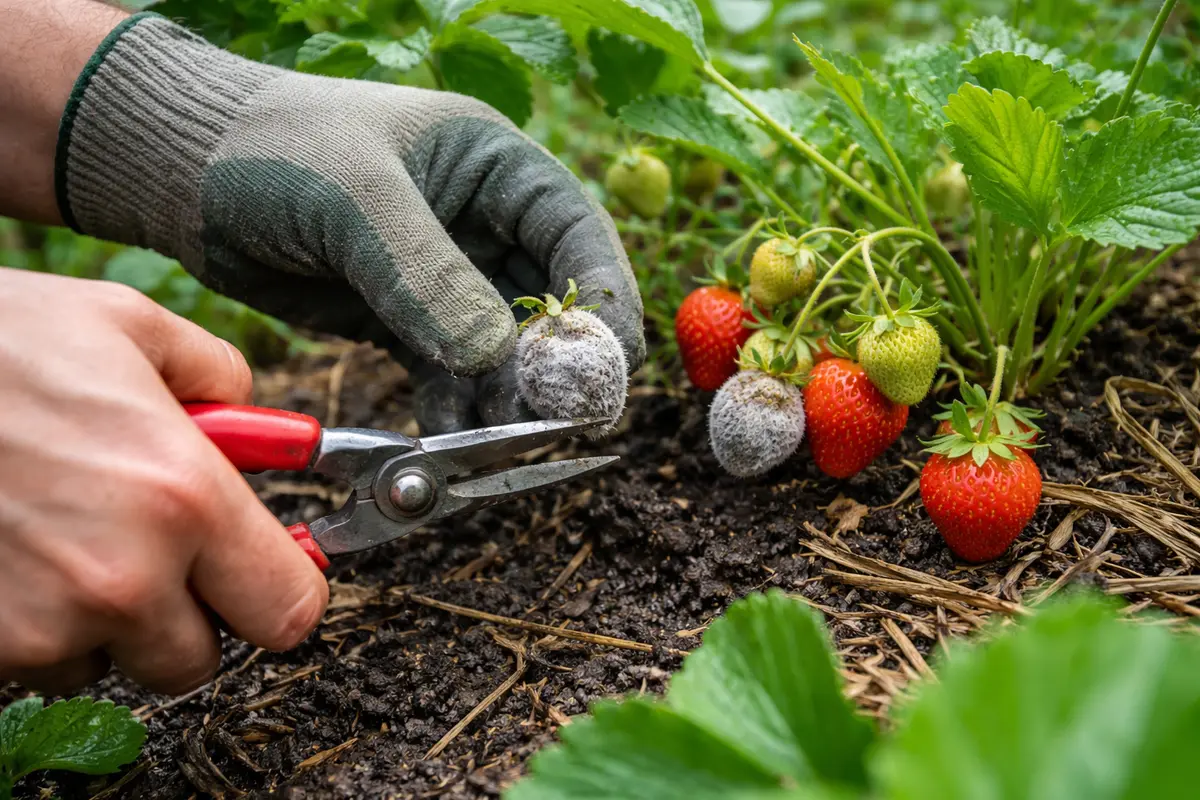
Remove any strawberries that show signs of mold or rot immediately. You will notice the overall health of your strawberry plants improving because mold can spread if not dealt with swiftly. This action not only helps salvage the remaining healthy fruits but also minimizes damage to the plant itself. Removing affected strawberries can also help reduce the attraction of pests, as they are often drawn to decaying matter.
Acting quickly is essential to prevent further deterioration of your plants. Rotting fruit can attract pests and fungal diseases, which can affect healthy strawberries. For instance, if you see just one or two fruits showing clear signs of decay, quick removal can prevent an entire batch from spoiling. Conversely, if left unattended, these initial signs can lead to widespread damage, infecting other fruits and even affecting nearby leaves within days. In fact, a team of gardeners during the last season found that some infected strawberries led to fungus that spread to the foliage, creating a larger problem that wasn’t addressed immediately
Many gardeners mistakenly delay this action, thinking that the problem will resolve itself. In reality, even a short delay can exacerbate the issue; serious rot can spread within just 24 hours of being ignored. I’ve seen plants severely affected after just one day of neglect, resulting in not only lost fruit but plant health declines. The key takeaway is to inspect your strawberry bed thoroughly after heavy rains, addressing any signs of rot immediately; any delay can drastically worsen the situation, leading to much larger problems.
Step 2 – Diagnose Root Causes of Strawberry Rot
Start by improving drainage in your strawberry beds by incorporating organic matter like compost or peat moss. Once established, you should notice that excess water drains more efficiently, reducing the likelihood of fruit rot. In fact, implementing a 40% organic material ratio often yields better results as it retains necessary moisture while allowing for adequate drainage.
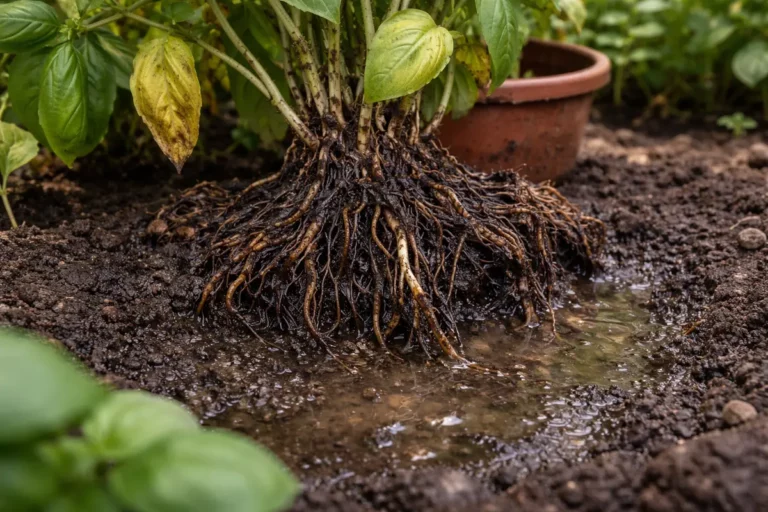
The heavy rainfall can lead to waterlogged soil, which impairs root oxygenation. In oxygen-deprived conditions, gray mold and other pathogens thrive, causing strawberries to rot. In contrast, well-aerated soil allows healthy root function, supporting robust growth that minimizes disease risk. A simple test is to dig down a few inches—if the soil feels soggy or smells foul, oxygen levels are low, and immediate action is required.
If you notice the soil smells sour, this indicates anaerobic conditions, and you should immediately aerate the soil by turning it with a garden fork. Alternatively, if your strawberry plants are wilting despite adequate water, this could signify root rot, which requires different treatment, such as removing affected plants and enhancing soil health. Meanwhile, a common mistake is overwatering while believing more water is needed; observe the symptoms carefully—if plants remain limp days after watering, drainage is most likely insufficient.
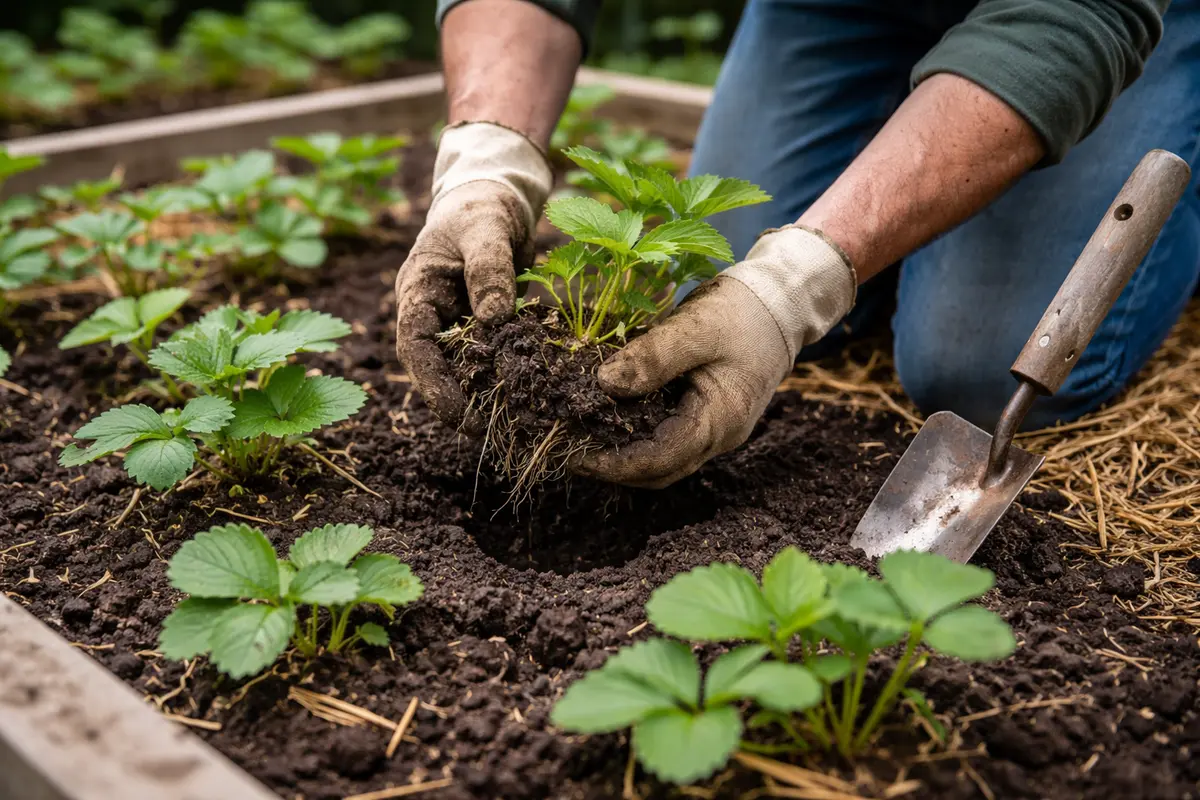
Strawberries thrive in well-drained soil, where excess moisture causes roots to suffocate, creating an environment for pathogens to flourish. If your soil retains water for extended periods after rainfall, consider incorporating organic matter such as compost to enhance drainage. This may require tilling the compost into the soil or layering it on top to improve aeration. Additionally, check for proper drainage systems; if water pools around the plants after the rain, you might need to install drainage tiles to reroute excess moisture away from their root zones, preventing stagnation.
If the sour or rotten smell persists, it might be necessary to engage a soil testing service to fully assess the health of your soil. This could affirm whether a pH imbalance or nutrient deficiency exists, necessitating more significant interventions. In cases where issues are severe and roots start to rot, consider raising your planting beds to encourage drainage and prevent future moisture accumulation. A raised bed can improve drainage, allowing excess water to flow away instead of pooling. This step is crucial to reverse the detrimental effects of waterlogged conditions and restore healthier growth in your strawberries.
Step 3 – Fertilize to Revive Waterlogged Strawberry Plants

Apply a balanced fertilizer specifically designed for strawberries to boost recovery. Within a few days, you should see new green growth emerging from the plants, which is a positive response to the fertilization. This step helps replenish nutrients that may have been leached away due to heavy rainfall and supports the plants’ recovery process. Stronger and revitalized plants create a more robust defense against pests and diseases, reducing long-term risks of rot.
Fertilization aids recovery by replenishing nutrients that heavy rainfall has washed away. It’s vital to choose a fertilizer high in potassium, as strawberries particularly benefit from this nutrient, which promotes fruit quality and plant health. After heavy rainfall, essential soil nutrients can become depleted, making it harder for your plants to thrive. This is why using a well-balanced fertilizer designed for strawberries is critical; it supports not just the plant’s recovery but also helps resist future occurrences of rot while maintaining satisfactory fruit production.
Be careful not to over-fertilize, as this can lead to additional stress on the plants, exacerbating rot conditions. Over-fertilization often manifests as leaf burn or stunted growth due to an excess of certain nutrients, particularly nitrogen. This situation can be particularly problematic for strawberries because the additional nitrogen might promote lush foliage but can hinder fruit production. Avoid fertilizing if the soil is still overly wet; this can create conditions that exacerbate rot by preventing proper nutrient uptake. Once the soil is dry enough, rejuvenating the plants with the right nutrients will initiate recovery more effectively, ideally leading to healthier fruit development and yield.
Step 4 – Space Strawberry Plants for Better Airflow
Increase the spacing between your strawberry plants to improve airflow around them. You will notice less humidity collecting near the plants, which helps prevent rot from returning. Adequate spacing is especially important in high-humidity environments, as close plantings can trap moisture and promote the growth of pathogens. Ideally, spacing your strawberry plants 12 to 18 inches apart will facilitate healthy air circulation and reduce disease risk.
Good airflow is essential for reducing moisture levels in the microenvironment surrounding your strawberries. High humidity encourages the growth of fungal spores, leading to rot. Proper spacing aids in overall plant health and reduces the incidence of diseases, allowing each plant access to sunlight and airflow. Whether you are planting new strawberries or reshaping your garden layout, taking these spacing considerations into account will improve growth potential and fruit quality.
In cooler months or rainy seasons, consider mulching with straw or pine needles, which can help maintain soil temperature and moisture levels while also facilitating airflow. This added layer not only absorbs excess moisture but also retains warmth, creating an optimal microenvironment for strawberries. Over time, you might see a notable decrease in fungal diseases when employing proper mulch techniques along with the right spacing. Combined with proper spacing, this method collectively prevents overcrowding and disease, allowing healthy growth for each plant while minimizing environmental stressors.
Step 5 – Check Strawberry Foliage for Signs of Rot
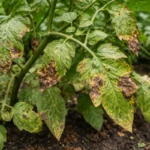
Next, check your strawberries daily for any signs of rot following heavy rainfall. Look for soft, mushy spots on the berries and a bad odor emanating from the soil. Rechecking these symptoms every morning for the next week can catch any developing issues early, rather than waiting until they become overwhelming. An effective practice is to schedule these checks for the same time each day to make it part of your routine.
Healthy strawberries exhibit firm skin and vibrant color. Signs of returning rot include darkened patches and a squishy texture, particularly around their bases. If the leaves become wilting and start to curl, particularly on the edges, that indicates an ongoing problem needing immediate attention. You should also observe if the plants are turning a lighter green color, which may indicate stress from inconsistent moisture levels. Be diligent—this often becomes apparent a short time after heavy rains when signs might still seem subtle.
If signs of rot persist despite following your monitoring routine, remove affected fruits immediately to prevent spreading. You can also apply a suitable fungicide that specifically targets strawberry diseases if the situation worsens. Caution is important here; using fungicides on stressed plants can further harm them. Always follow the manufacturer’s recommendations for applications and timing. If the problem escalates, consider re-evaluating your drainage strategy or switching to varieties more resistant to excessive wet conditions.
A healthy, fully recovered plant will display vibrant green leaves and firm, healthy strawberries without any rotten patches. To ensure that your strawberries are thriving, regularly touch the fruit and leaves; healthy strawberries feel firm and plump, while fruit that feels mushy or appears discolored shows ongoing issues. Consistently checking your plants helps catch any early signs of rot that might otherwise go unnoticed, allowing for timely intervention if required. If rot symptoms reappear, consider reviewing your watering regimen and drainage once again, as conditions can vary rapidly with changing weather patterns.
The effectiveness of your previous solutions can diminish over time, especially following heavy rains where soil conditions are likely altered. It’s beneficial to remain vigilant about your plants’ health to maintain an optimal growing environment. Frequent heavy rains might lead to an overly saturated root environment, so maintaining awareness of changing weather patterns and proactively adjusting care practices will ensure long-term strawberry productivity.
FAQ
How long does it take for strawberries to recover from rot?
Recovery time varies but generally takes around a week to notice improvements once corrective measures are implemented. Factors like the severity of the rot and the effectiveness of your interventions will influence recovery speed. Monitor for new growth as a sign that the plant is bouncing back from previous stressors.
Can fruit rot spread among strawberry plants?
Yes, rot can easily spread from one affected fruit to nearby strawberries, especially in humid conditions. Regular inspections and immediate removal of any affected fruit will help contain the issue. Without prompt action, the risk of healthy strawberries becoming infected increases significantly, making vigilance crucial. Additionally, it’s advisable to maintain cleanliness around the strawberry patch, as decayed organic matter can introduce pathogens.
Should I remove all parts of infected plants?
It’s advisable to remove all visibly infected fruits and any severely affected leaves to prevent further spread. Precision in trimming should occur immediately to reduce the risk to the rest of the plant; leaving infected tissue can lead to further rot entering the system. Make sure to dispose of the waste properly away from the garden beds to prevent reinfection. Correct early action is critical in sustaining the health of your strawberry crop and ensuring a successful harvest.