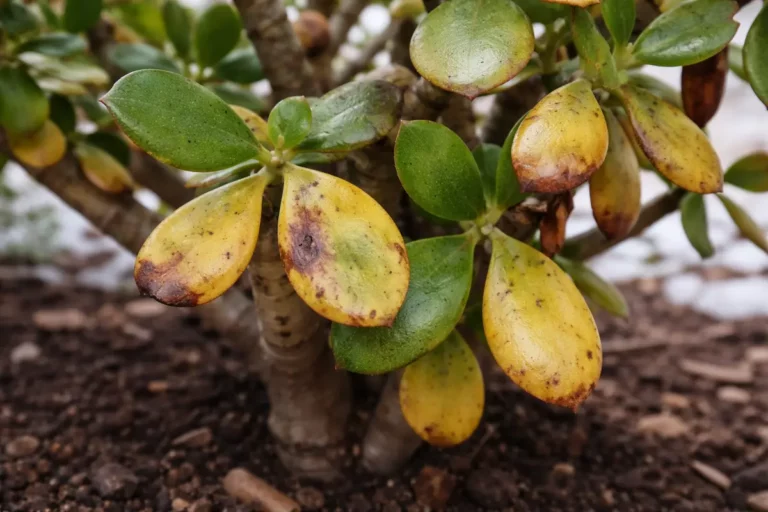
You may notice that your azalea’s leaves turn yellow in fall, which is why you need to know why do my azalea leaves turn yellow in fall. This yellowing typically occurs due to nutrient deficiencies or stress factors affecting the plant’s health, resulting in damaged foliage. If left unaddressed, the problem can spread and weaken the plant, making recovery more difficult, but you can fix it now by checking soil conditions and adjusting your watering routine.
Step 1 – Prune Yellow Azalea Leaves Immediately

Start by checking the soil moisture around your azalea. If the soil feels overly dry, thoroughly water the plant at the base to ensure moisture reaches the roots. Within a few days, the leaves should begin to perk up and regain some vitality, indicating that the plant is receiving the hydration it needs.
Acting quickly is crucial for an azalea since yellowing leaves often signal root stress or nutrient deficiencies. Azaleas are particularly sensitive to fluctuations in moisture levels; delayed watering can lead to dehydration, and the longer the roots suffer, the more pronounced the yellowing becomes. If you notice your azaleas dropping leaves, inspect soil conditions immediately; failure to act now risks more extensive damage.
A gardener who waited too long to address dry soil in their azaleas observed that by the time they finally watered, nearly half of the leaves had dropped. This contrast illustrates the dramatic impact of timely intervention; prioritizing rapid action can prevent significant leaf loss. If yellowing persists after watering, check for root rot caused by over-saturation instead.
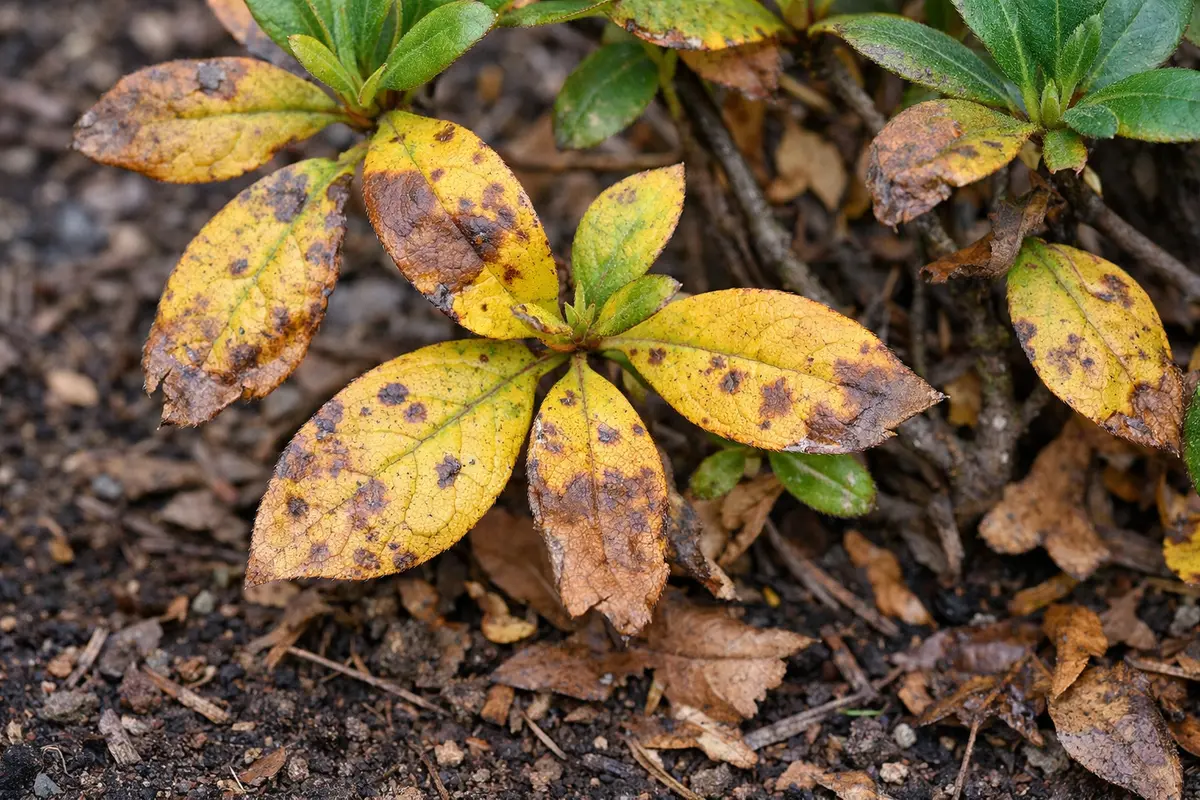
When you prune yellow leaves, you are allowing the plant to redirect nutrients to the healthier parts. This can significantly enhance the vigor of the remaining foliage, as azaleas can be prone to wasting energy on unhealthy leaves. If you notice a cluster of yellow leaves, this is a strong signal the azalea is under stress, possibly from pests or inadequate nutrients. If you delay pruning, the affected leaves can fall off naturally, further weakening the plant and enhancing the risk of infections.
Many gardeners often hesitate to prune, fearing they might harm the plant further. However, pruning promptly helps in reducing strain on the azalea and encourages new growth. Make sure to use clean and sharp tools to avoid causing additional damage, as jagged cuts can lead to infections. After pruning, observe the surrounding foliage closely; if you see a sudden increase in dry, crispy edges on any remaining leaves, that can signal deeper issues that weren’t immediately visible.
Step 2 – Diagnose Nutrient Deficiency in Azaleas
Start by examining the soil moisture around your azaleas. If the soil feels overly dry or waterlogged, adjust your watering habits accordingly, and observe whether the leaves regain their vibrant color over the next few weeks.
The yellowing of azalea leaves in fall can be caused by improper watering practices, affecting root respiration. When roots are too dry, they struggle to absorb nutrients effectively, leading to a direct impact on leaf color. Conversely, overly saturated soil deprives the roots of oxygen, which can also trigger chlorosis, causing yellow leaves. If your azaleas have yellow leaves but the soil remains consistently moist, there may be other nutrient-related issues to explore.
If the soil smells sour, it indicates root rot due to excess moisture. In this case, take immediate action to improve drainage by amending the soil with organic matter or relocating the plant to a drier location. Alternatively, if the leaves turn yellow but retain some green veins, nutrient deficiencies like iron might be at play, necessitating a different fertilizer strategy to rectify the symptoms.
A nutrient deficiency directly affects leaf pigmentation; for instance, a lack of nitrogen may cause chlorosis, where leaves lose their green color. Azaleas thrive in slightly acidic to neutral soil (pH 5.5-6.5), and any deviation can impact their nutrient uptake. If you find the pH is outside this range, you will need to amend the soil accordingly. If the nutrient levels show low nitrogen, phosphorus, or potassium, these results correlate directly with the yellowing you’re observing. Monitoring soil moisture at this stage is crucial; overwatering or underwatering can compound nutrient uptake challenges.
If soil smells sour or has an overly compacted texture, consider that overwatering may have caused problems as well. If you find that your azalea’s roots are sitting in waterlogged soil, the risk of root rot rises significantly, which can be catastrophic. Address this by improving drainage, such as aerating the soil, or altering your watering habits. An acidic soil amendment may be necessary if you find that pH levels are high. If nutrient deficiencies persist even after amendments, it may indicate that your plants are competing for limited resources, and you might need to consider relocating or thinning nearby plants.
Step 3 – Fertilize to Help Recover Yellowing Azaleas
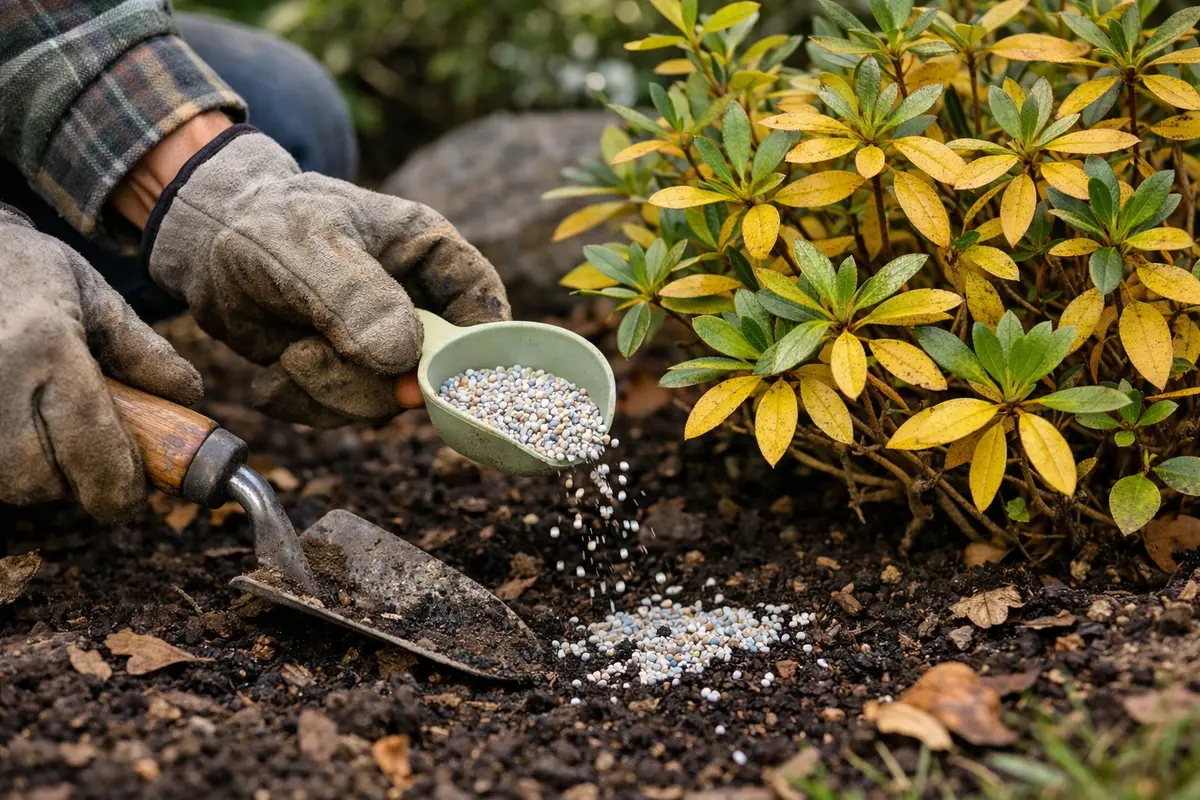
Apply a balanced fertilizer designed for azaleas to support recovery. You will notice healthier new growth within a few weeks, including darker green leaves emerging. This boosting effect promotes vigor and helps offset previous nutrient deficiencies. Ensure that you choose a granular or slow-release variety to allow for consistent nutrient availability over time.
Regular application of a proper fertilizer replenishes necessary nutrients, allowing azaleas to recover more quickly from the yellowing problem. When azaleas are nourished, chlorophyll production increases, returning foliage to its rich green hue. Timing is essential; applying fertilizer during active growth periods (spring and early summer) yields the best results. If you apply it in fall too late in the season, it may stimulate new growth that will be vulnerable to winter damage.
A common pitfall is over-fertilizing, which can lead to leaf burn or salt buildup in the soil. Be cautious and follow recommended dosages for the product you choose; applying more than the advised amount can severely damage root systems, causing them to function poorly. If your azalea still continues to yellow despite fertilization, consider reducing watering frequency as consistently damp roots can further inhibit healthy growth. If you notice salt crusts on the surface of the soil or around the base of the plant, that’s an immediate sign to flush the soil with fresh water to remove these harmful build-ups before applying any fertilizers.
Step 4 – Water Regularly to Prevent Azalea Stress in Fall
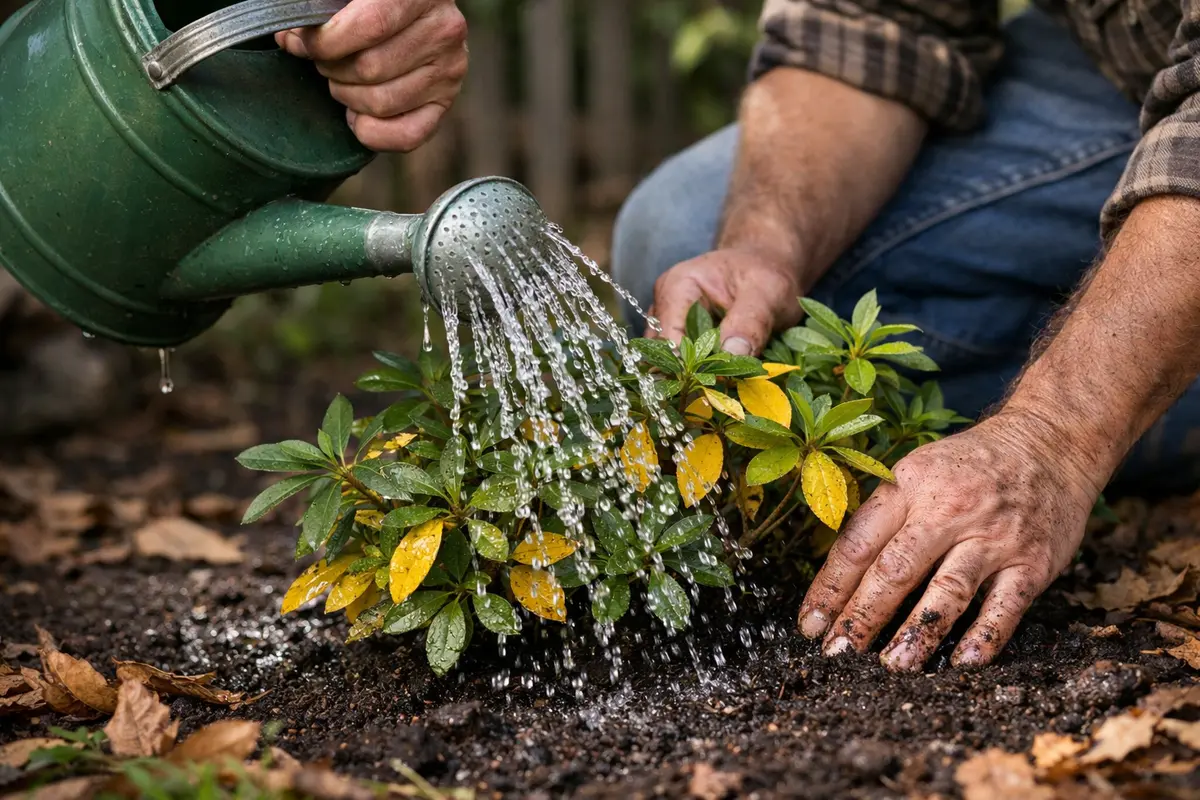
First, water your azaleas deeply at least once a week, ensuring the soil remains consistently moist but not soggy. This practice prevents leaf yellowing as it promotes stronger root systems and improved nutrient uptake, which stabilizes leaf health during the fall.
Yellowing leaves often indicate that your azaleas are not receiving enough water or nutrients, particularly in nutrient-poor soils or during dry autumn seasons. By implementing a regular deep watering routine, you effectively mitigate the stress that environmental factors impose, unlike plants left thirsty, which struggle to thrive and often experience premature leaf yellowing.
In addition to regular watering, apply a balanced acid-loving fertilizer in early fall to provide essential nutrients. If you notice continued yellowing despite adequate watering, check for over-mulching which can restrict moisture access; adjust accordingly to ensure your azaleas have the resources they need.
Yellowing leaves are often attributed to nutrient deficiencies, particularly nitrogen, which can occur in alkaline soils. When the pH levels rise above the ideal range, azaleas struggle to uptake essential nutrients, leading to symptoms like leaf discoloration. Maintaining the appropriate pH through regular soil testing and amendments can directly address this issue and promote better nutrient availability.
In colder climates, supplement the routine by providing organic mulch around the base of your azaleas to regulate soil temperature and moisture retention during fall. This added layer will help maintain stable conditions, reducing stress on the plants and preventing future yellowing of leaves as temperatures drop. If your leaves still show signs of yellowing, check for root rot caused by overwatering during wet conditions.
Azaleas prefer moist but well-drained soil; too little water can cause stress, leading to yellow leaves, while too much can lead to root rot. Adopting a watering routine helps maintain the necessary moisture levels, supporting healthy photosynthesis and growth. Observe the moisture levels by feeling the soil; it should be slightly damp but not soggy. If you find dry patches or crusty soil around the base, this suggests inconsistent watering. Conversely, if the soil feels sludgy and oily, it’s time to rethink your watering habits.
Be wary of seasonal weather changes; overwatering can become a common mistake in the fall if heavy rains occur. To address this, consider using mulch to help retain moisture while allowing excess water to drain; this creates a buffer against sudden downpours. A good practice is to check the moisture level every few days during dry periods and reduce frequency in high rainfall conditions. Your goal should be to maintain that ideal moisture balance; too often, gardeners either drown their plants or let them dry out, both leading to yellow foliage. This period of observation is vital for gauging how your azaleas respond to changing weather conditions.
Step 5 – Inspect Azalea Foliage for New Yellow Leaves Weekly
Start by monitoring your azalea plants at the onset of fall. Check the leaves for any signs of yellowing; this indicates potential stress or nutrient deficiency. Reassess the condition every few days and focus on changes in leaf color and texture to confirm whether your plant is on the mend or if the issue persists.
A fully recovered azalea will display vibrant, dark green leaves without any yellowing, indicating active and healthy foliage. In contrast, early signs of a problem returning may include a gradual yellowing at the leaf tips or a somewhat dry, brittle texture in the previously recovered leaves. If you notice a return to yellowing, immediately check the moisture level in the soil, as overwatering can lead to root stress.
If the yellowing continues despite your efforts, consider adjusting your care routine. Increase soil drainage by amending it with organic matter to prevent waterlogging. Alternatively, test the soil pH; if it’s too high, a targeted acidifying treatment can help restore balance to your azaleas.
A fully recovered azalea will display vibrant green, glossy leaves with firm texture, indicating vitality. Early signs of the problem returning include yellowing leaves that may start to curl or appear brittle, along with a dull texture, signaling stress. If you see curled edges, check for inadequate watering or root rot signs.
If yellowing returns despite your efforts, consider performing a soil test to pinpoint possible nutrient imbalances or pH issues affecting absorption. If the problem persists, escalate by consulting a local gardening expert or applying a balanced fertilizer tailored for azaleas to address specific deficiencies.
During inspections, look for signs of vitality such as vibrant green leaves and new growth shoots, which indicate the plant’s recovery. A common oversight is to simply look for yellow leaves; it’s also crucial to assess overall leaf texture and the presence of any pests. Soft, limp leaves developing anew may be an alarm that pests are returning or that environmental conditions have changed suddenly. Healthy leaf texture signifies proper water and nutrient supply.
If yellow leaves reappear after following these steps, consider re-evaluating your watering and fertilization regimen. For instance, if you notice a few yellow leaves but the rest look healthy, adjusting your fertilizer might suffice. In some cases, pest infestations like aphids may also become evident during inspections, necessitating further action with insecticidal soap or horticultural oils. If issues persist or worsen, it may be prudent to consult a local gardening expert for tailored advice, especially as specific pests can vary widely by region. Maintaining vigilance will be key to keeping your azaleas healthy through the changing seasons.
FAQ
How long does it take for azaleas to recover from yellow leaves?
Recovery time varies, but generally, you should see signs of improvement within 1 to 3 weeks after correcting the nutrient deficiency and watering issues. With the right care, new healthy growth will emerge during this period. Factors such as overall weather conditions and soil health might speed up or slow down this process.
Can yellowing azalea leaves spread to other plants?
Yes, if the yellowing is caused by pests or disease, it can spread to nearby plants if not addressed quickly. Keeping a close watch on both the yellowing plant and its surroundings will help in identifying and controlling any potential spread. If neighboring plants begin to show similar symptoms, that is a strong indicator that the issues may be systemic and need broader treatment.
Should I remove yellowing leaves permanently?
Yes, removing yellowing leaves is beneficial as it helps prevent the potential spread of disease and enables the plant to conserve energy. Pruning these leaves allows the azalea to direct resources towards healthy growth. When cutting, ensure you dispose of affected leaves properly to avoid introducing any pathogens back into the soil.