You may notice that your juniper is showing signs of distress, such as drooping leaves and yellowing needles, which is why you need to know how to treat root rot in juniper after overwatering. This condition occurs when excess moisture causes the roots to become mushy and start rotting, leading to further damage to the plant. If left unaddressed, the problem gets worse and can spread, ultimately weakening the plant and making recovery harder to fix, but quick action now can help as you remove, check, and adjust the care for your juniper.
Step 1 – Remove Excess Water from Juniper Roots
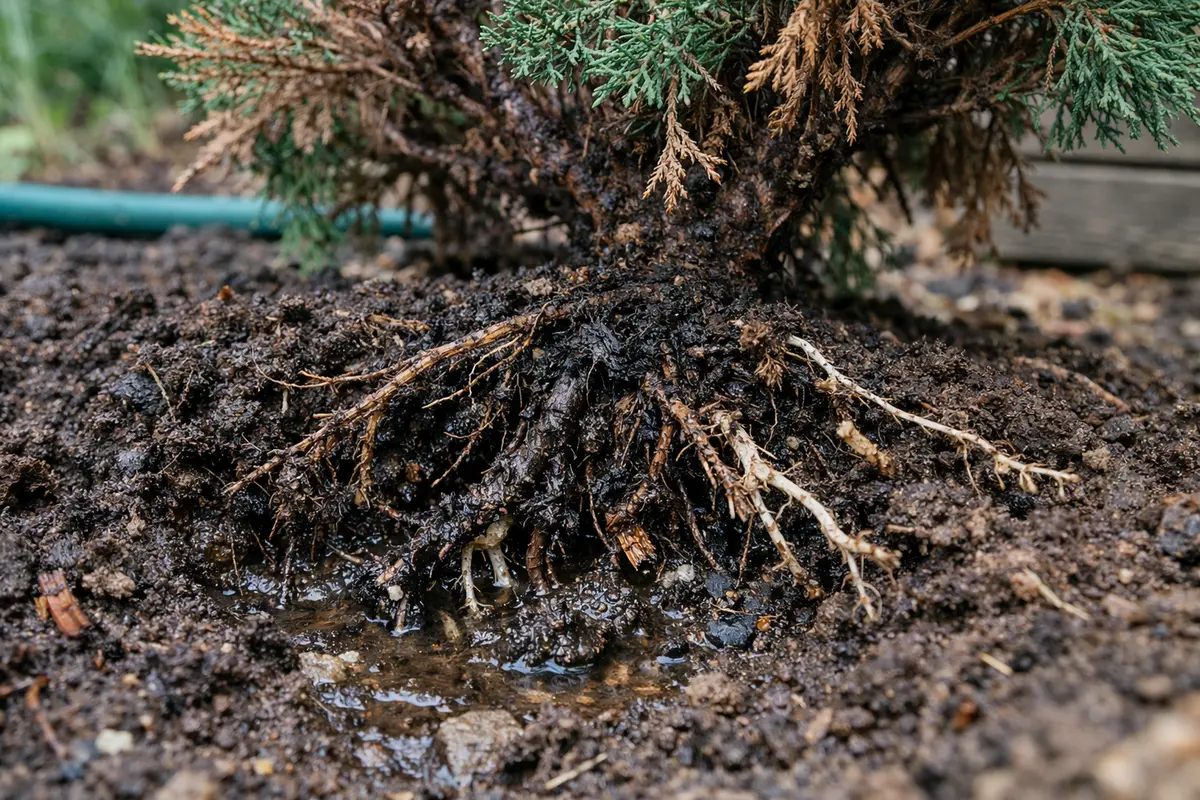
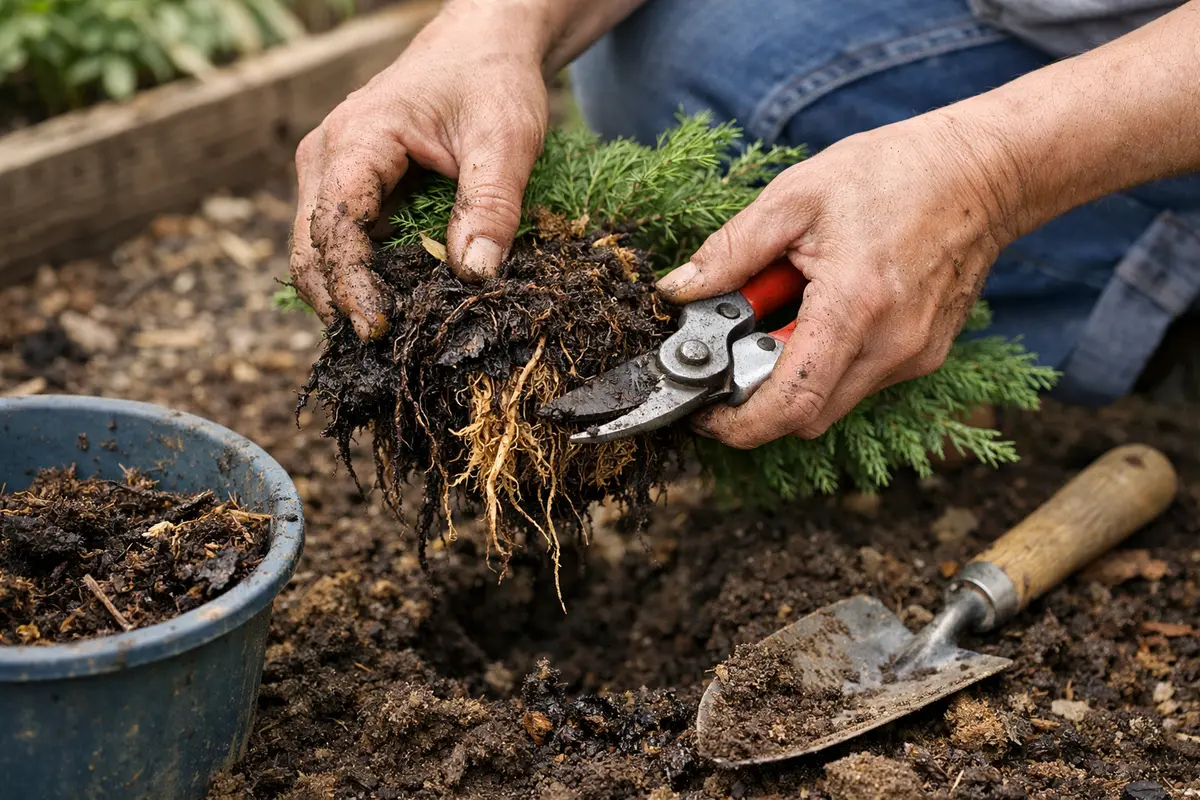
Start by gently lifting your juniper plant from its pot to inspect the roots for excess water. You will notice that the soil feels overly saturated and the roots may appear dark or mushy. This action helps prevent further root damage by quickly addressing the waterlogged condition. Remove the juniper from the pot immediately; delaying this can result in getting stuck in heavy soil, making it difficult to assess damage efficiently. Aim to remove the plant and examine the roots within an hour after noticing symptoms, as each minute of excess moisture increases the likelihood of irreversible damage. In poor drainage conditions, plants may also develop root rot in potted herbs.
Overwatering deprives roots of oxygen and creates a breeding ground for pathogens. When excess water sits around the roots, it saturates the soil, eliminating necessary air pockets vital for root respiration. If this saturation continues, it can lead to the breakdown of root tissues, making the plant susceptible to fungal infections. An inspection of the root system should show visible signs of rot, such as darkening which can extend into the stem; this color change indicates active decay. If the roots have a slimy texture, they are likely beyond saving and will need to be trimmed immediately to prevent further rot.
A common mistake gardeners make is delaying this initial step, thinking it will resolve on its own. For instance, if your juniper has been in soggy soil for several days, pulling it out and inspecting the roots is crucial; waiting could mean mangled roots that are beyond saving. Always check the moisture level of the soil quickly to mitigate damage. Consider using a moisture meter to confirm saturation levels; if the meter consistently reads above 30% moisture, it is too wet and needs immediate attention. Ensure that the area where you are working on the juniper is well-ventilated, as handling wet roots can lead to the spread of mold spores and pathogens without proper airflow.
Step 2 – Identify Overwatering Damage in Junipers
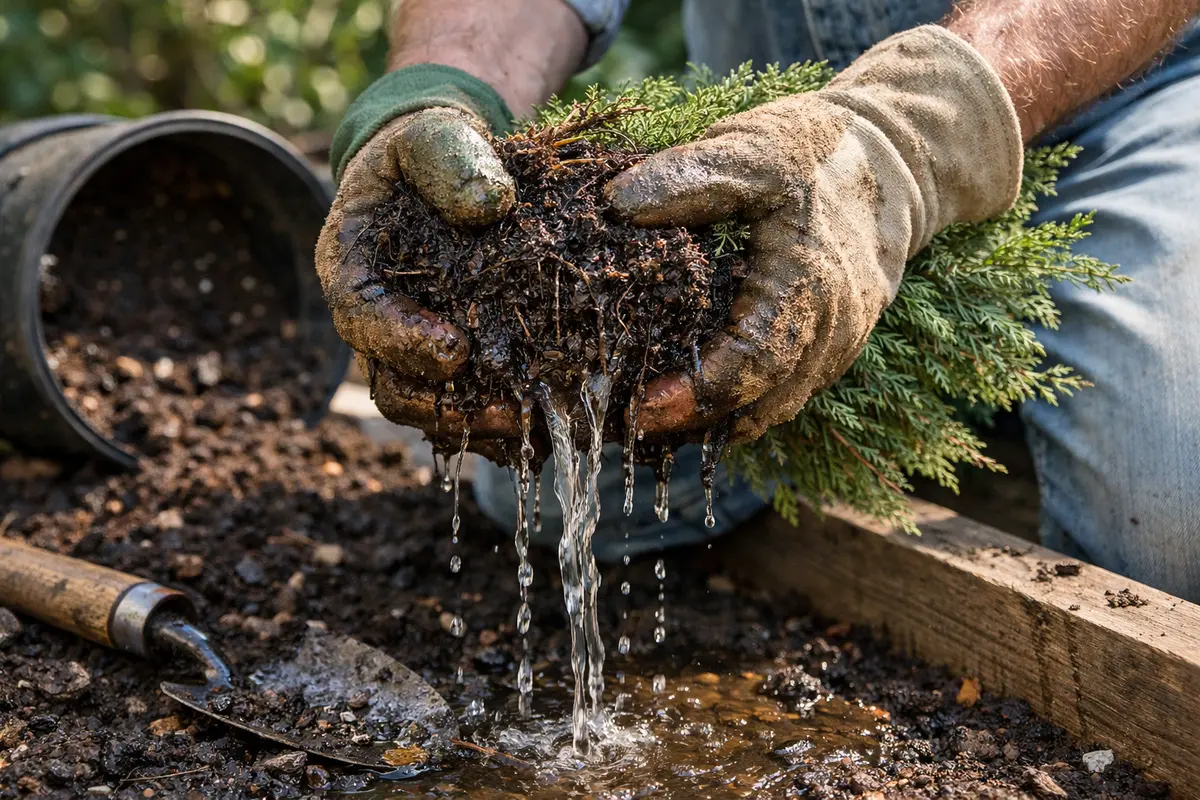
Examine the root system for signs of rot and take immediate action by trimming off any mushy or black roots. You will observe that this will stop the spread of rot and could lead to a healthier plant foundation. When performing the trimming, use clean, sanitized pruning shears to avoid introducing any more pathogens to the plant. By removing affected roots, you allow the healthy parts of the plant to take over and help instigate new growth. A healthy root system is crucial for nutrient and water absorption, which is essential for recovery.
Identifying root rot is critical because it facilitates your next steps. When you see yellowing leaves and softened root structures, it signals that water and nutrients cannot penetrate properly—a clear sign that rot has set in, especially after prolonged overwatering. Addressing this promptly minimizes the cascading effects of rot on the plant’s health. Your examination should extend beyond the immediate roots; carefully checking the base of the stem can also help uncover potential fungal growth. If the stem turns brown or produces soft spots, it indicates that rot has begun to compromise the plant health further up. Excess moisture often leads to problems like jasmine droop after overwatering.
If the soil emits a sour smell or feels greasy, further action is required; consider repotting your juniper into fresh, well-draining soil instead of simply trimming the roots. In some cases, you may need to use a sterilized blade to avoid transferring pathogens from one root to another. Keep in mind that the symptoms of overwatering may resemble those of underwatering, but the texture and color of the roots will provide the true diagnostic clues. If struggling to identify bark and stem color differences, attaching a tag or note will help track recovery progress and guide future inspections. If after trimming the roots, you still notice a foul smell coming from the potting mix, this is an indication that root rot is extensive, and immediate repotting should take priority.
Step 3 – Treat Affected Juniper Roots with Care
Apply a fungicide treatment to the affected roots, ensuring you follow the product’s instructions closely. The correct dosage is usually mentioned on the label; typically, a solution rate of 1–2 tablespoons per gallon of water is used for root drenching. You should start to see signs of improvement, such as new growth or firmer stems, within a week. This treatment assists in preventing further fungal spread as the plant stabilizes. A thorough application of the fungicide should target not only the roots but also the surrounding soil, as some pathogens can linger in contaminated soil. For every gallon of water used, ensure that you saturate the soil thoroughly, allowing excess drainage to remove any sitting fungicide, which can lead to crop burn.
Fungicides are effective because they directly target pathogens that invade damaged roots, encouraging healthier root structures. If the plant regains its vital nutrients and oxygen through healthy root systems, you can expect enhanced vigor and color within a week or two. An important factor to consider is the type of fungicide used; not all formulations are suitable for juniper, as certain natural remedies can trigger phytotoxic reactions, leading to further plant distress. If you see signs of new growth, such as small green buds or slightly darker green foliage, then the treatment has likely been successful. If you notice any adverse effects, such as drooping leaves post-application, be sure to flush the soil with fresh water to dilute the fungicide. When feeding is off, expect signs such as if petunia plants turn yellow.
A common mistake during this recovery phase is over-watering again; it’s crucial to adjust your routine post-treatment. If you notice rapid moisture accumulation, like during a section of rainy weather, allow extra drying time before watering once more; waiting until the top two inches of soil are dry to the touch can be a good indicator. Keep the soil consistently moist but not waterlogged to support new growth. In case symptoms persist, reassess the fungicide’s efficacy and consider applying a different type within the recommended intervals to combat resistant strains. It’s vital to have an awareness of local weather patterns to determine when to shift your usual watering frequency; prolonged rainy seasons might necessitate a total watering pause.
Step 4 – Use Proper Watering Techniques for Junipers
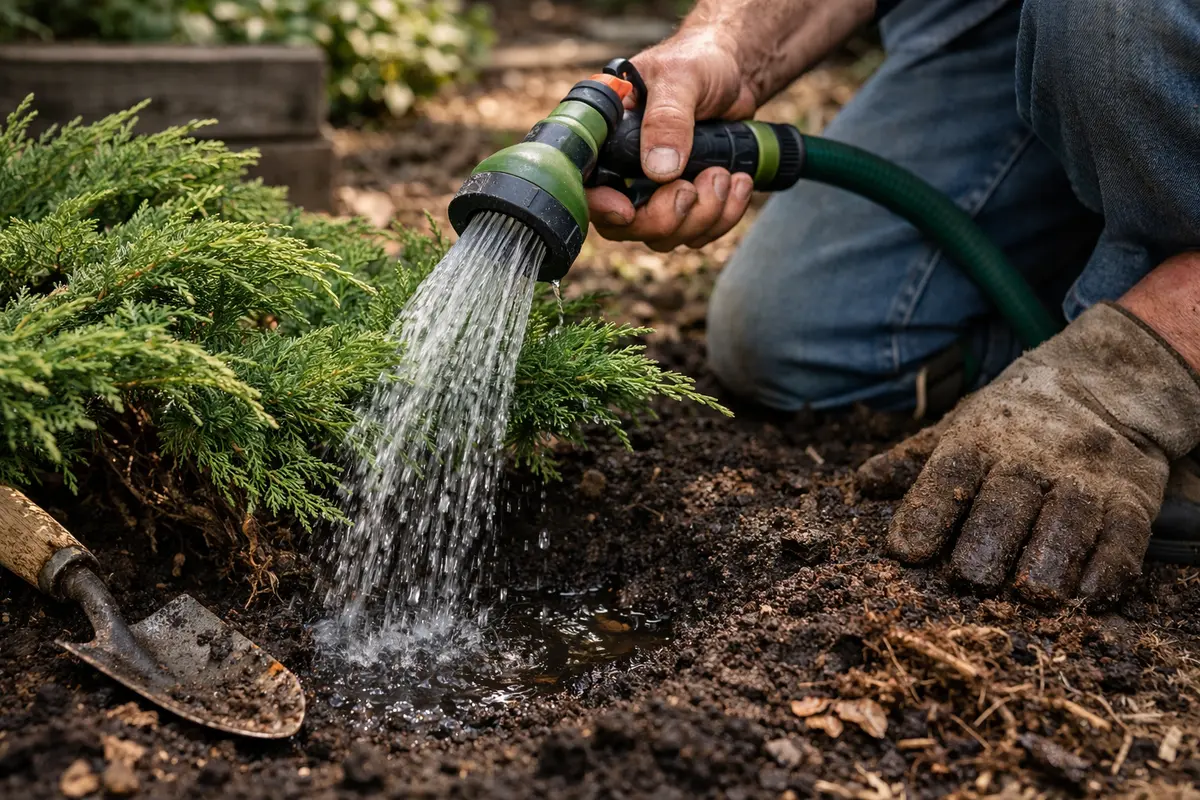
Start by adjusting your watering schedule to water junipers only when the top inch of soil is dry. This adaptive routine helps prevent overwatering and allows for healthier roots, reducing the likelihood of root rot.
Overwatering often occurs in humid conditions or when junipers are planted in poorly draining soil, which leads to stagnant water around the roots. By ensuring your soil drains well and monitoring environmental humidity, you address the root cause of the problem; for instance, junipers in sandy soil may thrive better compared to those in clay, which retains moisture. If you observe yellowing leaves but the soil feels dry, check the drainage capacity of your pot or garden bed. Excess moisture often leads to problems like root rot in potato plants.
In addition to adjusting your watering technique, implementing a layer of mulch can help maintain soil moisture during dry spells without overwhelming the roots. During the summer months, you might reduce watering frequency as increased evaporation occurs. If temperatures drop significantly, consider using a light frost cover to prevent soil moisture loss while protecting the juniper.
Proper watering techniques address the root cause of overwatering by ensuring that excess moisture does not accumulate. Junipers thrive in environments that mimic their natural arid habitat. Therefore, adjusting your watering schedule to align with the humidity and temperature can significantly minimize the risks associated with root rot. Consider a soil moisture probe in monitoring water levels and adjusting schedules accordingly. Even during growth periods, moisture measurement becomes critical, as root issues can be masked by foliage that appears healthy. If your juniper is subject to environmental stress, it may require more frequent observation, so being proactive with moisture checks will ensure timely watering. In poor drainage conditions, plants may also develop root rot in potted cacti.
In drier months, you may need to check moisture levels more frequently, while during higher humidity seasons, less frequent watering is necessary. If you notice heavy rain coinciding with your regular watering schedule, it might be best to skip watering altogether until the soil shows signs of drying out. Additionally, applying mulch around the base can help with moisture retention without causing waterlogging, particularly helpful in hotter climates. Be cautious, though; heavy or thick mulch can sometimes trap moisture and create a microclimate conducive to rot, especially if it is too densely packed against the stem base.
Step 5 – Inspect Juniper Foliage for Signs of Recovery
Monitor your juniper’s foliage every few days for any signs of recovery, specifically focusing on firmness and coloration of the leaves. You should also check the soil moisture regularly, ensuring that it remains well-drained. A healthy juniper will show a return to vibrant green leaves and new growth during this phase. Regular inspection allows for early detection of issues, ensuring that subtle changes do not escalate. If new leaf growth emerges firm and shapely, then your plant is regaining vigor.
Signs of recovery typically include firm leaves that do not wilt and a noticeable regrowth of foliage. The leaves should appear plump, while the new growth will likely be brighter in color, indicating that the plant has reclaimed its energy. Conversely, if the yellowing continues or new symptoms develop, it may mean you need to reassess the condition of the soil and roots. If new growth is minimal, this could signal a need for testing the soil pH and nutrient levels, as unbalanced soil conditions can hinder recovery despite good watering practices. If soil tests reveal an unbalanced pH, consider adding an appropriate soil amendment to restore balance.
If you find that the plant is not recovering despite adhering to the new watering habits and treatment regiment, consider reevaluating your environmental conditions or even seeking professional guidance. Factors such as inconsistent light exposure or inadequate soil composition can ultimately impact recovery efforts. Pay attention to any root or leaf necrosis that may present itself, indicating deeper issues that require intensive care or a more drastic soil amendment. Additionally, observing nearby plants and their health can offer hints about underlying soil issues that could affect your juniper; nearby wilting or yellowing could suggest a larger root disease issue in the area.
FAQ
How long does it take for junipers to recover from root rot?
Recovery from root rot can take anywhere from several weeks to a few months, depending on the severity of the damage and environmental conditions. Consistent care, such as ensuring proper watering and nutrient support, will expedite the recovery process, leading to a more successful rehabilitation of your juniper. Healthy environmental factors, like optimal light and regular airflow, also significantly contribute to recovery timelines.
Should I remove all affected roots in juniper rehabilitation?
It’s advisable to remove any visibly rotten roots while preserving healthy portions to support regrowth. Trimming the affected sections will enhance the plant’s recovery potential by minimizing the risk of spreading disease. Overzealous trimming can risk removing too much healthy root tissue, which may lead to a longer recovery time than necessary. If multiple branches are affected but other segments are healthy, focus on balancing the recovery design by maintaining some robust roots to stabilize the juniper.
Will my juniper fully recover from root rot if treated quickly?
With prompt and appropriate treatment, your juniper has a strong chance of bouncing back from root rot. However, ongoing care and observation will be crucial in promoting long-term health and preventing future problems. Addressing any signs of moisture stress or root deterioration immediately after treatment will help maintain the plant’s renewed health. If recovery takes longer than expected, consider factors beyond treatment, like environmental changes or pest invasions that could interfere with progress.