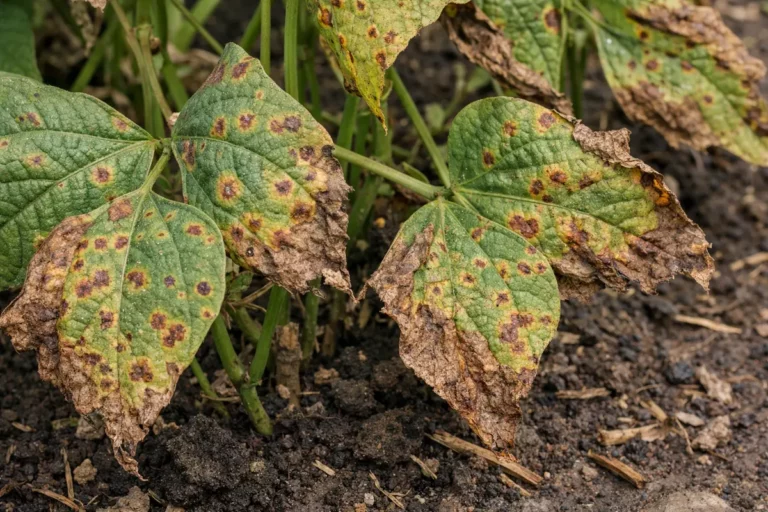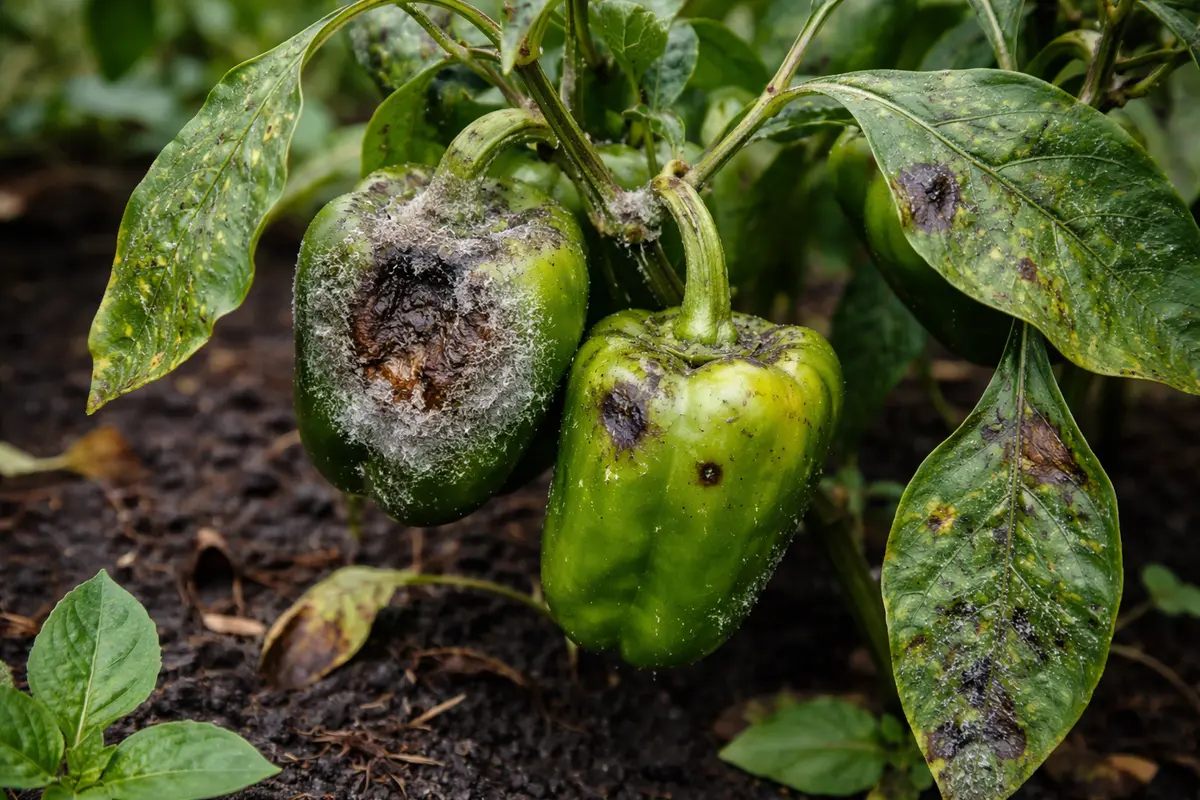
You may notice your bell pepper plants exhibiting unusual leaf spots and a general decline in health after a particularly heavy rain, which is why you need to know how to treat blight on bell peppers after heavy rains. The excess moisture creates a perfect environment for fungal infections, leading to yellowing leaves and rotting fruit. If left unchecked, this issue can spread rapidly and weaken the plant, making it harder to fix later on, but you can improve the situation now by trimming affected areas and applying a suitable fungicide.
Step 1 – Prune Affected Bell Pepper Leaves ASAP
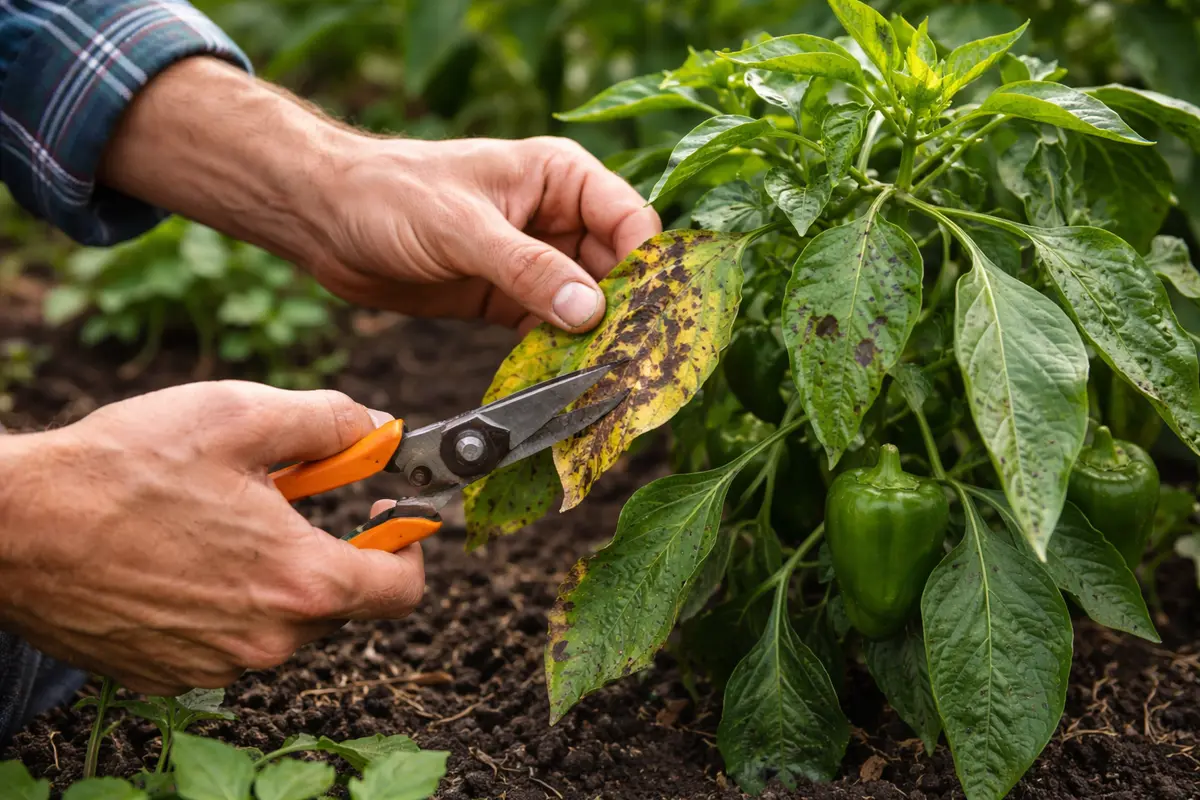
Prune the infected leaves immediately. You will see a reduction in visible dark spots and an improvement in airflow around the remaining foliage. By removing the affected areas, you limit the spread of the blight, preventing the fungus from affecting healthy parts of the plant. Look for leaves that are most severely affected, as these are often the primary sources of fungal spores.
Acting fast is crucial because fungal infections can spread rapidly under moist conditions. Ensuring good airflow and reducing the number of infected leaves minimizes the moisture that encourages fungal growth. The sooner you prune, the less likely you are to encounter a full-blown outbreak that could devastate your plant. If you delay this step, the blight may take hold deeper in the plant, making recovery more challenging. Check the bases of the stems as well; fungal infections can sometimes spread from there, and pruning close to the base will ensure you remove any possible source of spores.
Many gardeners mistakenly focus on treating the blight with sprays before removing infected material. Failing to prune first can lead to the continued spread of the fungus. A frequent pitfall is treating the leaves with fungicides while leaving the source of infection intact, resulting in temporary results at best. In my experience, I’ve found that immediate removal not only visibly improves the plant’s health but also sets the stage for more effective recovery measures in later steps. After pruning, monitor the plant for any new symptoms as fresh foliage emerges to ensure you stay ahead of the disease. If new leaves begin to appear but you see signs of blight returning, consider repeating this pruning step to keep the infection in check.
Step 2 – Assess Excess Moisture Impacting Bell Peppers
Check the soil moisture levels immediately. You should notice whether the soil is overly saturated or retains too much water. If the top inch feels wet, it indicates poor drainage that can exacerbate fungal growth, thereby worsening the blight situation. Use a moisture meter or your finger to gauge soil wetness; soils that remain consistently wet are breeding grounds for pathogens. If the soil has a sour smell, that’s an additional indicator of root rot risk caused by excess moisture.
Excess moisture in the soil prevents proper aeration and can suffocate the root systems of bell peppers. When roots can’t breathe, they can rot, leading to further problems such as nutrient deficiencies and stress in the plant. Addressing moisture levels helps create an environment less conducive to fungal pathogens. Consider factors like recent rain patterns and geographical drainage; if you have heavy clay soils, they will hold moisture longer and require that you adjust your care approach accordingly. Note that bell peppers prefer well-drained soil, so amending the soil can become necessary if drainage is an ongoing issue.
If the soil has standing water, consider relocating your plants to an area with better drainage. Alternatively, improving drainage through raised beds or amending the soil with organic material like compost can make a significant difference. Watch for signs of recovery such as perkier leaves after correcting the soil conditions. If you notice that the leaves remain droopy even after addressing moisture, inspect for potential root damage. Additionally, establish a routine for checking drainage by monitoring storm patterns—if heavy rains are a recurring issue, itemize corrective measures like establishing a rain garden or improving soil structure that allows for better water absorption and dispersal. Make it a habit to check soil moisture levels regularly during rainy seasons to anticipate issues before they escalate.
Step 3 – Test for Fungal Presence on Bell Peppers
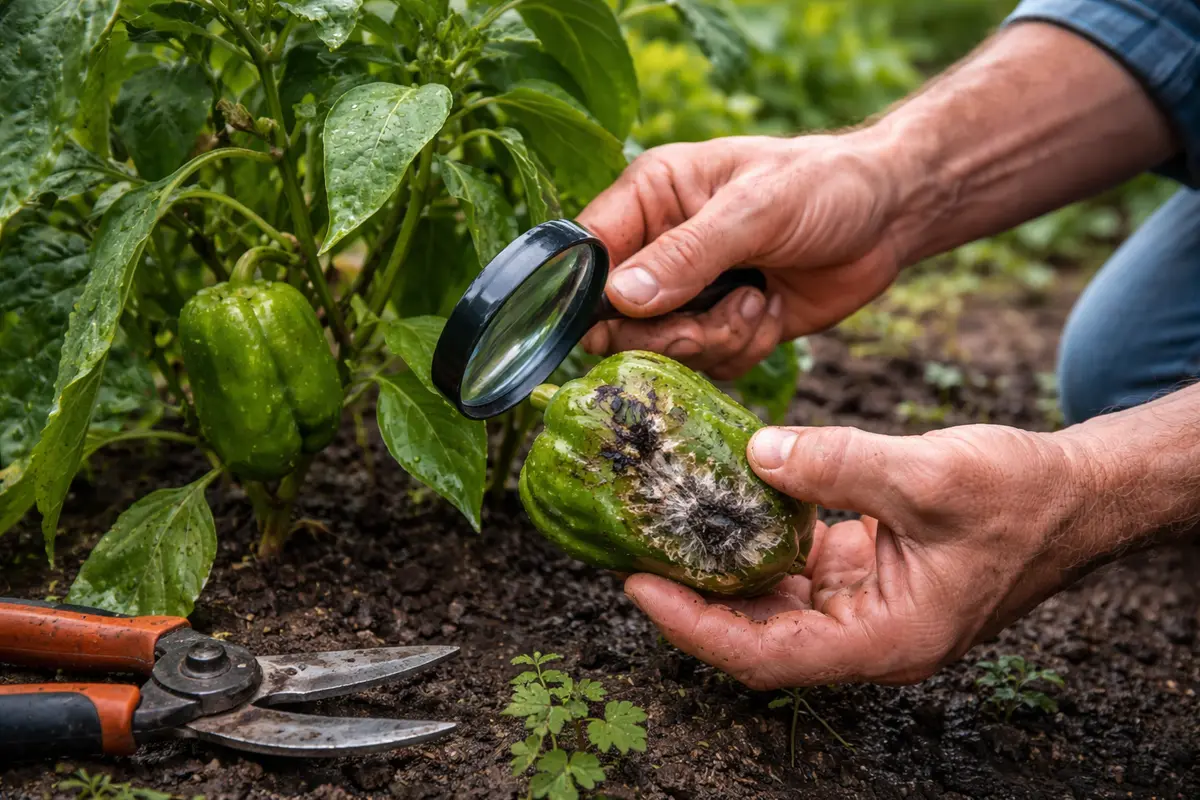
Inspect the leaves and stems for signs of fungal spores. Confirm the problem by looking for fuzzy white or gray spots on the foliage and stems, which indicate the presence of blight. If these signs are present, you can confirm that a fungal infection is indeed affecting your plants. A healthy leaf should maintain a smooth texture; any fuzziness is a red flag. Use a magnifying glass to get a closer look if needed, and pay attention to the undersides of leaves where fungi often thrive.
It’s vital to differentiate blight from other potential issues, as yellowing leaves due to nutrient deficiency might resemble disease symptoms. If the discoloration is accompanied by a powdery residue or fuzzy appearance, you are likely dealing with a fungal infection. Leaf curl from overwatering or drought stress can also seem similar but usually lacks the fuzzy texture seen in fungal infections. Be observant for other symptoms; wilting or drooping leaves can suggest root rot stemming from excessive moisture, which indicates a need for immediate intervention. If any branches appear discolored, these should be examined closely as well for fungal infection.
If you’re uncertain about the diagnosis, conduct a simple test by trying to wipe off the suspected fungal patches with a damp cloth. If the marks remain, it confirms the fungal presence. On the other hand, if the marks clear, it could be dirt or debris, not fungal spores. Do not proceed with treatment until you have a clear confirmation to avoid unnecessary interventions. If blight is confirmed, prepare to shift your strategy toward treatment; ensure that you have all necessary supplies on hand before continuing with further steps. Keep a record of your findings; this will aid in observing patterns over time and can help with future identifications.
Step 4 – Apply Compost Tea to Revive Bell Peppers
Apply compost tea around the base of your bell peppers. You should see healthier, greener leaves starting to reappear within a week under optimal conditions. This organic treatment helps provide essential nutrients, enhancing the plant’s resilience against infections and promoting regrowth. To make compost tea, steep well-aged compost in water for several days, then strain it before application to deliver a concentrated nutrient boost directly to the roots. Aim for about 1 cup of compost per gallon of water with a steeping time of at least 3 days for maximum benefit.
The nutrients in compost tea stimulate healthy microbial activity in the soil, which not only supports the plant but also assists in protecting against future fungal attacks. Over time, nutrients from compost tea help restore the plant’s vigor, contributing to a robust recovery from the blight. Additionally, the microbial blend can aid in re-establishing a healthy soil ecosystem. Healthy soil leads to healthier plants; focus on this aspect to build resilience against future issues. As an ongoing practice, consider applying compost tea every four weeks during the growing season to maintain soil health.
A common mistake is to apply too much water or too frequently during recovery, thus overwhelming the plant. Focus on maintaining just the right moisture level to stimulate root growth without waterlogging. If you notice that new growth is stunted or discolored, it might suggest the need for an altered approach, such as increasing air circulation around the plants. If the soil is consistently damp, adding a layer of mulch can help retain moisture without saturating the roots. Moreover, always check the soil pH when applying compost tea; the optimum pH range is between 6.0 and 7.0 for bell peppers, affecting their nutrient uptake and overall health. Adjustments using lime or sulfur can be made based on soil test results.
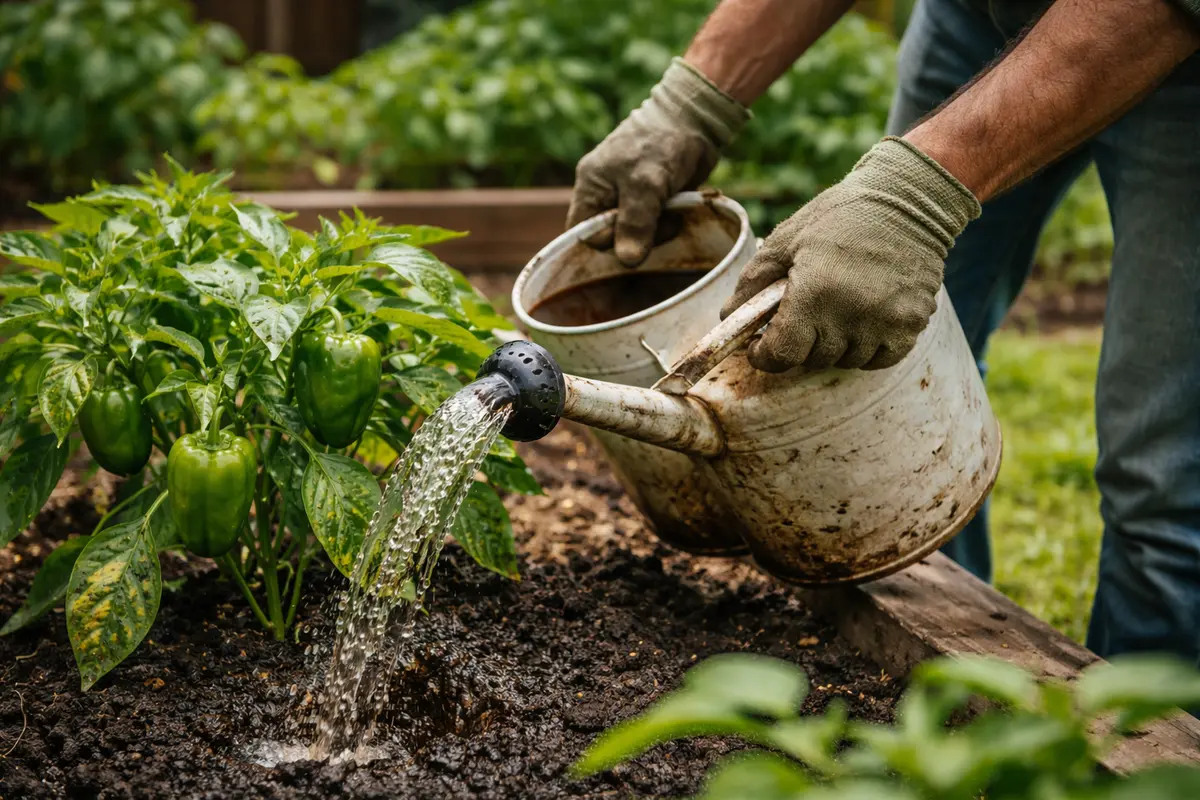
Step 5 – Water Bell Peppers Only at Soil Level
Start by applying a balanced organic fungicide to the soil and leaves of your bell pepper plants immediately after heavy rains. This proactive measure can significantly reduce the chances of blight developing, helping to secure your pepper crop against further infections. Follow the product instructions closely, and use a sprayer for an even application, ensuring you cover all foliage.
The recurrence of blight often stems from excessive moisture combined with poor air circulation around the plants, which creates a perfect environment for fungal spores. By routinely applying fungicide and ensuring adequate spacing between plants, you can disrupt the life cycle of the fungi responsible for blight and diminish their presence on your plants. If you spot rapid wilting after rain but the soil appears dry, check for signs of blight on the foliage. Assess whether the fungicide is applied adequately; if not, consider reapplying or switching to a different product based on active ingredients.
As a seasonal variation, during periods of high humidity or anticipated heavy rainfall, increase the frequency of your fungicide applications. Additionally, consider incorporating mulch around your plants to help with drainage and reduce moisture retention in the soil. This dual approach can further protect against blight and promote a healthier growing environment. Additionally, careful inspection of watering practices is essential; overhead watering can leave foliage wet for extended periods, creating the ideal environment for fungal growth. Moisture on leaves, particularly combined with warm and humid conditions, invites diseases such as blight to thrive.
By concentrating your watering efforts at the base of the plants, you promote better health without overexposing the leaves to moisture. Consider checking soil moisture again after implementing this change; you may see a quicker drying time in the top layers compared to before. During heavy rain periods, it’s also wise to create drainage channels to divert excess water away from the plants. If you find that your soil retains moisture longer than usual during this time, consider using mulch to help insulate roots and protect against fungal spores that can become airborne after rain. The goal is to strike a balance between adequate moisture for growth and avoiding soggy conditions; always assess how your garden layout contributes to drainage patterns.
Step 6 – Inspect Bell Pepper Foliage for New Symptoms
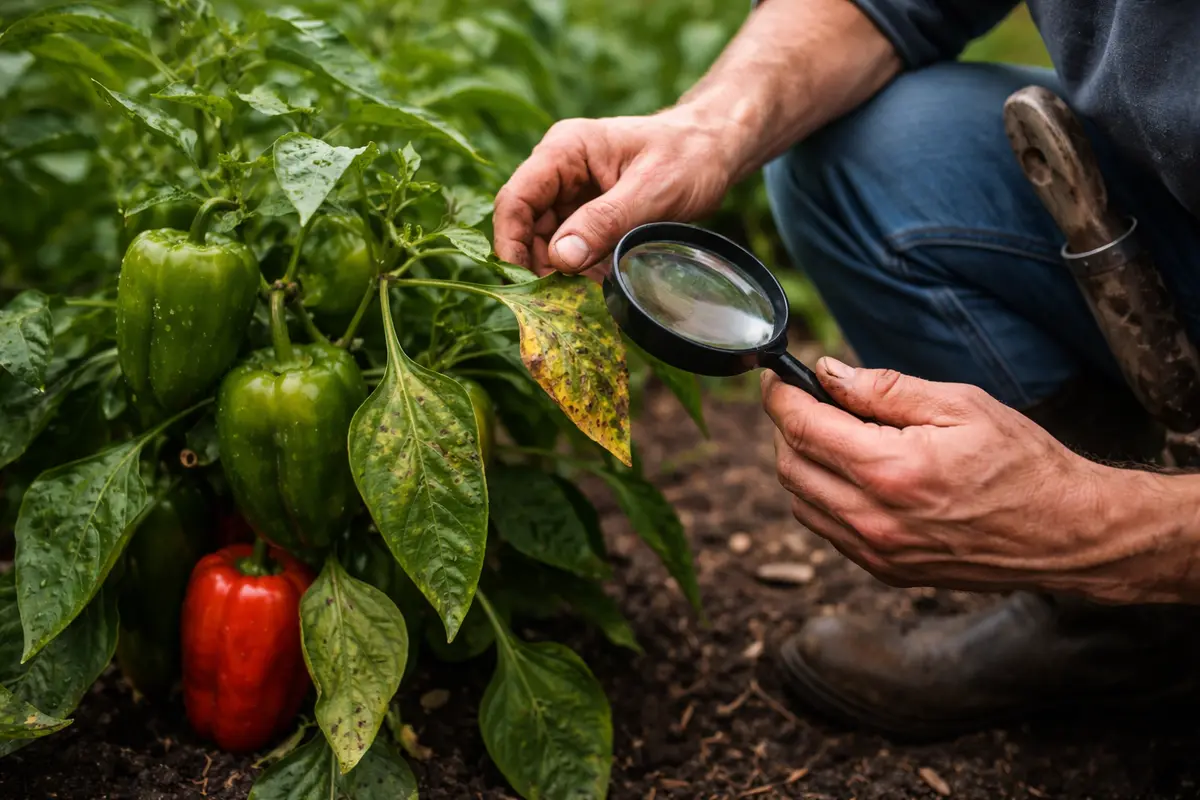
Check your bell pepper plants every few days for any new symptoms of blight. You should observe green and healthy leaves as a sign of effective recovery, while any signs of returning blight require prompt attention. This routine monitoring allows you to intervene quickly if symptoms reappear. Implement a chart to track daily observations—this not only helps maintain awareness but can reveal patterns in symptom recurrence related to environmental conditions. If you notice any new gray spots or discoloration, address them immediately to prevent further spread.
A fully recovered bell pepper plant will exhibit vibrant green leaves and strong stems. In contrast, the early signs of recurring blight may include the re-emergence of dark spots or yellowing leaves, indicating that conditions have not improved sufficiently. Keeping track of these visible changes helps you evaluate the effectiveness of your interventions. Look for variations in plant behavior—healthy plants often adjust quickly to changes and show new growth, unlike struggling ones that may exhibit muted responses.
If signs of blight return after following these steps, consider reassessing your watering schedule or drainage practices. It might also be necessary to apply a fungicide as a preventive measure, depending on the severity of the recurrence. Additionally, remember that consistently beneficial practices, such as crop rotation and companion planting, can enhance plant health further. Monitoring at this stage is crucial; the goal is to stay ahead of the disease before it spreads out of control. If symptoms worsen beyond your control, consult local agricultural extensions for options specific to your regional challenges, as they might provide localized solutions that suit your specific conditions.
FAQ
How long does it take for bell peppers to recover from blight?
Recovery from blight varies based on the severity of the infection and the care provided. Generally, you can expect visible improvements within one to two weeks if optimal conditions and treatments are applied consistently. Healthier foliage and a decrease in dark spots mark significant progress with observable leaf growth indicating that the plant is regaining its strength.
Can blight spread to other plants nearby?
Yes, blight can spread from infected bell peppers to surrounding plants, especially if they are closely spaced. Maintaining good airflow and promptly addressing any infections can significantly reduce the chances of spreading. Watch for the proximity of other nightshade family plants, including tomatoes and eggplants, as they can also be susceptible to similar fungal pathogens. Regular inspections of these nearby plants will help catch issues before they escalate.
Should I remove all the affected leaves at once?
Remove as many affected leaves as you safely can without stressing the plant further. Gradually pruning back affected foliage allows the plant to maintain some functioning leaves for photosynthesis and helps it manage shock more effectively. Be cautious of the plant’s overall stress levels; if it shows significant wilt or droop, take a slower approach to removal and consider waiting a few days to check for any recovery before taking additional action.