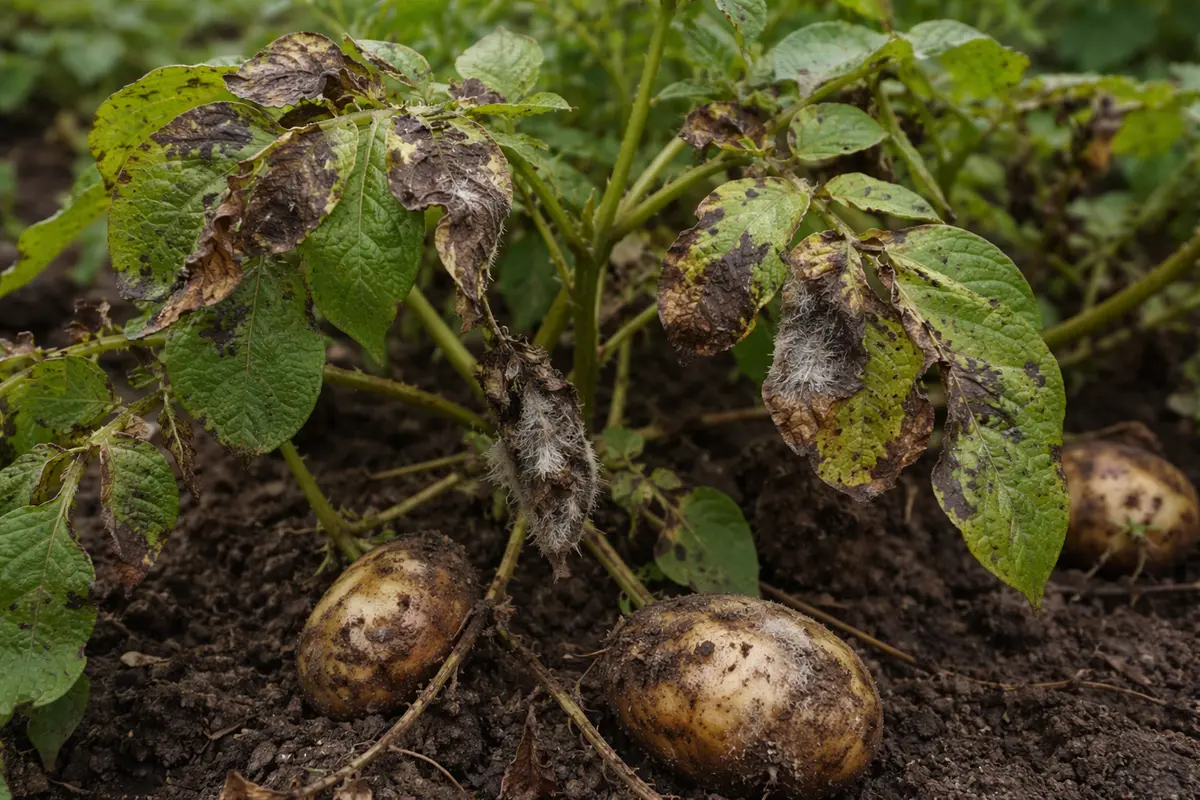
You may notice your potato plants developing dark, water-soaked spots during the humid months, which is why you need to know how to stop blight on potatoes during humid months. This blight occurs when excess moisture creates an ideal environment for fungal pathogens, leading to the telltale signs of decay and damage. If left unaddressed, the issue gets worse, ultimately weakening the plant and leading to more damage, but fixing it is possible if you regularly inspect and adjust your care routine.
Step 1 – Prune Away Infected Potato Leaves Immediately
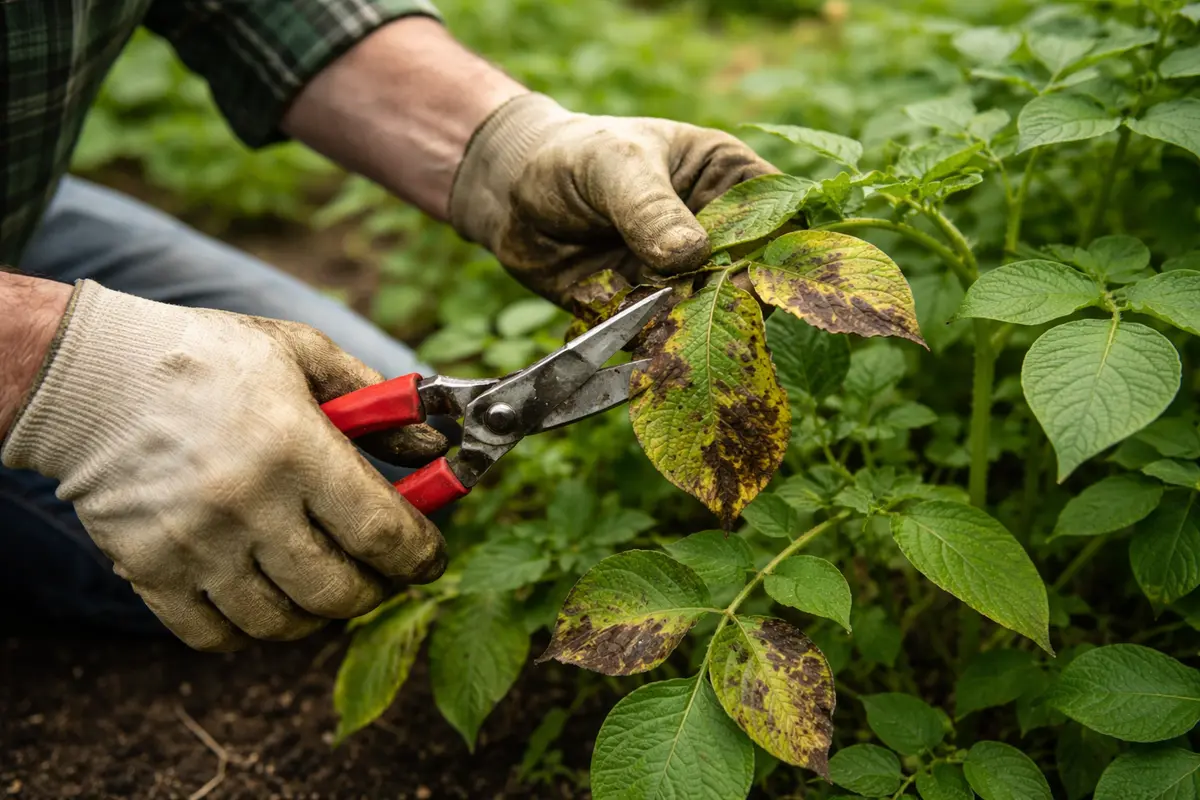
Start by removing any affected leaves and stems from your potato plants immediately. Use clean shears to cut the parts that show signs of blight, such as dark spots or a fuzzy mold, making sure to dispose of them away from your garden. You should notice a reduction in visible symptoms after a few days, as the remaining plant parts will begin to look healthier and more vigorous.
Acting quickly is crucial because late blight progresses rapidly in humid conditions, causing systemic infection within days. If you delay this action, the disease can spread from foliage to tubers, leading to devastating losses. Remove any infected parts as soon as you notice them; if you find wilting leaves and no dark spots, inspect for other diseases like early blight instead.
For example, in one garden, timely removal of blighted plant sections led to a harvest of ten times more tubers compared to a neighbor who delayed action. Many gardeners mistakenly assume the blight will stop on its own, resulting in complete crop failure by the end of the season. Remember, prompt intervention in the early stages makes a significant difference in outcomes.
By systematically removing affected foliage, you not only reduce the source of fungal spores that can infect healthy leaves and stems but also improve air circulation among the remaining leaves. Early intervention is essential because prolonged exposure to humidity facilitates the spread of these pathogens. The blight can devastate your plants within days if not addressed quickly, making swift action critical. When you maintain well-pruned plants, you can foster a healthier micro-environment that supports their growth.
A common mistake gardeners make at this stage is hesitating to prune, thinking it might damage the plants further. It’s crucial to understand that excess foliage harboring fungal spores does more harm than good. A prompt trim of symptomatic leaves can significantly minimize further infection. In my experience, acting swiftly allows for healthy green growth to flourish, saving the majority of your crop when early-stage blight emerges. If you’re uncertain which leaves to prune, focus on those with distinct dark spots or wilting; as you remove these, watch for the overall improvement in your plants’ structure.
Be sure to use clean, sharp pruning shears to prevent any cross-contamination; disinfect them before and after pruning. This can lower the chance of inadvertently spreading the infection further. If pruning tools aren’t cleaned properly, they can transfer spores to healthy plants, leading to a renewed outbreak.
Step 2 – Test Soil pH for Potato Blight Risk
Start by removing any infected potato plants and ensuring good air circulation around your remaining plants. This action will reduce moisture accumulation and help stop the spread of blight, making it easier to manage the conditions that favor the disease.
Blight thrives in humid conditions when moisture settles on the leaves, creating an ideal environment for fungal spores to germinate. Infected tissues show dark lesions, while healthy foliage displays vibrant green colors without any spots. If your soil is compacted or waterlogged, this can exacerbate humidity levels around your plants, leading to increased disease susceptibility.
If your soil has a sour smell when disturbed, this indicates anaerobic conditions that encourage blight and root rot. In such cases, improve soil drainage by incorporating organic matter or planting in raised beds. Conversely, if the soil appears dry but the plants are wilting, check for root damage caused by pests, which requires a different approach.
Potatoes thrive in a slightly acidic environment with soil pH levels ranging from 5.5 to 6.5. When the pH drops below this threshold, it inhibits healthy root growth, creating stressed plants that become increasingly vulnerable to diseases, including blight. For example, if your soil pH is too acidic, the nutrient uptake may be compromised, resulting in poor plant health and diminishing defenses against blight. You may observe that discolored leaves accompany poor growth if the conditions remain untreated.
If your test shows an acidic reading, consider adding agricultural lime to raise the pH toward the optimal range. Typically, applying 2 to 5 pounds of lime per 100 square feet should help adjust the soil chemistry effectively. Spread the lime evenly and incorporate it into the top 6 inches of soil for best results. On the other hand, if the soil appears excessively alkaline, it may impede the uptake of essential nutrients, weakening the plant further, which can also lead to increased vulnerability to diseases like blight. Regular assessments will help you keep soil conditions ideal and ensure healthy crops.
Monitor pH levels regularly, especially before planting or after significant rainfall, as soil can become more acidic over time due to leaching. This not only safeguards your potatoes but also reinforces their defense mechanisms against potential blight attacks.
Step 3 – Confirm Blight Presence on Potato Foliage
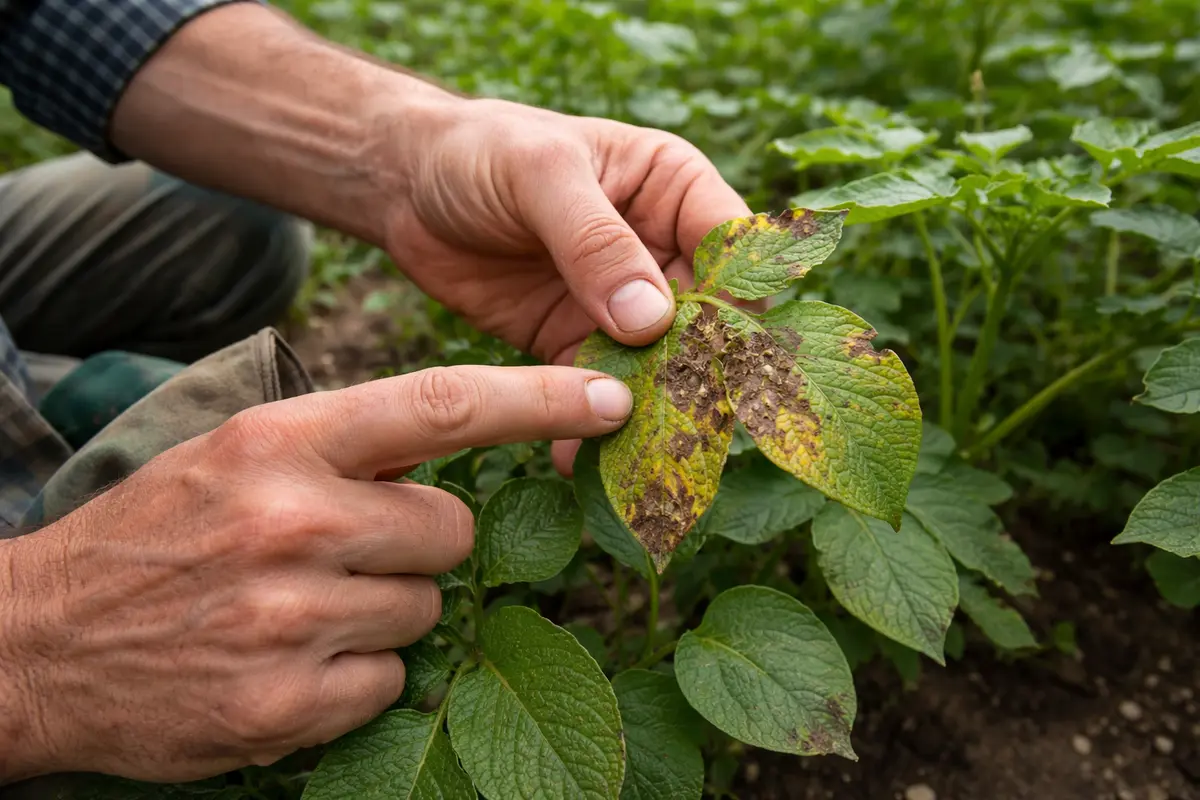
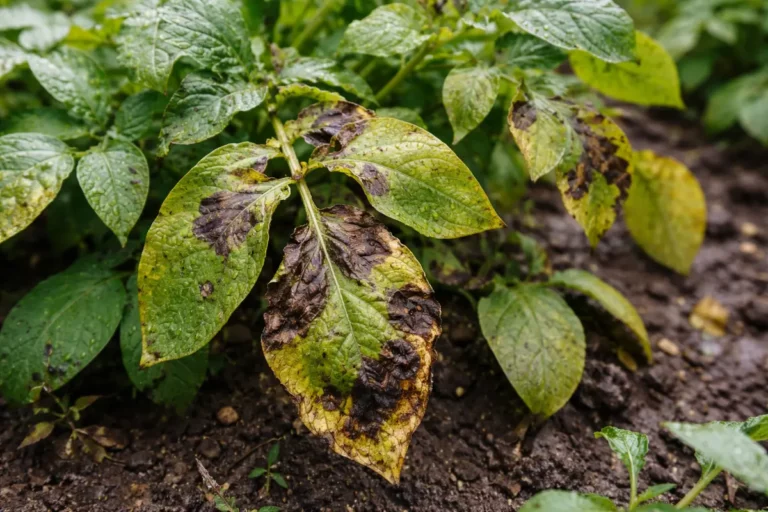
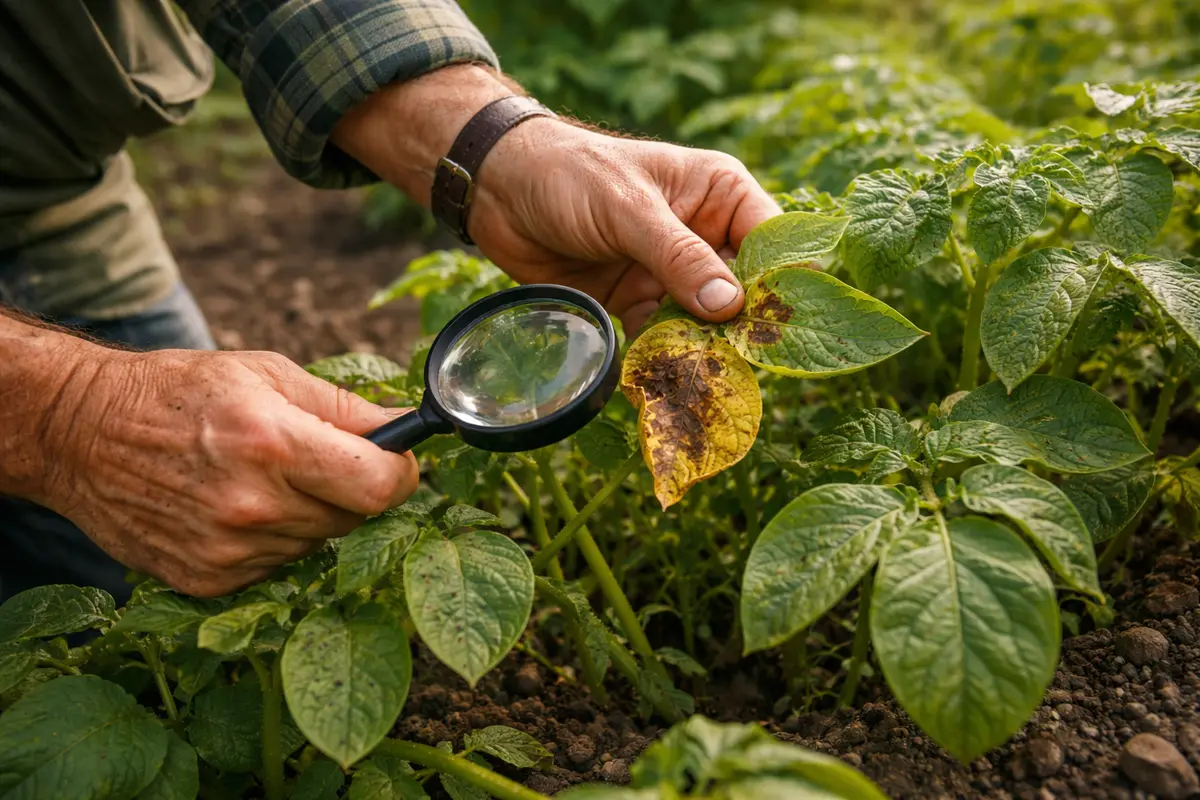
Start by inspecting your potato plants for signs of blight, especially after periods of high humidity. Look for irregular dark spots on the leaves, which may appear water-soaked or greasy. As the blight progresses, these spots can rapidly expand and lead to yellowing and wilting of the leaves.
Be aware that other issues like downy mildew or nutrient deficiency can mimic blight symptoms. Downy mildew typically produces a white, fuzzy growth on the underside of leaves, while nutrient deficiencies may show as overall yellowing without dark spots. If your leaves are crispy and falling off without dark lesions, they are likely suffering from a different condition.
If you are uncertain about the diagnosis, monitor your plants closely for a week and take note of any changes. Additionally, consider taking samples of the affected leaves to a local extension service for further analysis. If the problem persists without noticeable improvement, you may be dealing with an advanced case of blight, necessitating intervention.
Blight can sometimes be confused with other issues like nutrient deficiencies or frost damage. While nutrient deficiencies might show yellowing leaves without dark spots, frost damage often results in a more leathery texture and browning at the tips. If you see faded areas on the leaves that do not have the characteristic water-soaked lesions of blight, you may be dealing with a different concern.
If you’re unsure whether your potatoes have blight or another issue, take a step back and monitor the plants for a few days. Note any changes in the symptoms present; if the dark lesions worsen or new ones appear, proceed with blight treatment. Otherwise, consult additional resources or experts for clarification on your observations.
Look for the telltale characteristics, such as yellowing edges around the dark spots, which are major indicators of blight. However, be aware that other conditions can mimic these symptoms, such as nutrient deficiencies, which usually appear as uniform leaf yellowing or curling without the presence of dark spots. A lesser-known differentiator is that nutrient-related issues tend to affect older leaves first, while blight can impact newer growth rapidly. The better you identify the source of the problem, the more effectively you’ll be able to take action.
If you are unsure whether the plants have blight or are simply stressed from environmental factors, monitor the plants’ overall condition closely for a few days. If the dark spots spread and new symptoms develop, you can be confident that the blight is indeed present and requires urgent management measures. On the other hand, if the plants seem to recover and no further symptoms appear, it might be a sign of temporary stress rather than an active infection. Keeping a record of your observations can help in tracking down recurring issues.
Step 4 – Water Potatoes Deeply to Aid Recovery
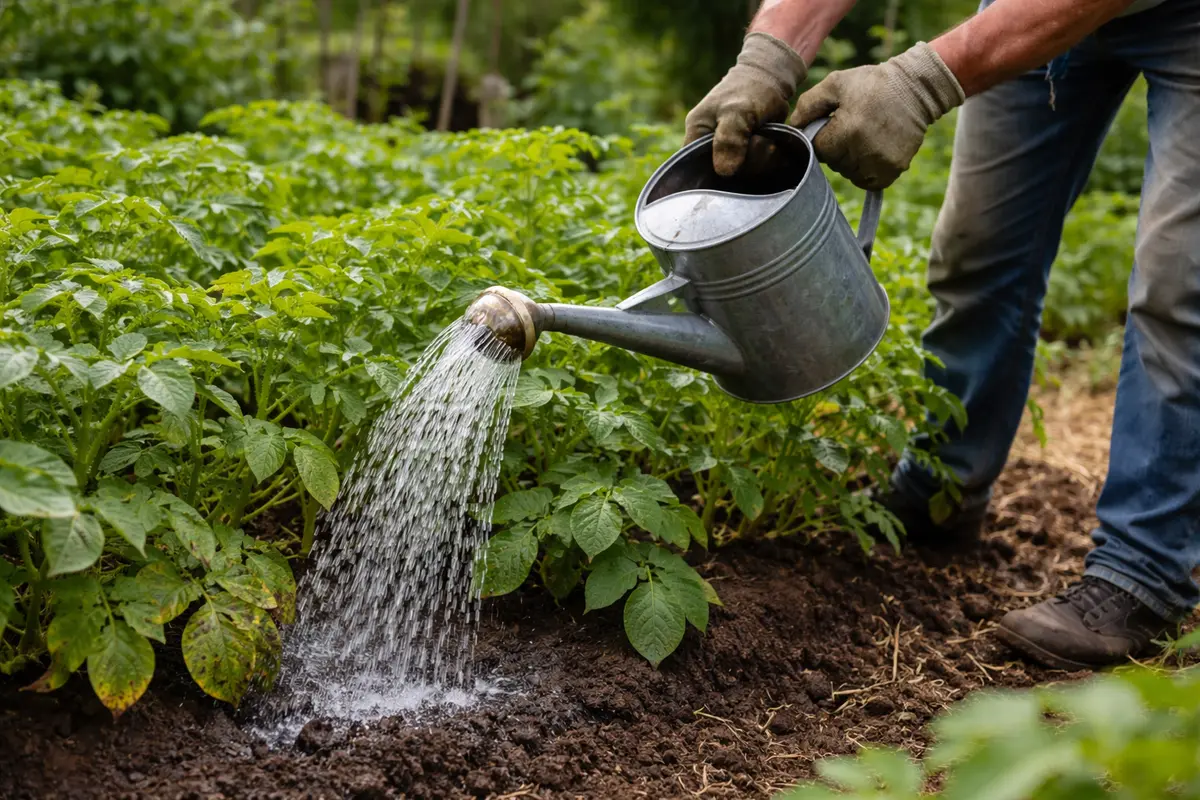
Water the potatoes deeply but infrequently to support recovery. You should see the leaves perk up and regain their firmness within 48 hours if they were previously stressed due to insufficient water or pathogen attacks. In cases where you provide adequate moisture, observe how quickly your plants become more vibrant.
Deep watering encourages the roots to grow deeper into the soil, seeking moisture further down. This promotes healthier growth and resilience among the plants. When potatoes are well-hydrated, they possess a better defense mechanism against diseases like blight. Ensure that you water until the moisture penetrates about six inches deep, allowing the potatoes to access adequate moisture without contributing to the wet conditions that are conducive to fungal growth. Rapidly check the soil after watering; if it remains soggy on the surface, you risk a higher blight occurrence.
A common mistake is overwatering, which can drown the roots and exacerbate issues like blight. Instead, allow the top layer of soil to dry out slightly between each watering session. By ensuring a balance, you safeguard your plants while minimizing fungal development. If your soil has poor drainage, consider elevating the planting bed or improving soil aeration to help maintain optimal moisture conditions. Often, failed drainage can make a good garden setup quite risky, especially in humid weather.
Step 5 – Employ Mulching Techniques to Prevent Blight
Apply a layer of organic mulch around the base of the potato plants. This will help retain soil moisture while providing a barrier against soil-borne pathogens that can lead to blight. You should notice less moisture accumulation at the base of the plants, creating a less favorable environment for fungal spores.
Using mulch improves soil structure by increasing its overall health and texture, which can mitigate surface moisture that may promote fungal growth. In particular, straw or wood chips act as excellent mulch materials, creating a microclimate that helps reduce humidity around the plant leaves, discouraging blight spore germination. In humid environments where the air moisture level is high, this technique is crucial for plant health. Regularly monitor the moisture levels beneath the mulch; if you find the soil remains wet too long, it will detract from your efforts.
In very humid climates, regularly check and replenish the mulch layer as it decomposes over time. It is essential to maintain a thickness of around 3 to 4 inches to ensure effective moisture retention without encouraging pathogens. If you notice the humidity remains high and fungal activity escalates, consider switching to a thicker layer of mulch or using more aggressive mulching materials that retain less moisture, thus offering better protection against blight. Pay attention to changes in atmospheric conditions as seasons shift, as mulch requirements may change alongside it.
Step 6 – Check Potato Vines for Signs of New Infection
Start by monitoring your potato plants daily during humid conditions, especially in the early morning and late afternoon. Check for signs of moisture buildup on leaves and stems, and look for any discoloration or fuzzy spots that could indicate blight. If you notice these symptoms, recheck every three days to track the progression of the disease.
A fully recovered potato plant showcases firm and vibrant green leaves that stand upright, free of any dark lesions or patches. In contrast, early signs of blight may present as yellowing leaves with a damp surface texture, followed by dark spots that feel slimy to the touch. If you spot wilting stems or a musty odor, confirm that the air circulation around the plants is adequate; otherwise, address this issue promptly.
If blight reemerges even after implementing preventive measures, promptly remove and dispose of any infected foliage to minimize spread. Escalate your action by applying a targeted fungicide recommended for potato blight, ensuring to reapply it according to the product’s instructions. If the conditions remain humid, consider enhancing airflow around the plants by pruning and spacing them appropriately.
A healthy potato plant will exhibit robust growth and show no new lesions or discoloration on its leaves. If you begin to see new symptoms appearing, such as spots spreading or leaves rapidly wilting, this indicates that the blight may be re-emerging. Act quickly to avoid further damage, as untreated blight can be devastating. If you have to trim additional infected leaves, ensure to do it with precision to reduce additional stress on the plant.
If you detect any signs of re-infection, return to previous steps: promptly trim back any newly infected plant parts and adjust your watering and mulching practices accordingly. You might also consider employing preventive fungicides specifically designed to combat fungal spores more effectively when a severe outbreak is evident, following the manufacturer’s guidelines to ensure safety and effectiveness. Keep records of re-infection instances as they can provide insight for future planting strategies.
FAQ
How long does it take for blight to spread on potatoes?
Blight can spread very quickly, often within 24 to 48 hours, especially in humid conditions. If not addressed promptly, affected plants can die within a week, severely impacting your potato yield. Monitoring environmental conditions alongside the plants can help notify you about the disease risk.
Can you still eat potatoes affected by blight?
It is generally safe to eat potatoes that have been infected with blight, provided you cut away any affected areas. However, it’s crucial to examine the tubers closely for any signs of rot or damage; consuming severely infected potatoes can lead to gastrointestinal issues. Ensure to wash and cook them thoroughly to mitigate any risks.
Should I remove all potato foliage to prevent further spread?
Do not remove all potato foliage unless the plant is severely infected, as it is essential for photosynthesis and nutrient uptake. Instead, focus on pruning away only the visibly infected portions to help maintain healthy growth and recover the plant effectively. Continuous monitoring will give you a clear picture of how your plants are doing amid the threats.