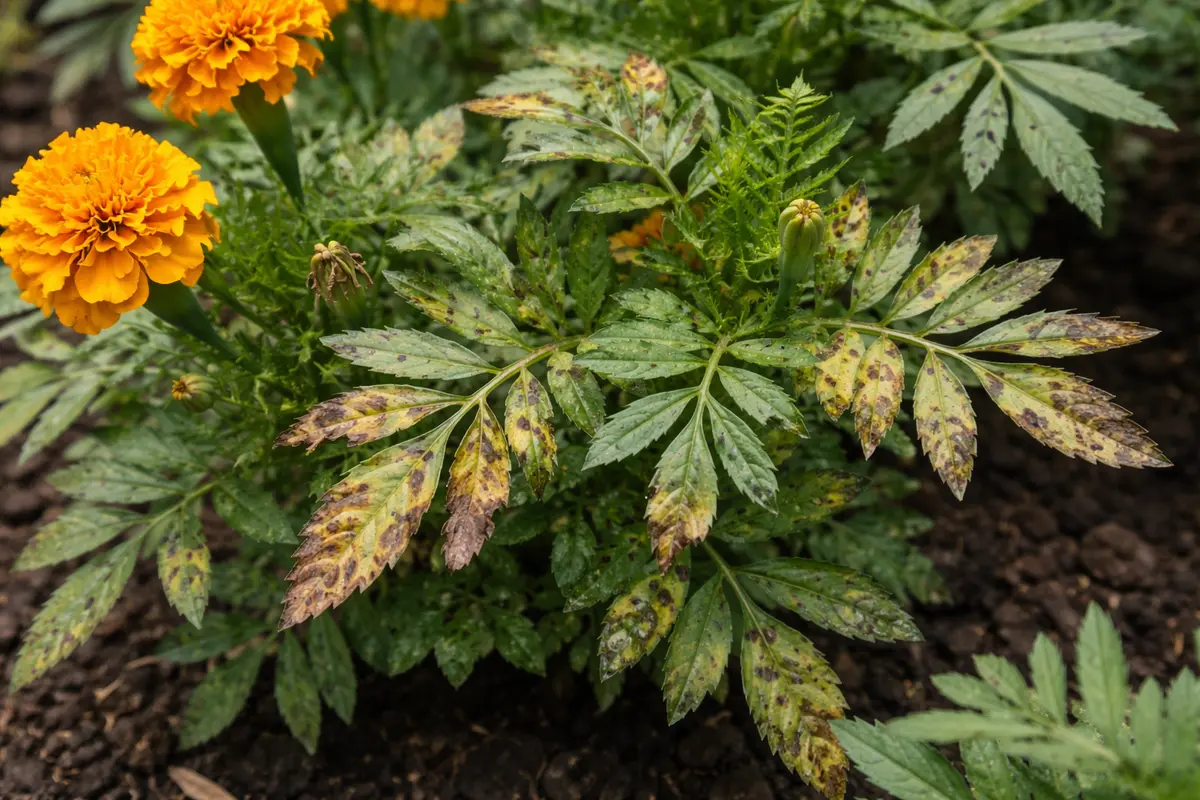
You may notice your marigolds looking distressed during humid days, which is why you need to know “Why are my marigolds developing brown spots during humid days.” This discoloration occurs when excess moisture creates ideal conditions for fungal infections, leading to unsightly brown spots on the leaves. If left untreated, the issue can spread and weaken the plant, but taking the time to inspect and improve airflow can make a significant difference.
Step 1 – Trim Brown Spots from Marigold Leaves
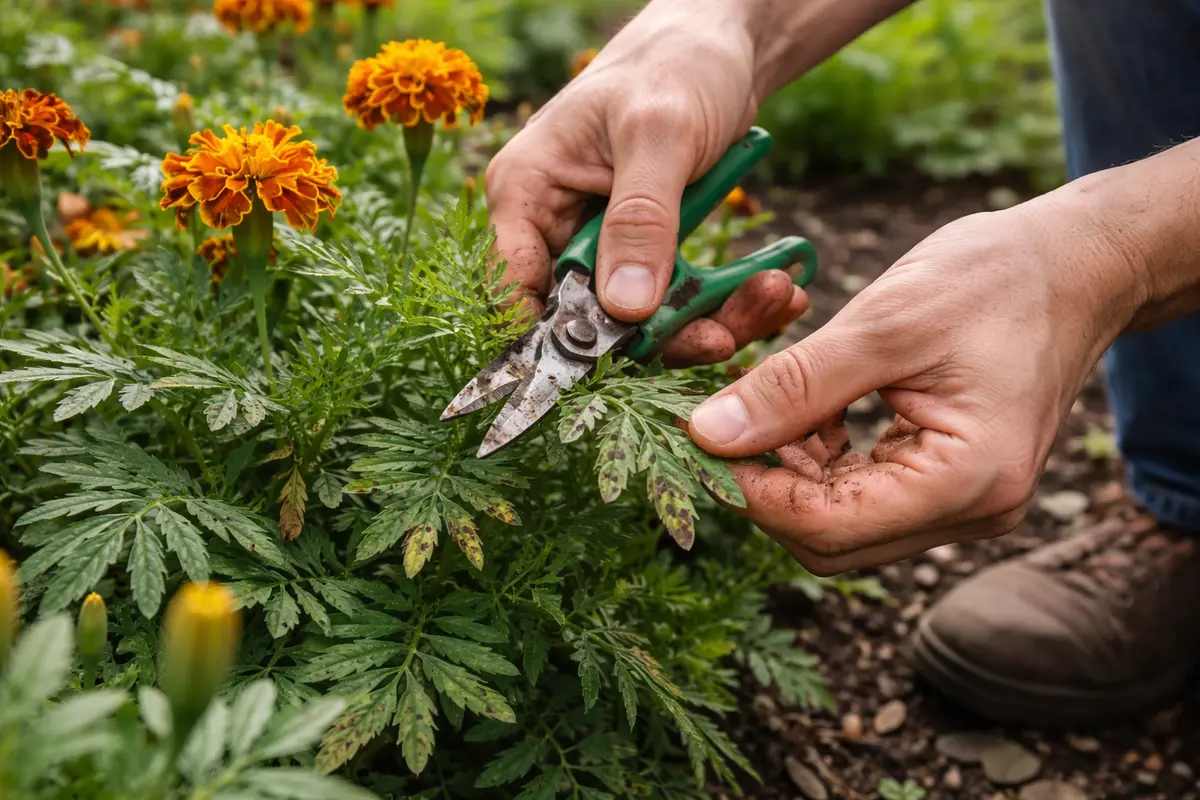
Remove any leaves showing brown spots immediately. You will see a reduction in the visible symptoms of infection within a few days. If you’re dealing with heavy brown spotting, ensure you cut back at least 2-3 inches beyond the affected area to prevent the spores hidden in the leaf’s edges from further spreading. In cases where a single leaf has extensive browning, it’s best to cut the entire leaf stem to minimize any chance of recurrence. If you notice a significant number of affected leaves, it might be wise to assess the overall health of the plant, as extensive browning could indicate deeper issues.
Trimming leaves helps limit the spread of fungal spores that thrive in humid conditions. By cutting away affected areas, you also improve air circulation around the plant, which is crucial for marigolds, as stagnant air can promote further mildew growth and other fungal diseases. Check for any remaining debris on the soil or any infected leaf parts left behind, which can also harbor pathogens that could resurface on your marigolds. Additionally, if you notice that brown spots are reappearing quickly after trimming, it may indicate that the underlying humidity issue has not yet been resolved adequately.
Many gardeners mistakenly wait too long to address these symptoms, allowing the problem to escalate to much of the plant. For instance, if a single leaf shows clear signs of infection, that can quickly escalate to much of the plant if it’s not promptly managed. A common oversight is not sanitizing tools between cuts; always disinfect pruning shears with rubbing alcohol before and after use to avoid cross-contamination. Taking action promptly by inspecting regularly and cutting off affected areas can greatly improve the plant’s overall health, reducing the time and effort needed to address larger outbreaks. If a neighbor’s garden or nearby weeds show signs of similar infections, it may accelerate the spread to your marigolds if left unattended.
Step 2 – Diagnose Humidity Issues Affecting Marigolds
Inspect the garden environment for humidity and excess moisture. You should observe if the humidity levels are consistently high or if the soil stays too moist, which can indicate a drainage issue. A simple test is to stick your finger into the soil up to the second knuckle; if it feels soggy and you see no water pooling on top, drainage amendments or construction will be necessary to rectify the conditions. On the other hand, if it feels dry and elevated parts of the soil appear cracked, watering may be inadequate. Also, examine for surface mold or algae, as these are symptoms of high moisture and poor air circulation.
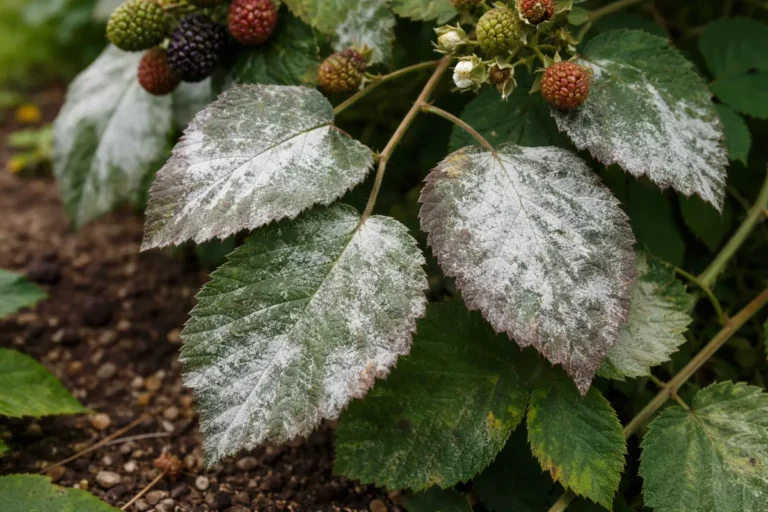
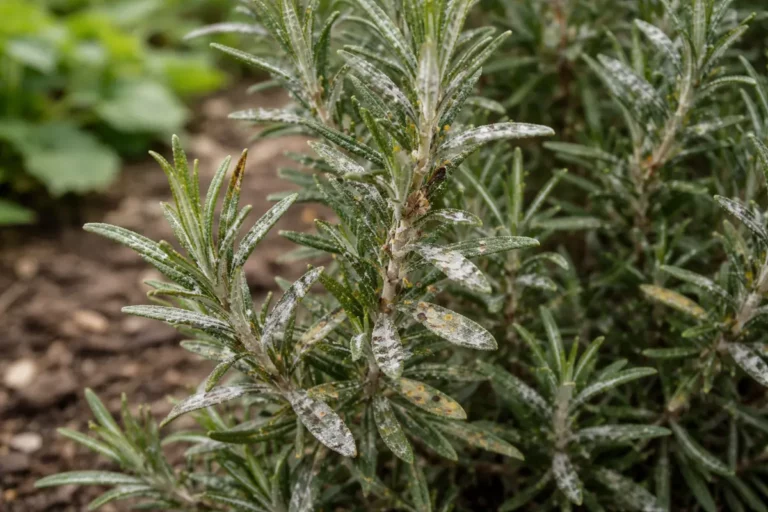
High humidity combined with poor drainage can create the perfect breeding ground for diseases such as powdery mildew. This often leads to the leaf spots that marigolds display during humid weather, as the plant cannot evaporate moisture efficiently, resulting in stress and vulnerability to infections. Observe leaf surfaces for a whitish powdery coating, a clear sign that fungal spores are affecting your plants. Meanwhile, if the air circulates poorly, the moisture can linger on the leaves longer than needed, intensifying conditions for those spores to thrive. If you observe that neighboring plants are also affected, it indicates that your local climate conditions are contributing to this issue.
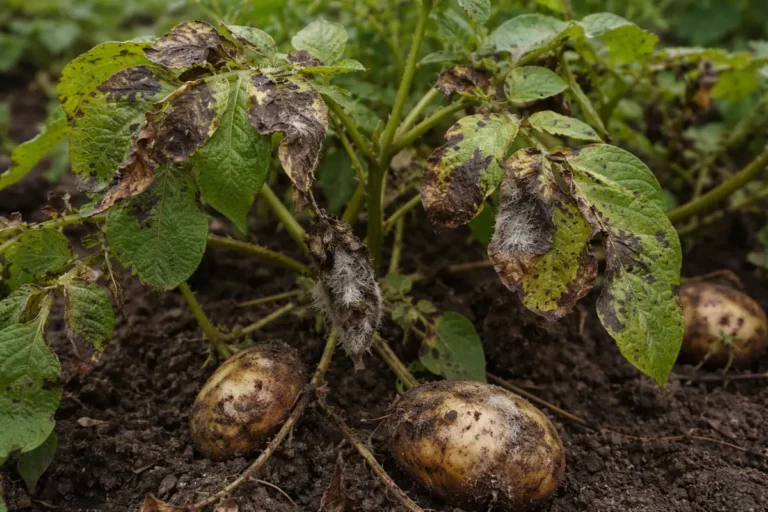
If the soil feels soggy and has a sour smell, this points to overwatering or poor drainage; try amending the soil with organic matter such as compost or sand to improve drainage capacity. Additionally, consider relocating the marigolds to a raised bed or container if drainage issues persist in their current location. Conversely, if the soil appears dry yet the leaves are still discolored, you may need to adjust your watering schedule to account for humidity. If you notice that after heavy rain, the water drains instantly and leaves the soil dry, it’s important to ensure your marigolds aren’t being stressed from too much waterlogging, which can lead to nutrient leaching and yellowing leaves. Always keep an eye on weather patterns, as prolonged wet spells will require ongoing adjustments to your care regimen.
Step 3 – Water Marigolds with Balanced Nutrient Mix
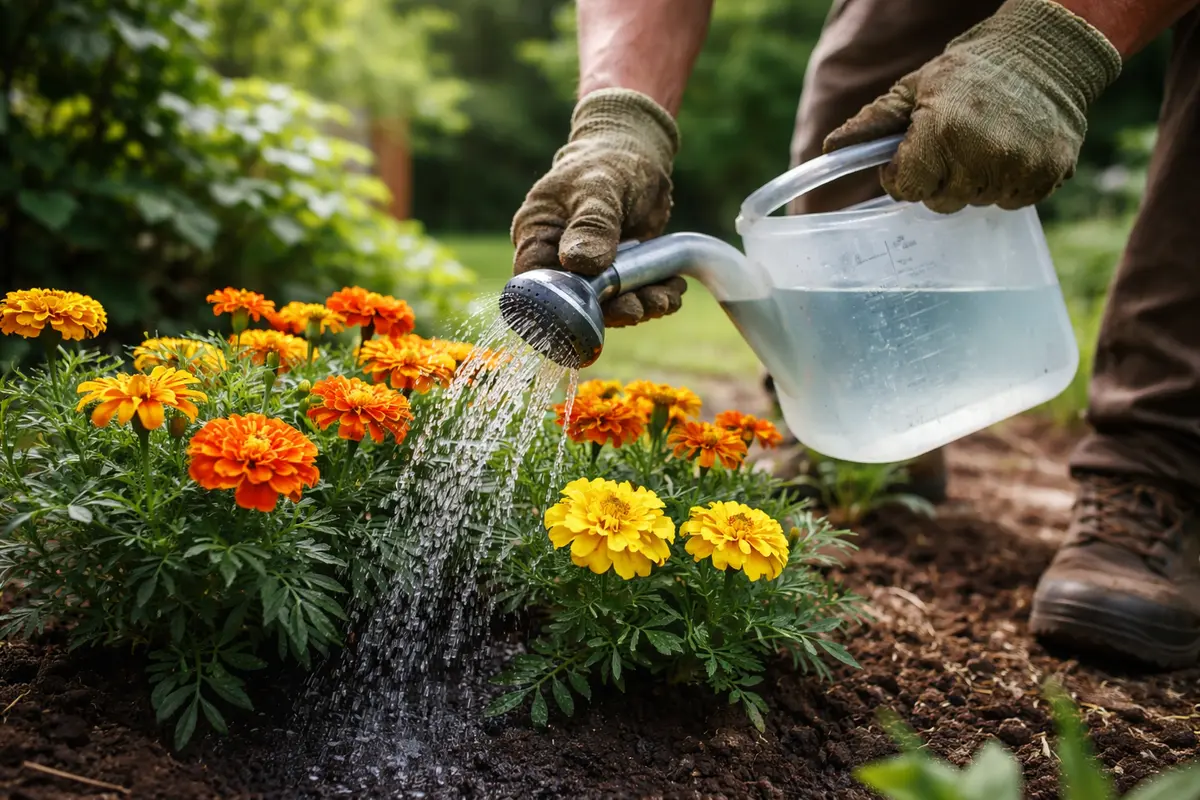
Apply a balanced nutrient mix while watering your marigolds. You will notice that the leaves begin to recover and new growth becomes visible within a week. Use a fertilizer ratio of 10-10-10 or a similar balanced approach to promote healthy foliage. Adding approximately 1 tablespoon of fertilizer per gallon of water will suffice for an effective mix, but be cautious of over-fertilization, which can lead to leaf burn. If you’re applying a slow-release fertilizer, make sure to follow the recommended dosage specific to marigolds to avoid excessive build-up in the soil.
Providing a nutrient-rich solution helps boost the plant’s overall vigor, enabling marigolds to combat environmental stressors effectively. The nutrients support the formation of new leaves and can rejuvenate plants that may have been weakened by previous fungal issues. However, if new growth appears deformed or is accompanied by browning tips, this may indicate that the fertilizer is too concentrated, and you should consider reducing the concentration in your next application by cutting back from 1 tablespoon to 1/2 tablespoon per gallon of water. Additionally, ensuring that the nutrients are distributed evenly throughout the soil will enhance even absorption by the root system.
A common mistake during recovery is overwatering; be sure to let excess water drain effectively to avoid root rot. After applying nutrients, monitor the soil’s moisture levels closely; when the soil dries out between waterings, it encourages speedy nutrient absorption and healthier growth. If you notice the leaves are lush but the color is fading, it could be a sign of nutrient imbalances or over-fertilizing, which can lead to further stress. Balance is key here; careful observation will guide whether to amend your watering or fertilizing schedules as required. Additionally, consider alternating waterings with plain water and nutrient solutions every other week, especially if the weather remains humid. Check for crusting on the soil surface after fertilizer application, as this can indicate overly high nutrient concentrations.
Step 4 – Adjust Watering Schedule for Humid Days

Start by removing any brown-spotted leaves and ensuring your marigolds receive adequate airflow by spacing them properly. Within days, you should notice a reduction in new brown spots forming as healthy foliage develops in the improved conditions. If additional spots are still appearing, ensure that plant spacing is optimized and not hindered by surrounding flora or structures.
High humidity creates an ideal environment for fungal diseases like powdery mildew, which appears as brown spots on marigold leaves. When you regularly remove affected leaves and space your plants correctly, you disrupt the humidity around the plants, making it less inviting for these pathogens to thrive. If you notice new leaf spots despite your efforts, check for overcrowding or insufficient airflow around the plants. Also, consider the direction of sunlight; a position that receives morning sun can significantly help plants dry out quicker.
As the season changes, particularly during rainy periods, increase the frequency of leaf inspections and misting with a fungicide if brown spots reappear. A proactive approach during humidity spikes will help maintain your plant’s vigor and prevent disease from taking hold once again. While adjusting the watering schedule, keep an eye on how long the soil retains moisture after rainfall; if it stays soggy even a few days afterward, that’s a sign to further alter your watering approach.
Humid weather often means plants require less water than usual, as evaporation rates decrease. Ensuring that the soil is not too wet at the root level can diminish the likelihood of fungal growth, allowing your marigolds to thrive. Inspect plant leaves for signs of wilting or drooping; if these appear despite high humidity, consider adjusting your watering techniques further. This could also vary depending on wind conditions; strong winds can increase evaporation even on humid days, potentially requiring more frequent checks to ensure optimal moisture levels. Make sure the watering schedule responds to daily conditions, such as temperature and wind speed, which can change how quickly the plants dry out.
In elevated humidity, reducing the frequency of watering is crucial for maintaining soil integrity. Be mindful during rainy periods; consider covering the plants temporarily if heavy rains threaten to overwhelm their usual drainage capabilities. If you have noticed that persistent fungal growth issues arise immediately after adjustments to your watering routine, it’s a red flag to reassess both the amount of water applied and the frequency of application. It might also be beneficial to incorporate mulch around your marigolds to help retain soil moisture while reducing the need to water more frequently, thus improving air circulation. Consider organic mulching materials like straw or shredded bark, which can also help improve soil health as they break down.
Step 5 – Inspect Marigold Foliage for New Spots Weekly
Check your marigolds weekly for any new brown spots on the leaves. You should observe the foliage becoming healthier, with no new spots developing if treatment was successful. Look out for positive signs such as greener leaves, healthier stems, and improved flowering output, as these indicate your marigolds are recovering well. If, however, you notice dark, damp patches resembling the earlier symptoms, return to your care regimen and inspect environmental factors that may have changed. In particular, collect data on how weather has fluctuated week by week, which can guide your adjustments.
A fully recovered marigold will show vibrant green leaves and robust flowering, indicating that they are on the mend. Early signs of a returning problem include new brown spots appearing or wilting leaves, which indicate that the humidity stress may still be present. If, after following your protocols, the leaves still show distress, it’s essential to reiterate that the strategy may need a more integrated approach, possibly involving environmental adjustments like relocating to a sunnier spot, where they can dry off more quickly and enhance their resistance to moisture-related diseases. Assessing sun exposure throughout the day can help you gauge if your marigolds need to be moved for optimal growth conditions.
If you see new spots despite following all previous steps, it may necessitate changing your approach to marigold care by seeking a professional assessment or trying a different fungicide. Investigate options with varying active ingredients that may specifically target pathogens afflicting your marigolds. This proactive measure ensures that your plant remains healthy and flourishing amidst fluctuating weather conditions, and it might also be beneficial to consider climate-resistant marigold varieties that are less susceptible to humidity attacks and pests. Additionally, engaging with local gardening clubs or online forums can provide insights into what varieties perform better under humid conditions.
FAQ
How long will it take for my marigolds to recover from brown spots?
Recovery typically takes about one to three weeks, depending on how prompt your interventions are. Improved watering practices and nutrient applications can speed up the healing process. If conditions remain humid, the process may be prolonged, necessitating regular checks and adjustments in care routines to mitigate the factors contributing to the browning.
Can brown spots on marigolds spread to other plants?
Yes, brown spots can spread if the underlying issue, like humidity or a fungal infection, is not addressed. Keeping humidity levels in check and ensuring good air circulation can help minimize the risk of spreading to neighboring plants. Monitoring adjacent plants for similar symptoms can allow for early detection and prompt treatment intervention to save those at risk, which is vital to maintaining a healthy garden ecosystem.
Should I remove all affected leaves from my marigolds?
Not necessarily all; remove only those leaves showing significant damage. This approach allows the plant to conserve energy for new growth while still benefiting from healthy foliage. Always observe the remaining leaves, as their health can provide clear insights into the plant’s overall condition and responsiveness to care.