You may notice your potted geraniums looking a bit off when they appear droopy and waterlogged after overwatering, which is why you need to know how to prevent root rot in potted geraniums after overwatering. The roots may start to rot, leading to mushy stems and yellowing leaves that signal serious health issues for your plants. If this problem goes unaddressed, it can spread and weaken the plant, making recovery harder later on, but with proper care, you can inspect, adjust, and improve their conditions now.
Step 1 – Remove Excess Moisture from Geraniums
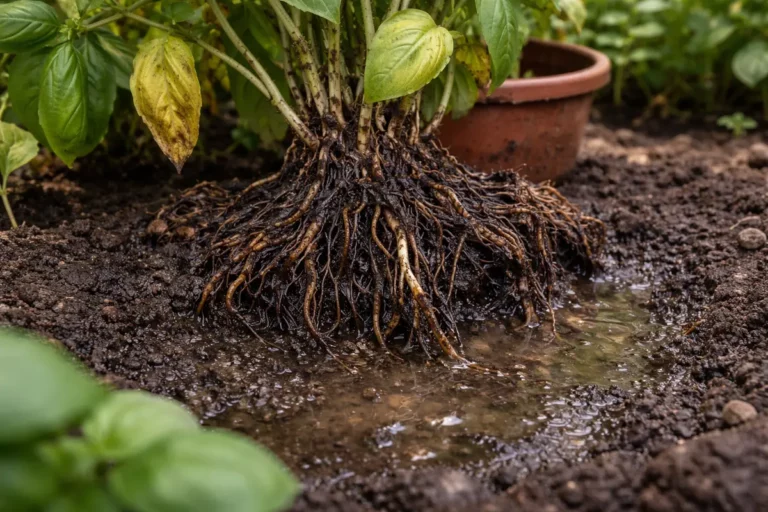
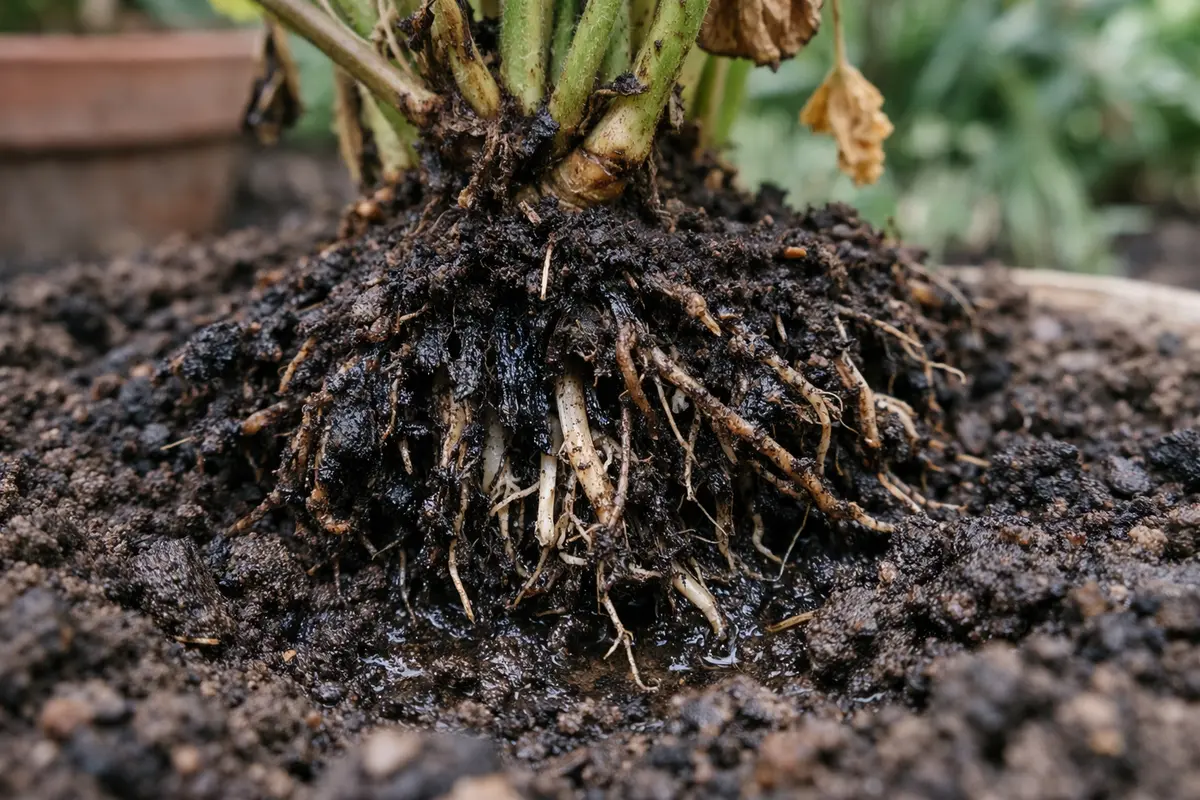
Start by carefully lifting your geranium from its pot to examine the soil and roots. You’ll immediately notice the soil appears overly wet, and the roots might look discolored or mushy. This initial action prevents further root suffocation and allows the plant to recover more effectively. Pay attention to the soil texture; if it feels soupy or is clumping together, this underscores the severity of the overwatering issue.
Removing excess moisture is critical because standing water around the roots leads to anaerobic conditions, preventing them from absorbing necessary oxygen. The oxygen-starved roots will begin to rot, which can render your plants incapable of uptake for water and nutrients effectively. Geraniums are particularly susceptible to this condition since they prefer well-draining soil. As you identify the moisture level, ensure you also note the overall soil volume; compacted soil can exacerbate the drainage problems, forcing roots to compete for air.
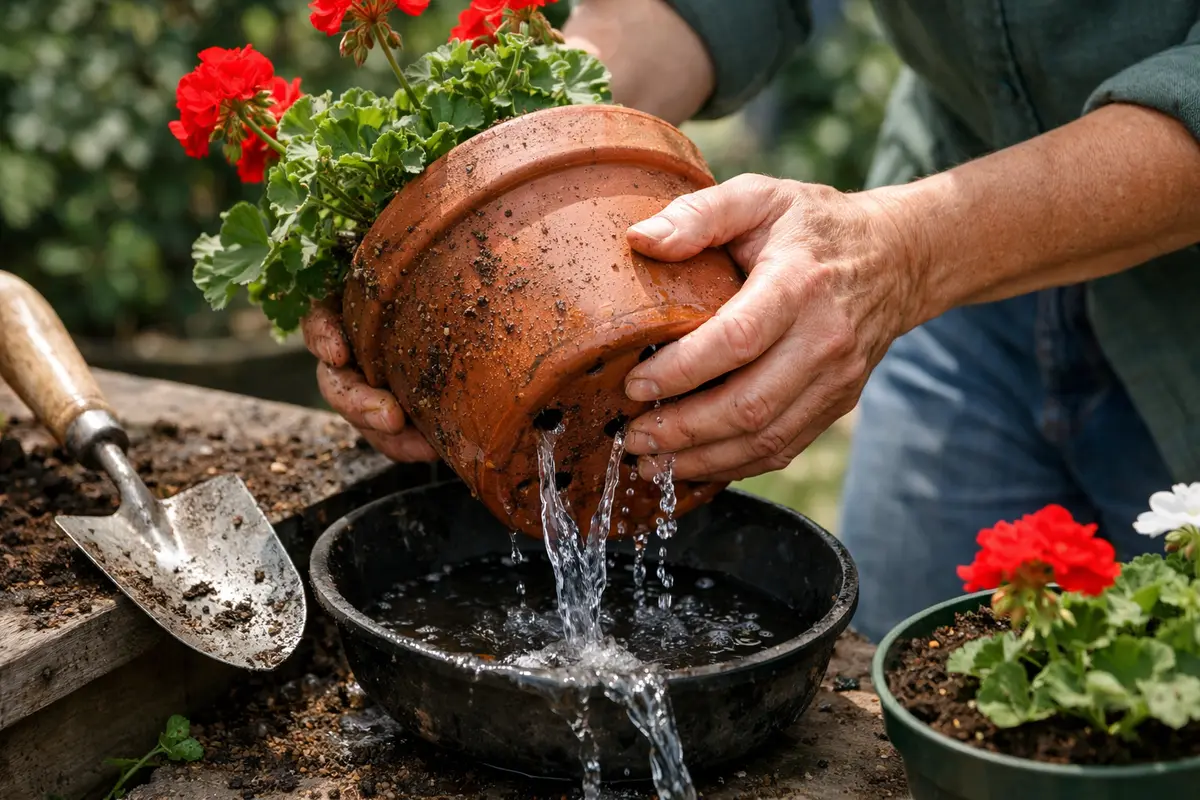
A common mistake at this stage is to panic and just water the plant instead of addressing the wet soil first. If you don’t inspect and dry out the roots, you risk worsening their condition. Always check the drainage holes in the pot and make sure they are clear of debris before proceeding to the next steps. Sometimes, lingering debris can lead to a blockage, increasing the chances of saturation—something that must be avoided for healthy root development.
Step 2 – Diagnose Overwatering Impact on Roots
Start by examining the moisture level of the soil and ensure that it is not overly saturated; remove excess water from the bottom of the pot immediately. When you fix the overwatering issue, the soil will begin to dry out, improving aeration and allowing the roots of your geraniums to breathe again.
Overwatering leads to an increase in moisture around the roots, creating an anaerobic environment where harmful bacteria and fungi thrive. In this condition, roots may develop dark, mushy areas indicating rot, while healthy roots remain firm and white. If you notice a foul odor emanating from the soil, that’s a clear sign of trouble—indicating that root rot is likely present.
If the soil smells sour, replace it entirely with fresh, well-draining potting mix, and allow the pot to dry out completely before watering again. Alternatively, if you observe wilting despite wet soil—a sign of root damage rather than thirst—check for compacted soil around the roots that may restrict their growth and oxygen supply.
Roots damaged by overwatering cannot transport moisture and nutrients efficiently, leading to further yellowing of leaves and stunted growth. If identified early, you can trim the affected roots and allow the healthy ones to further establish themselves in the soil without immediate competition for resources. Failing to address this can cause the plant’s health to decline rapidly. Keep a close eye on the root tips; if they are soft even after trimming, chances are the rot has progressed, necessitating further interventions.
If your plant has been droopy and you’re uncertain, check for other indicators like a sour smell emanating from the soil, which further suggests rotting roots. The color contrast between healthy and unhealthy roots will guide your decisions effectively — distinguishing between slight stress and severe overwater damage is vital to taking the correct remedial actions. Remember, if you find that the healthy roots are too sparse, it may be a sign that the plant’s overall health is at risk, prompting you to consider more drastic measures, such as a complete repotting.
Step 3 – Replant Geraniums in Fresh Drainage Mix
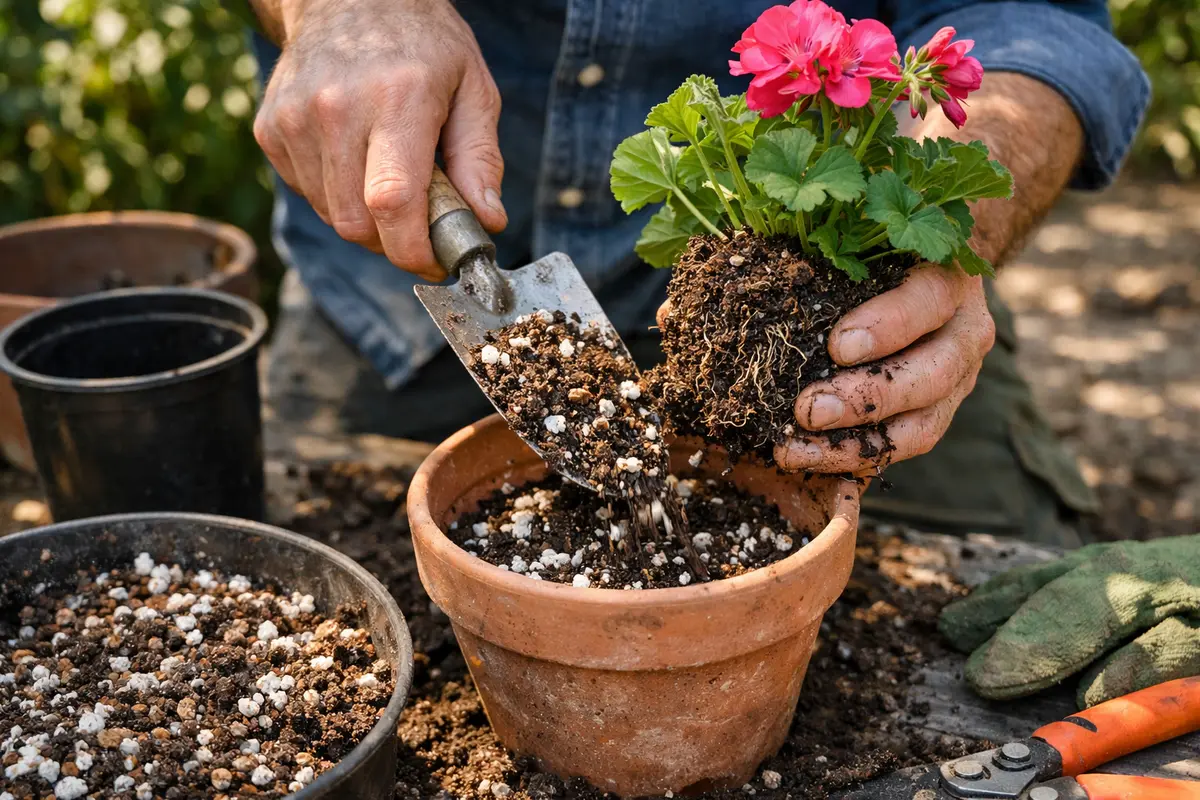
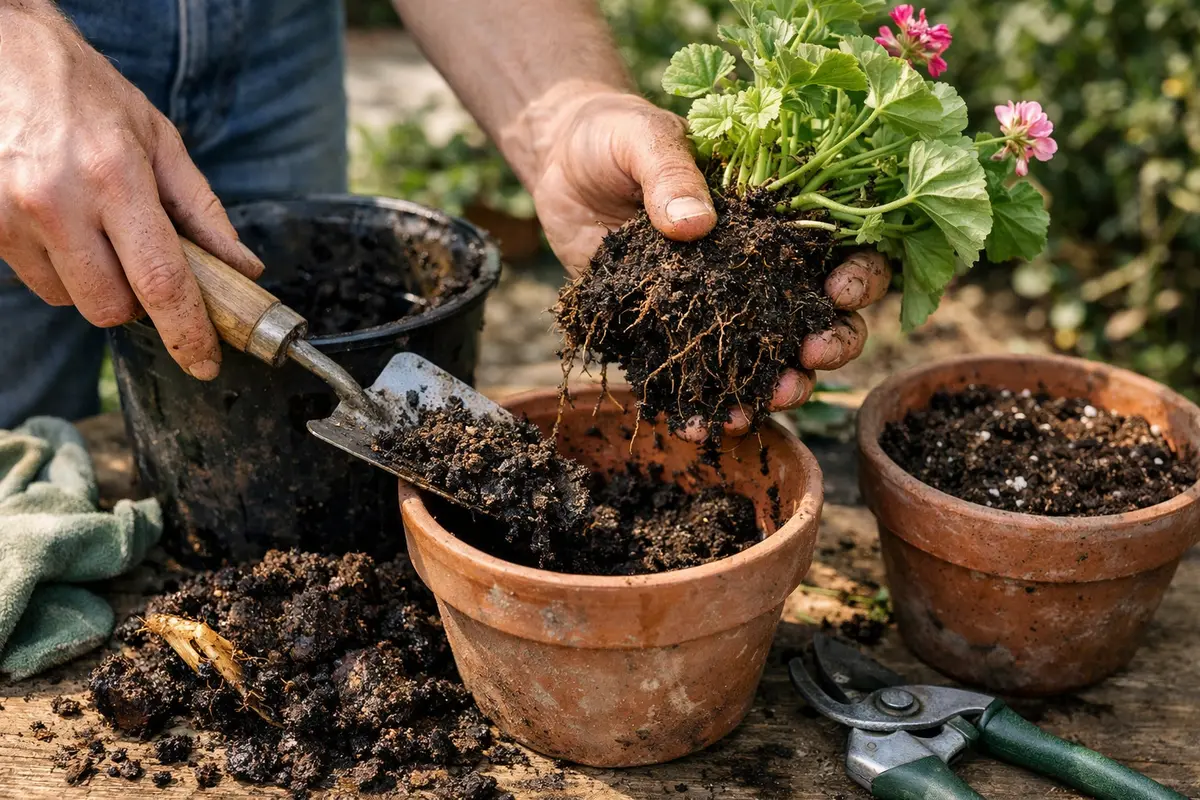
Replant your geraniums into fresh potting soil that ensures better drainage immediately after you’ve trimmed away any rotten roots. Within a few days, you will notice improved leaf color and a more upright posture. This critical step enables the plant to recover as it establishes itself in a more supportive environment. Prioritize potting soil that specifically mentions its drainage capacity, as this choice plays a significant role in the recovery process.
Using fresh soil introduces beneficial microbes and provides a new, untainted medium for root growth. Good-quality potting mixes specifically designed for geraniums contain both organic matter and perlite or sand, enhancing drainage. This improved aeration environment is key to preventing recurring root rot while allowing any remaining healthy roots to flourish. Be aware that the soil composition can dictate how fast a plant can recover; mixes heavy on organic material can sometimes retain moisture longer, risking future rot.
A common mistake during repotting is to water the freshly potted geraniums immediately, thinking they need moisture. However, overwatering again can suffocate the roots, so it’s crucial for the soil to remain moderately dry to allow the roots to expand without the threat of drowning. Checking soil moisture around 5 days post-replanting can help gauge when it’s safe to start lightly watering. If after five days the soil is still overly moist, delaying water for another 2-3 days could prevent further complications.
Step 4 – Avoid Overwatering Geraniums in Future
Start by ensuring that your potted geraniums have adequate drainage by using pots with drainage holes and a well-draining potting mix. This will prevent excess moisture from lingering at the roots, allowing your plants to thrive and reducing the risk of root rot.
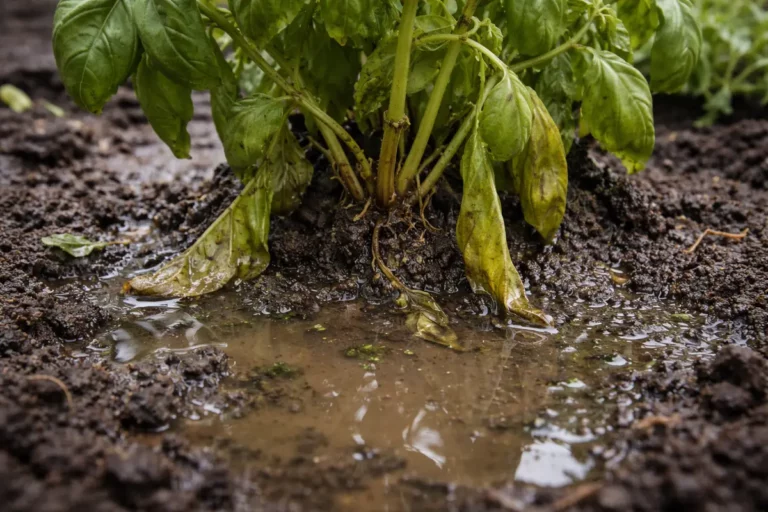
Root rot thrives in consistently damp conditions, often triggered by overwatering or poor soil drainage. By adjusting your watering routine and ensuring that excess water can escape, you actively combat these conditions before they lead to trouble. If you notice yellowing leaves and a musty smell, it’s a sign of overwatering; conversely, dry soil and wilted leaves indicate underwatering.
In warm, humid weather, geraniums require more frequent moisture checks as evaporation rates can change quickly. During rainy seasons, consider relocating your geraniums under cover to prevent excess saturation from rainwater. If not providing adequate drainage → check soil composition to ensure it contains perlite or sand for improved aeration.
To prevent overwatering, factor in seasonal changes; geraniums generally require more water in the warmer months and less in the cooler season. Using a moisture meter to gauge soil wetness can be beneficial, as it provides a reliable indication of when to water. For best practice, check the moisture meter a few inches down into the soil; if the reading is above the recommended level, it may indicate over-saturation that can potentially lead to rot. Implementing this practice systematically guards against future root problems, optimizing plant health over time.
Moreover, ensure your pot has sufficient drainage holes and that they remain unobstructed, as standing water can easily lead to root rot. Adapting your watering routine to the plant’s environmental needs is key; in hot climates, a geranium may require daily watering, while in cooler months, every 10 days may be enough. Tailoring your approach based on these conditions will lock in a proactive prevention strategy, where failing to adjust your schedule can quickly lead to the return of root rot.
Step 5 – Check Geranium Leaves for Stress Signs
First, check the moisture level of the soil by inserting your finger about an inch deep. Look for signs of excessive moisture like a soggy texture or a distinctly damp feel that doesn’t dry out within a few hours. Recheck the soil moisture every two to three days, adjusting your watering schedule to allow for adequate drying time between waterings.
A fully recovered geranium showcases vibrant green leaves that feel firm and slightly crisp to the touch, while early signs of root rot reemerge as wilting, yellowing leaves that may feel mushy or limp. If you observe new growth alongside healthy foliage, this indicates recovery; however, if the leaves start to droop again, immediately investigate the soil condition.
If signs of root rot return despite proper care, consider repotting the geranium in fresh, dry soil mixed with perlite for improved drainage. Should the problem persist after this, escalate your response by pruning away any rotten roots and allowing the plant to re-establish itself in a more suitable environment, ensuring the pot has sufficient drainage holes. Persistent moisture stress can present as discover why your succulent is turning.
When observing the leaves, look for signs of new growth and robust color, which indicate that the plant is healing and thriving in its new conditions. If the leaves still show signs of droopiness or decay, examine the roots again for underlying issues that may require addressing. It’s important to stay vigilant in order to catch any relapse into unfavorable conditions. If needed, correct any identified errors in the watering routine or nutrient levels.
If the problem persists, consider revisiting your watering techniques or environmental conditions. Humidity levels, temperature, and even the location of the pot can affect water retention and air circulation at the roots. Make a plan to reassess and adjust environmental factors, as returning symptoms often indicate that preventive measures need reinforcing or adjustments in care routines. Factors like fluctuating indoor temperatures from drafts can increase root stress; isolating your geraniums from such conditions can lead to noticeable improvements.
FAQ
How long does it take for root rot in geraniums to recover?
After replanting in fresh soil and correcting the conditions, it can take 2 to 4 weeks for geraniums to show significant signs of improvement. During this time, it’s vital to monitor them closely for regrowth and adjust care routines accordingly, ensuring you avoid introducing more water until the roots stabilize.
Can root rot spread to other potted plants?
Yes, root rot can spread if the same tools are used on multiple plants or if infected soil makes contact with other pots. To contain outbreaks, always sanitize your gardening tools after working with affected plants and dispose of infected soil properly, preferably in a designated compost area where pathogens cannot spread.
Should I remove all the affected leaves on my geranium?
Only remove the severely affected leaves to allow the plant to focus its energy on healthy foliage and roots. Ensure the remaining leaves are healthy before making further cuts, as excessive removal can stress the plant. Ideally, make these cuts in the early morning or late evening to minimize stress on the plant, when temperatures are more moderate and humidity tends to be higher.