You may notice fuzzy, white spots on your chamomile plants during the humid days of summer, which is why you need to know how to stop mold on chamomile after excessive humidity. This mold thrives in wet conditions, causing leaf drop and damaging the delicate foliage. If left untreated, the infestation worsens and can spread to other plants, but fixing it is possible now by inspecting your plants regularly and reducing excess moisture around them.
Step 1 – Trim Affected Chamomile Stems Immediately
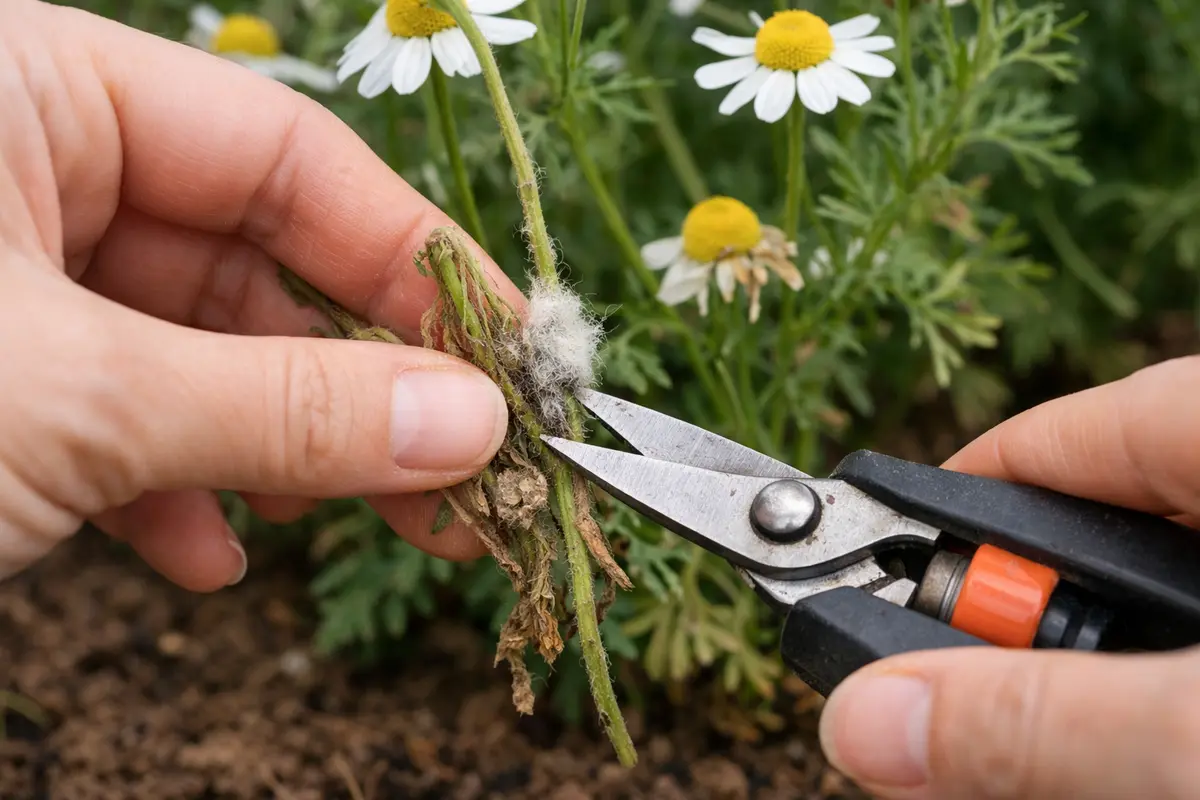
First, remove any visibly moldy leaves or stems from your chamomile plants and dispose of them to limit further spread. You should see an immediate reduction in the white or fuzzy appearance of mold on the remaining foliage.
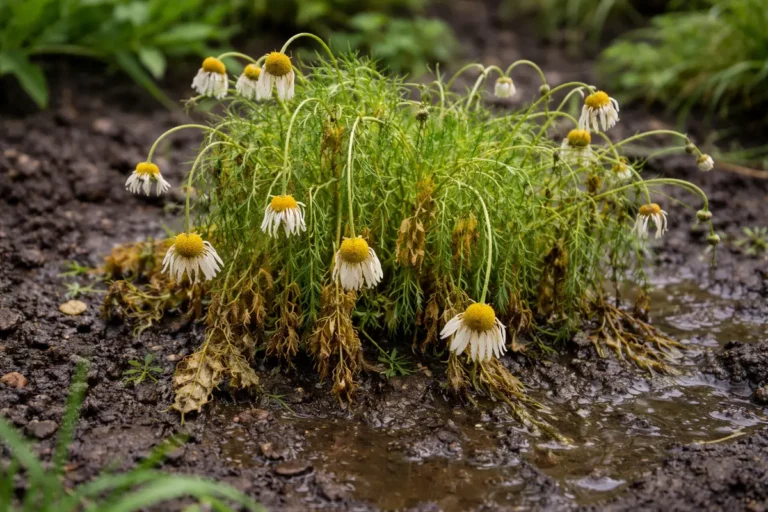
Acting quickly is essential because mold can rapidly consume the plant’s tissues, leading to significant decay and potential death. If you delay, the compromised areas may become more susceptible to secondary infections, significantly lowering the plant’s resilience. Healthy chamomile will exhibit vibrant green leaves, while infected plants display wilting and yellowing. If you notice leaves curling or rotting, check for excess moisture retention in the soil.
For instance, a gardener once ignored visible mold and waited a week before addressing the issue. By that time, several plants were severely damaged, necessitating complete removal rather than simple trimming. A common oversight is assuming all affected foliage can be saved when immediate action is paramount; addressing problem areas is crucial to restoring well-being.
Acting quickly is essential because mold can rapidly spread to healthy parts of the plant. Start by cutting away leaves that show speckles or a fuzzy appearance, extending at least an inch beyond the visible mold to ensure you have removed all infected tissue. By cutting away infected areas, you limit the opportunity for the spores to proliferate and damage the rest of your chamomile. When high humidity persists, mold thrives in damp, crowded environments, making early intervention crucial to maintaining plant health. For cutting, use sterilized shears to prevent cross-contamination between cut sections.
A common mistake at this stage is to only remove visible surface mold without cutting back affected stems. If you only wipe the leaves, the underlying issue can remain unaddressed, allowing the mold to return even stronger. Consequently, it’s advisable to use clean, sharp pruners to minimize damage to the plant. Watch out for dense clusters of growth in the future—if the humidity levels rise again, it could put your chamomile at risk once more. If mold reappears rapidly, it may indicate that fungal spores went unnoticed or that conditions remain favorable for mold growth, demanding swift further action. If the mold returns within a week after trimming, consider reassessing your watering and humidity control practices. This issue is often caused by lawn fungus evening watering.
Step 2 – Diagnose Excess Humidity Issues for Chamomile
Check the area around your chamomile for excessive moisture and poor drainage. You’ll quickly identify if the soil is overly saturated, leading to a significant reduction in oxygen for the roots and creating a prime environment for mold. Feel the soil; if it clumps together or appears soggy, that’s a clear red flag you can’t ignore. Aim for soil moisture that is neither bone-dry nor swampy—this balance is essential for your plant’s wellbeing.
Excess waterlogged soil retains humidity, which encourages microbial growth that negatively affects your chamomile. Inspect the soil texture; if it feels like mud or you notice a sour smell, that’s a sure sign of trouble. This can drastically hinder root health, which subsequently impacts the overall vigor of the chamomile. The roots need to breathe to function properly, and too much water prevents this, resulting in breakdowns that invite fungal issues. Inadequate drainage can also lead to root rot, compounding the problem and making recovery even more challenging. Regularly check drainage holes in pots, ensuring they are not clogged, as this can trap moisture. Excess moisture often leads to problems like root rot in potted cacti.
If you notice that your potting mix retains moisture much longer than usual, consider repotting in a well-draining mix or amending the current one with sand or perlite. Strong drainage is not just helpful; it’s vital for the survival of your chamomile. If your chamomile sits in the same container, monitor for any compacted roots indicating root-bound conditions, which can trap moisture. Additionally, if the humidity is consistently high in the growing area—consider air circulation solutions, such as fans or open windows, to enhance airflow and lower moisture levels. This observational check not only helps you address the immediate moisture issue but also establishes a baseline for ongoing monitoring.
Step 3 – Apply Organic Fungicide to Combat Mold
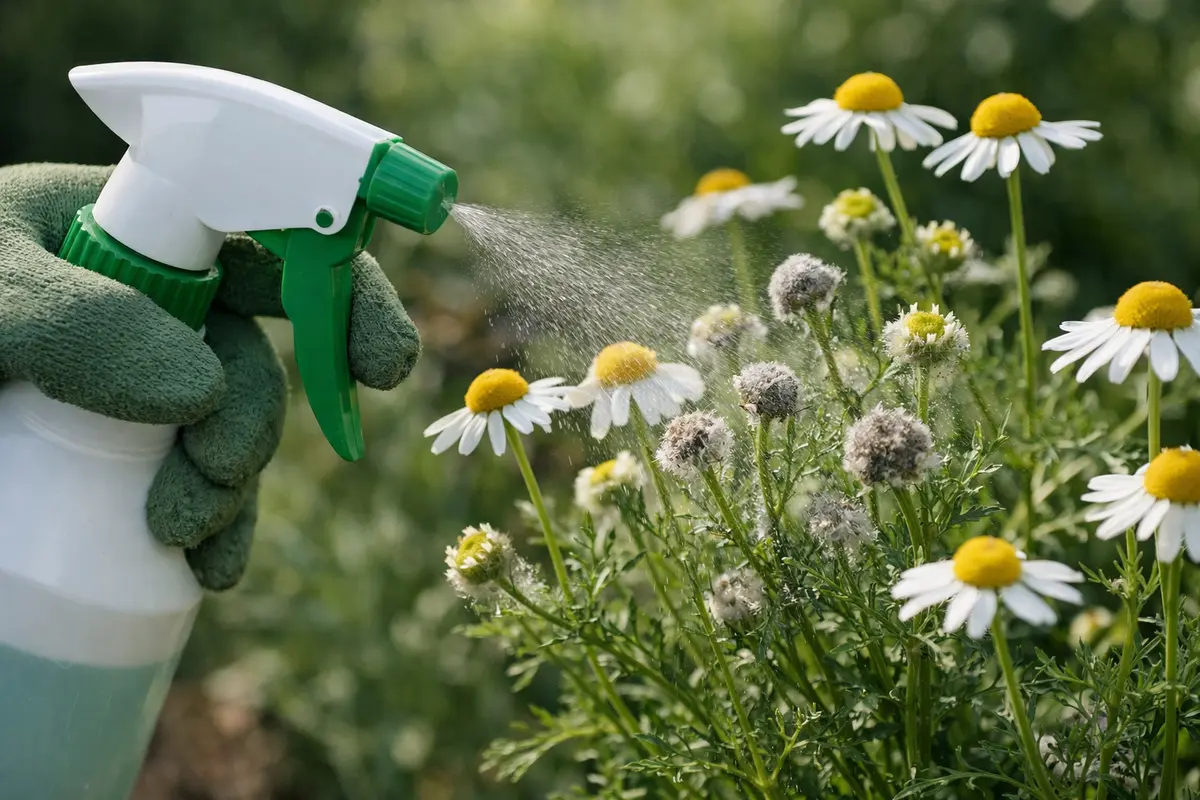
Spray the affected areas with an organic fungicide designed for use on edible plants. You should observe a significant reduction in mold growth within a few days of application. Follow the manufacturer’s instructions precisely regarding application intervals to maintain efficacy. This step serves as a proactive measure to disrupt mold reproduction while aiding the plant’s recovery.
Organic fungicides work by targeting the specific fungi without harming beneficial microorganisms present in the soil or on the plant itself. Using them correctly leads to a healthier chamomile plant as they disrupt the lifecycle of the mold spores, allowing your plant to restore its vigor. It’s essential to thoroughly cover all surfaces, including the underside of leaves, during application. Choose products marked safe for edible plants to ensure that your chamomile remains suitable for culinary use. This ensures that your efforts in mold prevention don’t inadvertently lead to contamination.
During the recovery phase, avoid over-watering your chamomile, as too much moisture can counteract the fungicide’s effects. If the weather is particularly humid, you might need to reapply the fungicide more frequently, potentially every 3-5 days, until the mold is fully eradicated. Observing signs of new growth will indicate that your chamomile is improving, but be vigilant—if mold reappears, it may suggest the prior measures were insufficient or that other conditions need addressing. Additionally, if mold persists despite fungicide use, a more potent chemical option might be necessary, but you should use this as a last resort. Furthermore, give each application time to work; if no change is observed after a week, consider rotating to another product to combat potential resistance.
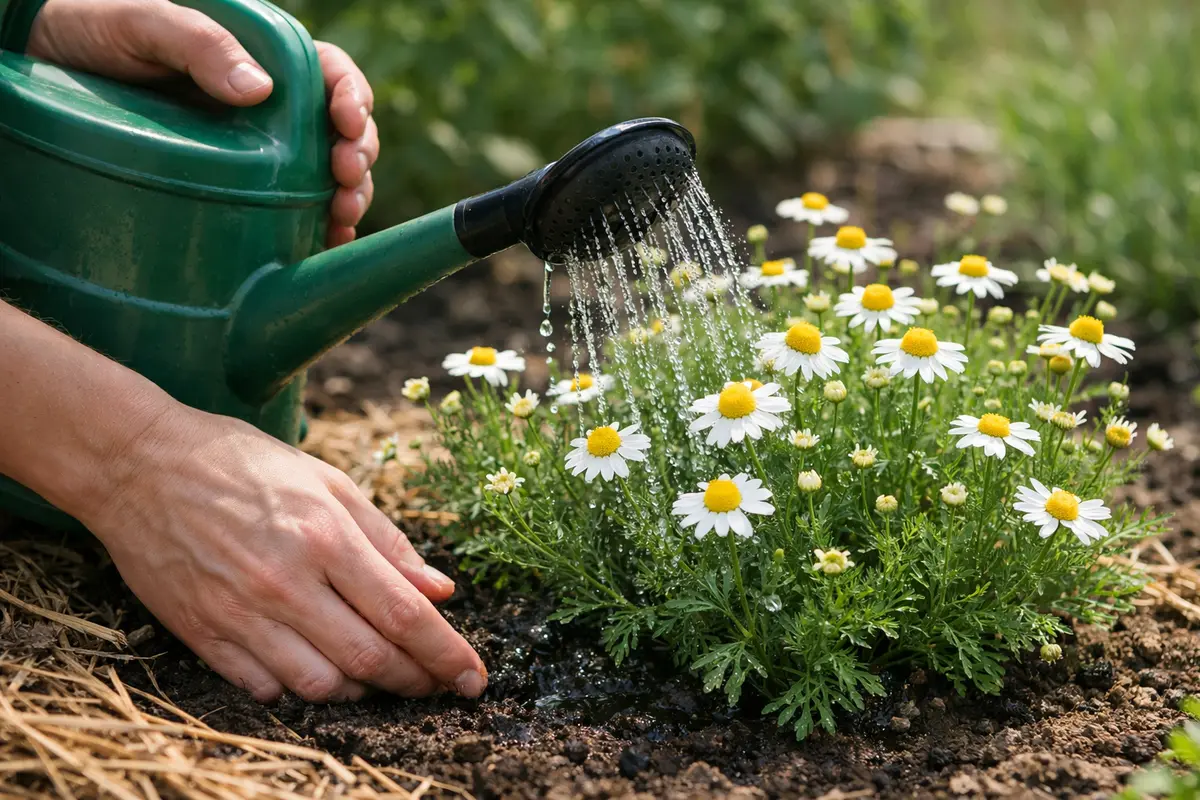
Step 4 – Adjust Watering Practices to Prevent Mold Growth
Start by ensuring proper air circulation around your chamomile plants by spacing them at least 12 inches apart, which will reduce humidity levels in their immediate environment. As a result, you will notice significantly less mold growth, leading to healthier foliage and blossoms.
Mold thrives in stagnant air and high humidity, especially during warm months following heavy rainfall. By increasing air circulation through adequate spacing, you tackle the moist microclimate that often invites fungal issues, preventing recurrence. If your plants are close together and showing signs of mold, check the air flow and adjust spacing immediately.
During periods of prolonged rain, reinforce this prevention routine by using a lightweight mulch, such as straw or pine needles, to absorb excess moisture around the base of your chamomile. This additional layer acts as a barrier, keeping the soil drier and reducing mold risk throughout wet seasons.
Allowing the soil to dry out between watering cycles decreases the moisture content that contributes to fungal problems. Mold thrives in soggy conditions, so employing a strategy that involves checking soil moisture helps prevent relapse. Consistency is key here; maintain your schedule through changing seasons to account for temperature shifts and humidity variations. If you find soil moisture remains excessive even when you cut back on watering, it may indicate that root rot has set in—take action immediately to investigate and treat, possibly requiring a soil change or repotting. Inhabitants such as earthworms can help maintain moisture balance, so consider beneficial soil ecology during this adjustment. In poor drainage conditions, plants may also develop root rot in potato plants.
As the seasons change, particularly high humidity during summer can mean you need to adjust your watering frequency. During particularly rainy or humid periods, you may even need to allow the soil to dry out for an extended period, consulting local weather forecasts to assist in your planning. In cooler months, a longer drying period is often beneficial. When planting for the next season, consider using mold-resistant varieties of chamomile that are less susceptible to fungal infections. This proactive step can help safeguard your gardening efforts in the future and contribute to longstanding plant health. Additionally, using a mulch layer can help maintain soil moisture without saturating it—this method offers balance by providing necessary retention while allowing excess moisture to evaporate.
Step 5 – Inspect Chamomile Leaves for Residual Mold Weekly
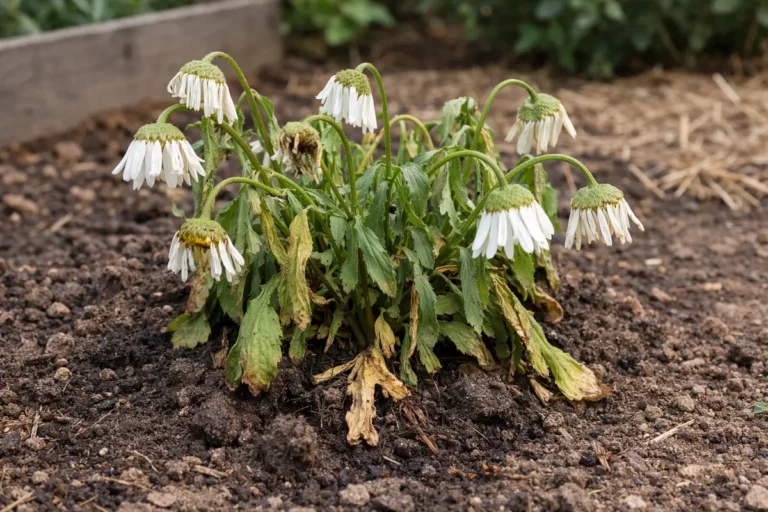
Start by checking your chamomile plants every few days for any signs of mold, such as a fuzzy white or grey coating on leaves and stems. Look for water-soaked, discolored spots on the foliage that indicate excess moisture. Recheck the plants on a weekly basis to observe whether the environment has encouraged recovery or the mold is reappearing.
A fully recovered chamomile will display vibrant green leaves that are firm and free from any discolored spots or moldy textures. In contrast, early signs of the problem returning may include a soft, bleached appearance in some leaves, or the presence of a dark, wet-looking area around the stem. If you notice a dusty, powdery residue forming, immediately inspect for mold issues.
If mold returns despite ongoing care, remove affected leaves and improve air circulation around the plant; consider repositioning them if they are too crowded. Should the problem worsen, escalate your response by applying an eco-friendly fungicide specifically designed for chamomile, following the manufacturer’s instructions. Regularly monitor the plant to ensure the treatment is effective.
During your inspections, pay close attention to any changes in leaf texture or color, which can indicate either recovery or returning mold. Healthy leaves should appear green and firm, while any yellowing or wilting signals an issue. It’s critical to note whether any reappearance of symptoms correlates with environmental changes, such as shifts in humidity or temperature. Continue this weekly check for at least two weeks after you’ve applied fungicides to ensure that mold has not returned and that your plant is thriving once again. During this time, track changes in external conditions that might have influenced mold growth.
If you find mold returning despite your efforts, consider escalating your treatment—perhaps switch to a more potent fungicide or reassess your watering habits. Alternatively, if humidity remains problematic, installing a dehumidifier in the growing area can mitigate the issue. In the case of ongoing issues, you might have to consult with a gardening expert to explore underlying problems not evident in your regular checks. Knowing what to look for reduces the chance of missing early signs of moisture imbalance or fungal resurgence. Integration of data about your environment and plant health can lead you toward better immediate responses.
FAQ
How long does it take for chamomile to recover from mold?
Recovery can take between two and four weeks, depending on how severe the initial mold infestation was and the effectiveness of your treatments. With proper care, you should begin to notice new growth and clear leaves within that time, but be prepared to continue monitoring the plant’s health closely, as the initial improving health should not lead to complacency.
Can mold on chamomile spread to other plants?
Yes, mold can easily spread to nearby plants, especially during high humidity or in poorly ventilated areas. It’s crucial to isolate affected chamomile and treat it swiftly to prevent any cross-contamination, which may jeopardize your entire garden. Continuous vigilance is essential—consider implementing barriers or companion-planting strategies for future plantings to help mitigate the risk.
Should I remove severely affected parts of the chamomile?
Yes, if parts of your chamomile are severely affected by mold, cutting them off will help protect the rest of the plant. Removing unhealthy sections also encourages new growth and can aid in faster recovery from mold infections. Consider the placement of your chamomile in relation to neighboring plants, as a crowded environment can contribute to mold issues.