You may notice your snake plant’s leaves turning yellow and softening after a prolonged period of overwatering, which is why you need to know what to do when snake plants show signs of root rot. This condition occurs when the plant’s roots become damaged and mushy due to excess moisture and poor drainage. If ignored, this issue can spread throughout the root system and lead to more damage, but fixing it is possible now—simply check the roots, remove any rotten sections, and adjust your watering habits.
Step 1 – Remove Diseased Snake Plant Roots
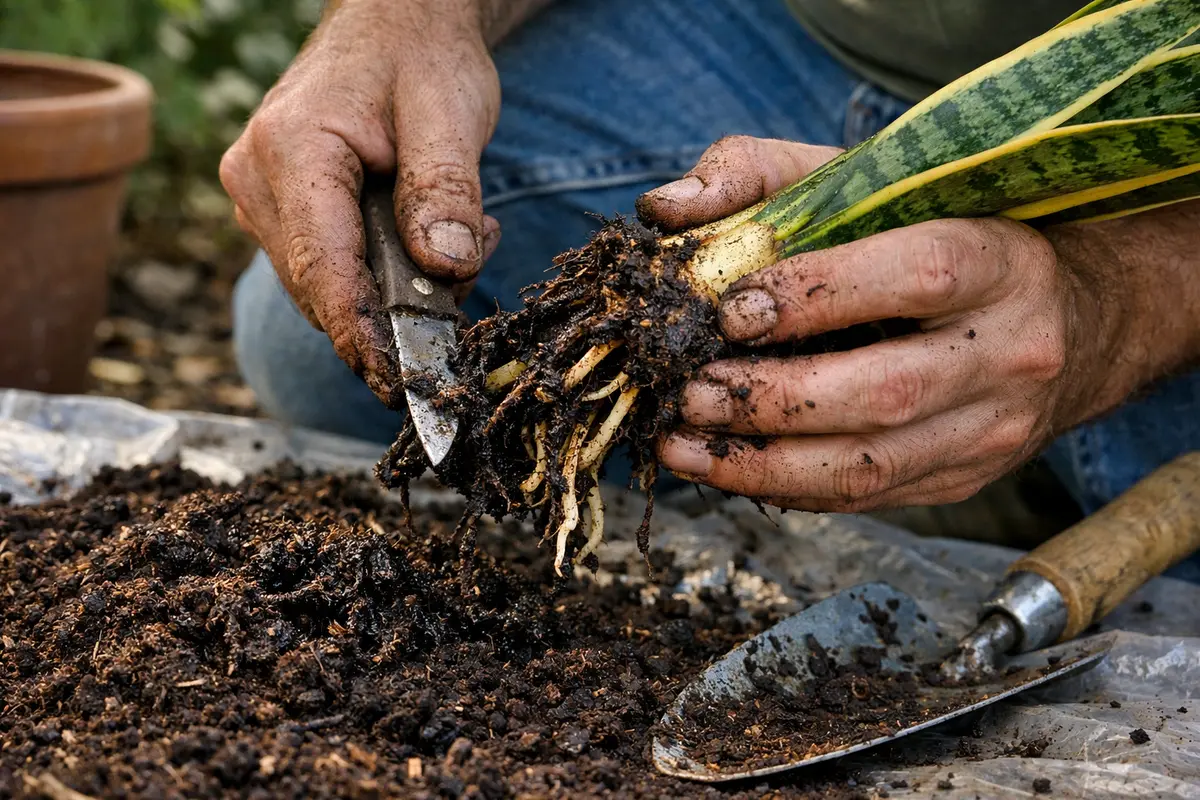
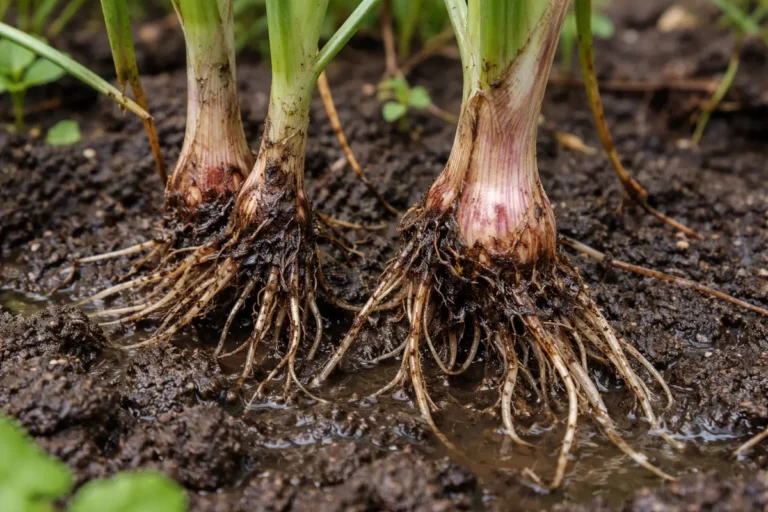
Begin by carefully removing the snake plant from its pot to inspect the roots thoroughly. You should see some roots appearing discolored or mushy, indicating rot. Additionally, healthy roots should look firm and white, contrasting starkly with the black or brown mushiness of rotting roots. If the roots do not look strong and white or if they break easily when touched, this confirms rot.
Prompt action is crucial when dealing with root rot. If you don’t intervene swiftly, the diseased roots will continue to degrade, leading to permanent damage or death of the plant. Snake plants are resilient, but they can’t tolerate prolonged exposure to damaged roots, especially in damp conditions that promote fungal growth. This becomes critical if waterlogged situations persist, as the compromised roots will fail to absorb necessary nutrients and moisture. An immediate concern is also the chance of disease spreading if the roots touch other plants; thus, keeping them separated until recovery is critical.
A common mistake at this stage is to just trim the yellow, mushy parts without addressing the root system sufficiently. Ensure you also inspect the roots for soft spots and remove them entirely; otherwise, you risk leaving the problem intact. If you find that the roots are mostly healthy but still have soft spots here and there, it is essential to err on the side of caution by cutting away more tissue than you think you need to. If your plant roots are mostly compromised, consider discarding the entire plant, as salvaging becomes impractical. In cases where the root rot is severe, it may take significantly longer to see any improvement, which adds to the urgency of checking all roots thoroughly.
Step 2 – Diagnose Soil Overwatering Issues
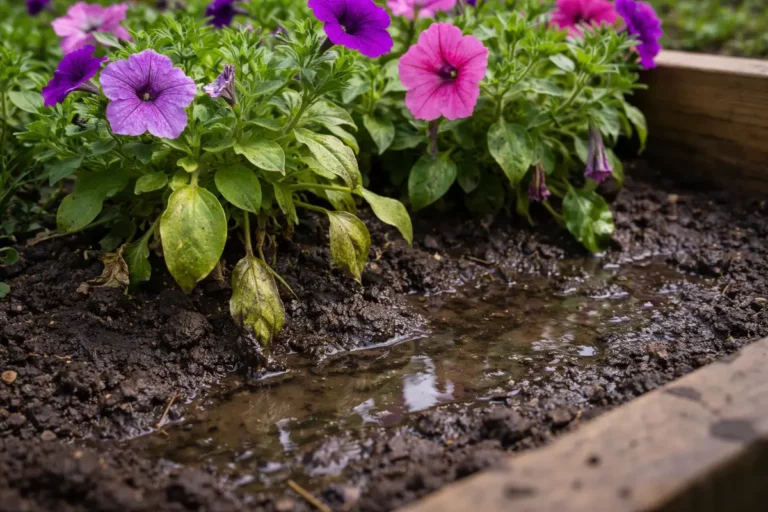
Check the soil moisture level and determine if the soil retains excess water. You will likely find the soil is soggy and may even emit a sour smell. If you reach into the soil and it feels wet and clumpy, this is a strong indicator of overwatering that warrants immediate attention.
Overwatering is the most common cause of root rot in snake plants. Excess moisture in the soil deprives the roots of oxygen, leading to decay. When roots begin to rot, they cannot transport water and nutrients to the upper parts of the plant, resulting in symptoms like yellowing leaves and drooping foliage. Compare this with well-draining soil, which feels crumbly and retains just enough moisture, ensuring healthy root life. If you find yourself in a situation with heavy soil that feels sticky, you will need to take corrective actions quickly.
If the soil smells sour, you need to replace it entirely. On the other hand, if the soil feels only slightly damp, it may be possible to let it dry out; however, make sure to avoid future overwatering. Frequent monitoring is key in determining the right balance, especially since snake plants thrive in dryer conditions. An effective way to monitor is to insert a finger about an inch deep into the soil before watering; if it feels moist, hold off. Consider using a moisture meter to help gauge soil saturation accurately and avoid subjective assessments, as subjective evaluation often leads to inaccurate watering decisions.
Step 3 – Repot Snake Plant with Fresh Soil
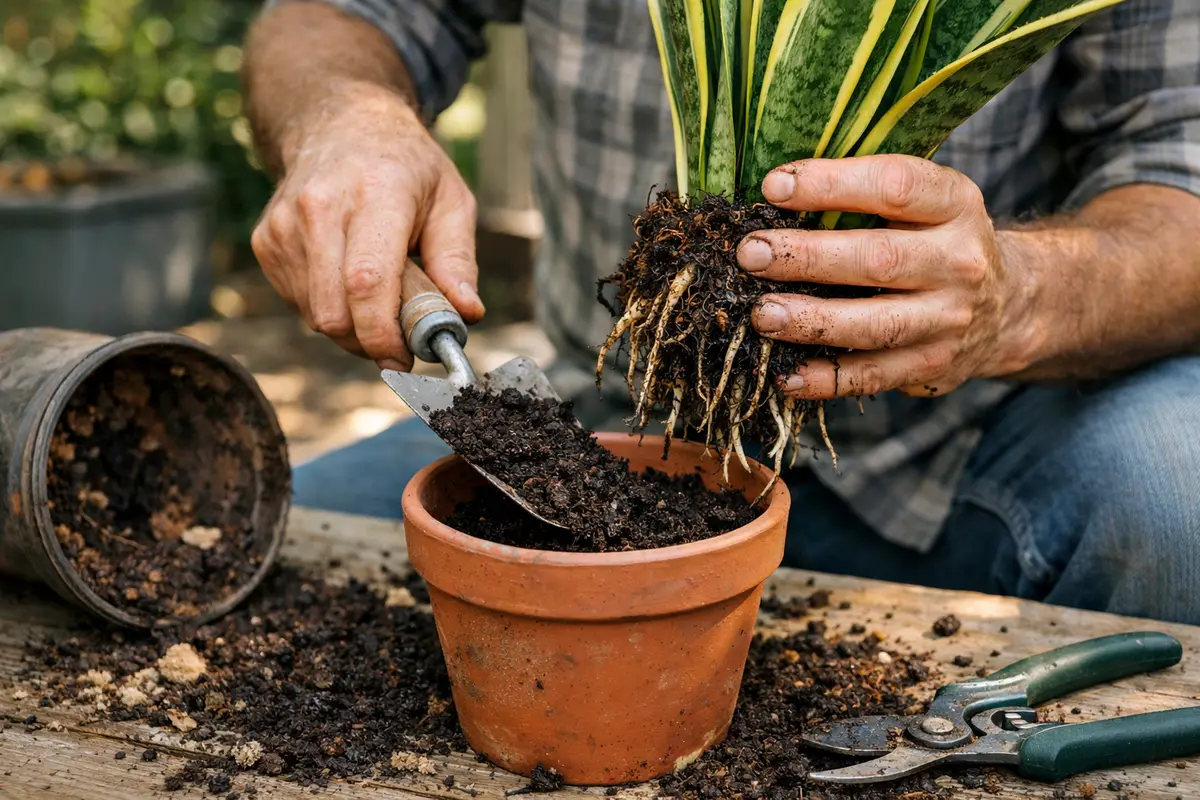
Remove the snake plant from its pot and inspect the roots for mushiness or dark coloration, which indicate root rot. Trim away the affected roots with sterilized scissors, and repot the plant in fresh, well-draining soil. In the days following this treatment, you should start seeing new shoots emerging as it begins to stabilize.
Realistic recovery timelines for snake plants typically span several weeks, with visible signs of improvement such as fresh, upright leaves. Favorable growth conditions include bright, indirect light and minimal watering, while slow recovery can occur in low light or overly moist environments. If the plant persists in wilting despite these adjustments, check the soil moisture level to confirm it isn’t overly saturated.
A key mistake to avoid during recovery is overwatering, as this can exacerbate existing issues rather than aid healing. With snake plants, wait until the top inch of soil is dry before watering again; if you notice leaf tips browning, adjust the watering schedule accordingly. If the leaves appear limp rather than crisp, check for signs of too much water or insufficient drainage.
Filling the pot with a special cactus or succulent mix provides significant benefits. This type of soil allows for improved drainage, which is essential for snake plants that are highly susceptible to root rot from excess moisture. Generally, a mixture that includes perlite, coarse sand, or pumice works effectively. For snake plants, a soil pH of between 6.0 and 7.0 is ideal for encouraging root health and preventing further deterioration. If the soil mixture resembles a standard potting mix that retains moisture, you risk setting yourself up for future problems.
A common error during this stage is to overwater the plant immediately after repotting out of concern for its recovery. It’s critical to let the soil dry out completely before reintroducing water, as the roots are still healing. If you notice visible cuts or bruises on the roots, they may still absorb moisture despite appearing damaged. Avoiding moisture immediately will help the roots stabilize without risking excessive dampness. Additionally, monitor the conditions where the plant is placed — a little indirect sunlight can speed recovery while preventing direct heat stress. If possible, define a specific location with filtered light that does not expose the plant to harsh conditions.
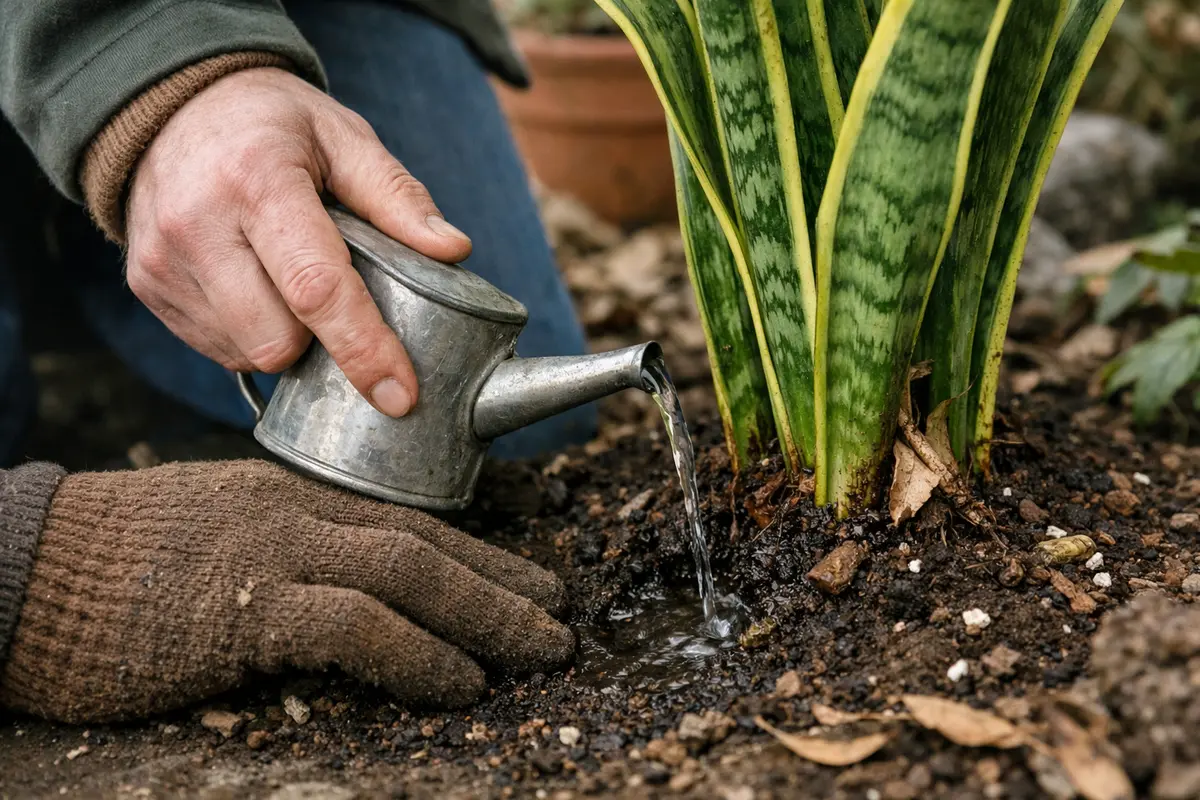
Step 4 – Water Snake Plant Sparingly in Winter
Start by ensuring your snake plants are potted in well-draining soil and containers with proper drainage holes. This will prevent water from accumulating at the roots and significantly reduce the risk of further root rot.
Excess moisture in the soil often occurs when containers lack drainage or when the potting medium retains too much water. By using a fast-draining mix and allowing the top inch of soil to dry out between waterings, you can address the root cause of root rot and create an environment where the roots can breathe. If you notice mushy or dark-colored roots, that indicates overwatering, while firm, white roots signify healthy conditions.
During the winter months, reduce your watering frequency as snake plants require less moisture in cooler temperatures. Additionally, consider placing your plants in a brighter spot to enhance evaporation and promote quicker drying if you notice signs of lingering moisture affecting their health.
Step 5 – Inspect Snake Plant Leaves for Signs of Recovery
Start by regularly checking the roots of your snake plant for dark, mushy tissue that indicates root rot caused by disease. Every 1-2 weeks, examine the base of the plant and gently pull it from its pot, looking for any foul odor or wilting roots. Observe any changes in the color and texture of healthy roots, which should be firm and white, signaling improvement.
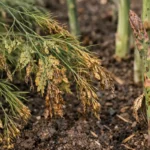
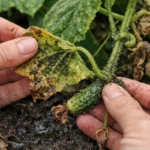
A fully recovered snake plant will display firm, vibrant green leaves with a smooth texture, contrasting sharply with early signs of rot where leaves may appear yellowed or limp and feel mushy. If the root rot recurs, the roots will again become discolored, exhibiting dark spots, and the leaves will start to droop. If not this, check for a waterlogged pot, which may lead to new fungal growth.
If root rot reappears despite following previous measures, take more drastic action by repotting the plant in fresh, sterile soil and ensuring it has adequate drainage. Monitor the moisture levels closely and reduce watering frequency, providing conditions that are less favorable for the disease. If the issue persists, consider applying a fungicide that targets root rot pathogens to help eliminate the problem.
A healthy recovery should see new shoots sprouting within a few weeks, indicating that the root system is reestablishing itself effectively. If leaf color transitions from yellowish to a more vibrant green, this means the recuperation is working. The leaves should also start to regain their firmness as the plant begins to uptake water and nutrients properly again. If the leaves remain limp or show no new growth after a month, and the roots remain compromised, you may need to reconsider your watering practices, especially during the transition from recovery into more active growth.
If you notice symptoms of root rot returning, such as yellowing leaves or soft textures, revert your focus back to inspecting the roots and soil. Specific attention should be given to the leaves; any sign of wilting or renewed yellowing indicates that stressors are present. You might have to repeat steps one and two to ensure any remaining rot is eliminated. In some cases, consulting a gardening expert can provide additional insights and suggest more advanced corrective measures. Remember, a new approach may be necessary if the situation does not improve despite following the previous steps diligently.
FAQ
How long does it take for a snake plant to recover from root rot?
Recovery from root rot varies based on the severity of the damage and the care provided. Typically, if the affected roots are removed and conditions are optimal, new growth can start to appear within two weeks. However, if you continue to face growth issues, consider the watering frequency and overall soil condition as critical elements of successful recovery. Signs of improvement like new leaf sprouting indicate that the root system is stabilizing.
Can root rot spread to other plants?
Yes, if the affected plant is not isolated, root rot can spread through water or soil contamination. It is essential to keep a close eye on other plants in the vicinity, and you may also need to adjust their watering practices to prevent the spread of disease. Regular inspection of nearby plants is advisable, especially if they share the same soil or drainage system.
Should I remove all the affected parts immediately?
It’s essential to remove all visibly diseased roots right away to prevent further damage and ensure the health of the plant. However, do assess the remaining healthy parts and soil conditions before making additional drastic changes. If multiple plants are present, ensure to separate them immediately to limit the chances of cross-contamination. This separation is crucial in ensuring that the health of other plants in your care remains intact.